


10
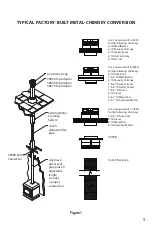
Figure 10
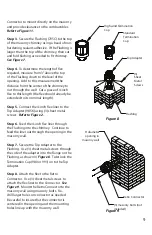
Figure 11
Step 9. Slide the Wall Thimble Cover (940)
over the Retro Connector and secure with
masonry bolts. (Figure 10) If you have a
framed wall in front of the masonry, use
wood screws to mount the Wall Thimble
Cover to the framed wall, over the Retro
Connector and the 10” square framed
opening. (Figure 11) If needed, add a section
of direct vent pipe to the Retro Connector in
order to extend through the opening in the
Wall Thimble Cover.
Step 10. The connection between the
appliance and the Retro Connector may be
completed with section of black direct vent
pipe, together with adjustable length pipe
section.
Retro
Connector
Masonry Chimney
Stud Wall
10” x 10” framed
opening in wall
Retro Connector
Wall Thimble Cover
Wall Thimble Cover
(4) Masonry Bolts
(Not Included)
(4) Masonry Bolts
(Not Included)
Summary of Contents for DirectVent Pro
Page 11: ......


