


7
Power-Supply for D200
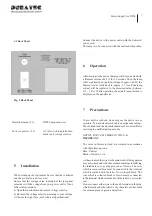
4.2 Back Panel
Fig. 2 Back Panel
:
)
1
.
2
(
p
m
a
l
m
u
i
r
e
t
u
e
D
.r
o
t
c
e
n
n
o
c
-
p
m
a
L
0
0
2
D
:
)
2
.
2
(
r
o
t
c
e
n
n
o
c
r
e
w
o
P
-
e
s
u
f
d
e
t
a
r
g
e
t
n
i
h
t
i
w
t
e
l
n
i
C
A
r
o
t
c
e
l
e
s
e
g
a
t
l
o
v
d
n
a
r
e
d
l
o
h
5
Installation
When setting up the instrument be sure that the ventilator
and the air inlets are not covered.
Ensure that the voltage value indicated at the rear panel
coincides with the voltage from your power outlet. If not,
follow this procedure.
a) Open the fuse holder and remove voltage selector.
b) Re-insert the voltage selector according to your voltage.
c) Choose the right fuse (see Technical Specifications)
6
Operation
After turning on the device the lamp will be pre-heated with
a filament current of 4.5 A for 30 seconds. Then the lamp
will be ignited by an ignition voltage of approx. 600V, the
filament current falls back to approx. 2.5 A and the lamp
current will be regulated to the presetted value (between
0,8 - 1,8A). While operating the actuall lamp-current is
displayed on the panelmeter.
7
Precautions
To prevent fire or shock, do not expose the unit to rain or
moisture. To avoid electrical shock, do not open the cabinet.
The ventilator and the air-inlets should not be covered. Refer
servicing to qualified personnel only.
NOTICE FOR COSTUMERS IN THE U.K.
IMPORTANT
The wires in this mains lead are coloured in accordance
with the following code:
Blue: Neutral
Black or Brown: Live
As the colours of the wires in the mains lead of this apparatus
may not correspond with the coloured markings identifying
the terminals in your plug proceed as follows: The wire
which is coloured blue must be connected to the terminal
which is marked with the letter N or coloured black. The
wire which is coloured black or brown must be connected
to the terminal which is marked with the letter L or coloured
red.
Do not connect either wire to the earth terminal in the plug
which is marked by the letter E or by the safety earth symbol
or coloured green or green-and-yellow.
Connect the device to the power outlet with the delivered
power cord.
The lamp is to be connected with the enclosed lamp cable.
Summary of Contents for NT-D200
Page 4: ...4 ...


