background image

3

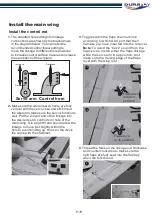
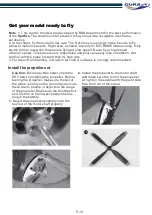
. Adjust the linkage in the control connector 

    to make sure the counterbalance leading

    edge of the elevator and the rudder level

    with the leading edge of the horizon stabilizer 

    and the vertical fin respectively. 


Note:

 Use a drop of thread lock on the screw

    before secure the rod into place.

2.

    neutral position, for computerized transmitters, 

    use the servo/channel sub-trim feature to make 

    each servo arm fully vertical. 


Note

: Make sure the trims and the sub trims in 

    neutral position before making some mechanically 

    trim. 

ake

    sure all servo arms are as fully vertical with the

    servo case as possible. If not, adjust the servo 

    arm by using  the trim function on your radio.


Adjust the servo arms mechanically m

Make sure all the control surface trim in 

4

. Adjust the control connector on the rear

    landing gear steering arm to make sure 

    the wheel align with the centerline of the 

    fuselage. 


5. 

The motor should rotate counterclockwise

    when viewing the plane from the front.

    Or you will have to disconnect any two of

    the motor plugs and plug them back to

    each other’s socket. 


Test the electric device

1.2

1.1

2

5

4

3.1

Rudder

Elevator

Elevator up/Stick Down

Elevator down/Stick up

Ruder left / Stick left

Rudder right / Stick right

P.9

Summary of Contents for SUPERMARINE SPITFIRE MK24 V2

Page 1: ...INSTRUCTION MANUAL ...

Page 2: ... and others or result in damage to the product or the property of others This model is controlled by a radio signal subject to interference from many sources outside your control This interference can cause momentary loss of control so it is advisable to always keep a safe distancein all directions around your model as this margin will help avoid collisions or injury Age Recommendation Not for chi...

Page 3: ...od of the stabilizer Test the stabilizer control servos Install the main wing Install the control rod Test the retract and the LED set Install the auxiliary parts Mount the main wing Get your model ready to fly Important ESC and model information The transmitter and model set up Check the control throws Install the propeller set Install the antenna mast Check the C G Center of Gravity Before the m...

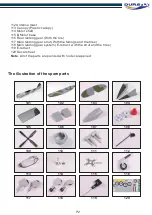
Page 4: ...er installed 104 Wing fairing set 105 Battery hatch cover 106 Under wing radiator set 107 Air scoop With the plastic lip installed 108 Spinner 1 The fuselage assembly With the motor the canopy the electronic parts ESC 2 Main wing With all electric device installed 3 Horizontal stabilizer with elevator joiner installed 4 Under wing radiator 2 PCS 5 Air scoop 5 Propeller spinner set cannon set and t...

Page 5: ...anding gear strut With the fairings and the tires 118 Main landing gear system E retract with the strut and the tires 119 E retract 120 Decal sheet Note All of the parts are painted with no decal applied 101 105 109 113 117 102 106 110 114 118 103 107 111 115 119 104 108 112 116 120 The illustration of the spare parts P 2 ...

Page 6: ... begin to swell or balloon discontinue use immediately Charging or discharging a swelling or ballooning battery can result in fire Always store the batteries at room temperature in a dry area to extend the life of the battery Always transport or temporarily store the battery in a temperature range o 40 120 F Do not store battery or model in a car or in direct sunlight If stored in the battery can ...

Page 7: ...ecure the horn from the backplate side using the provided screws Note The longer screws always locate on the leading edge side of all the control surface 4 Install the aileron control horn on the servo side of the main wing with the horn towards the hinge line as the picture shows Assemble the plane Install the Control horn 1 1 1 2 1 3 3 4 1 4 2 Alieron P 4 ...

Page 8: ...top the flap from fully retract 3 Connect the wing leads to the harness the first Two ailerons servo to the Y harness labeled AILE CH1 main landing gears to the harness with GEAR CH5 two LED leads and the flaps to the four way harness labeled FLAP CH6 Secure the connector using the tape Assemble the plane Install Control horn Connect the Y harness to the main wing 1 1 2 1 2 3 1 3 2 3 3 Alierons Ge...

Page 9: ...same with the port side half Note Make sure the elevator connector interlock to each other before fully slides the star board stabilizer half into place 3 Turn over the plane so the bottom of the plane face up and secure the stabilizer halves using the provided screws Screws PA2 6 10 2PCS 4 Secure the elevator connector halves together from bottom side of the elevator using one piece of self tappi...

Page 10: ...testing steps until the manual tell you to do it Before getting started bind your receiver 4 Attach the receiver to the receiver chamber at the end of the battery hatch using double side tape or velcro tape 3 Note All servo and retract leads have been specifically labeled for your convenience Use the provided Y harness for situations where two or three servos are controlled by one channel for exam...

Page 11: ... OFF position move the elevator and the rudder on the transmitter to make sure aircraft control surface move correctly If controls respond in the opposite direction reverse the direction for operation of flight controls Turn on the transmitter and power on the model 3 The provided piece of fuel tubing keeps the clevis closed during flight Secure all the linkages the same way Note Do not over slide...

Page 12: ...lly trim ake sure all servo arms are as fully vertical with the servo case as possible If not adjust the servo arm by using the trim function on your radio Adjust the servo arms mechanically m Make sure all the control surface trim in 4 Adjust the control connector on the rear landing gear steering arm to make sure the wheel align with the centerline of the fuselage 5 The motor should rotate count...

Page 13: ...e linkage to different hole positions to increase control surface travel and increase the aerobatics of the airplane Increase Decrease Decrease Increase Servo arm Control horn Flap servo in down position Flap servo in up position 3 Toggle switch the flaps channel knob according to which AUX port that the Y harness you have inserted into the receiver Note To avoid the buzz sound from the flap servo...

Page 14: ... navigation light on port side L wing tip emitting red beams the starboard R is green 2 Apply glue to the radiator where it fits with the main wing using the glue brush or any other applicator 3 Fit on of the cannon set into the notch on the leading edge of the main wing with the shorter cannon located on the wing tip side It will fit perfectly with the notch with no gap between the cannon and the...

Page 15: ...n 5 Glue the air scoop into place 1 Install the main wing fairing fillet by fitting the proper one into place with no glue applied the first 2 Glue the fairing back into place Install the main wing Mount the main wing 5 4 1 1 2 1 1 2 2 2 P 12 ...

Page 16: ...it the main wing into place to avoid any tangling to prevent the wing from fully mounting 3 Check to make sure the main wing before secure it into place using the provided self tapping screws two pieces A to hold the wing front into place The PA 2 6 45 pieces are used to secure the rear side of the wing into place PA 2 6 50 Mount the main wing Install the main wing 2 1 3 A B P 13 ...

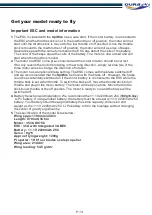
Page 17: ...en the throttle is moved The motor and ESC come pre connected and the motor rotation should be correct If for any reason the motor is rotating in the wrong direction simply reverse two of the three motor wires to change the direction of rotation The motor has an optional brake setting The ESC comes with the brake switched off and we recommended that the Spitfire be flown with the brake off However...

Page 18: ...ravel the same amount in response to the control stick 1 Move the controls on the transmitter to make sure aircraft control surface move correctly See diagrams below If controls respond in the opposite direction reverse the direction for operation of flight controls Refer to your transmitter s instructions for changing direction of transmitter flight controls Make sure all control sticks on your r...

Page 19: ...e hec c k to align the control surfaces well by trim the control channel The ailerons align with the trailing edge of the wing tip Get your model ready yo fly 2 3 2 4 2 2 2 1 Alierons Rudder Elevator P 16 ...

Page 20: ...alance leading edge Rudder 14mm left and right measured at the counterbalance leading edge Flaps Full 25mm 2 The dual rates and the Exponential setting for intermediate flyers of are based on the ATV set in previous step Spitfire High Rate Expo Low Rate Expo Aileron 100 16mm up down 30 69 11mm up down 20 Elevator 100 16mm up down 25 63 10mm up down 20 Rudder 100 20mm left right 25 75 15mm left rig...

Page 21: ...1 This control throws were developed by R D department for the best performance of the Spitfire The small mount of elevator throw on low rate is capable of extreme aerobatics 2 Only switch to high rate when the plane is flying at slow speed Never fly at high speed at full air speed This plane is very responsive and pilot can easily lose orientation Get familiar with the plane first and then try hi...

Page 22: ...eft between the assembly 3 Install the spinner middle part 1 Glue the antenna mast into the pre notched hole on rear end of the fuselage with it incline toward the rudder side Get your model ready to fly Get your model ready to fly 3 4 1 1 1 2 Install the antenna mast P 19 ...

Page 23: ...n wing as shown with the battery pack installed Mark the location of the CG on top of the wing 2 When balancing your model support the plane at the marks made on the top of the main wing with your fingers or a commercially available balancing stand This is the correct balance point for your model Make sure the model is assembled and ready for flight before balancing 3 Always balance the plane with...

Page 24: ...receiver and the transmitter batteries have a good connection Find a flying site clear of buildings trees power lines and other obstructions Until you know how much area will be required and have mastered flying your plane in confined spaces choose a site which is at least the size of two to three football fields a flying field specifically for R C planes is best Never fly near people especially c...

Page 25: ... number Always check to make sure all screws on the aircraft are tightened Pay special attention to make sure the bullet of the rotor adaptor is firmly in place before every flight While applying power slowly steer to keep the model straight the model should accelerate quickly As the model gains flight speed you will want to climb at a steady and even rate The Spitfire will climb out at a nice ang...

Page 26: ...eiver Aircraft will not respond to the throttle but responds to other controls ESC is not armed Throttle channel is reversed Lower throttle stick and throttle trim to lowest settings Reverse throttle channel on transmitter Replace damaged parts Tighten parts for propeller adapter propeller and spinner Remove and install propeller correctly Completely recharge flight battery Replace flight battery ...

Reviews: