Durabrand PDV-708U Instruction Manual Download Page 22

IB-PDV708U-WU-E-011706

INITIAL SETTING

Select  the  aspect  ratio  of  the  movie  to  match  the
LCD screen and your TV set. There are three types
of  screen  sizes  you  may  select.

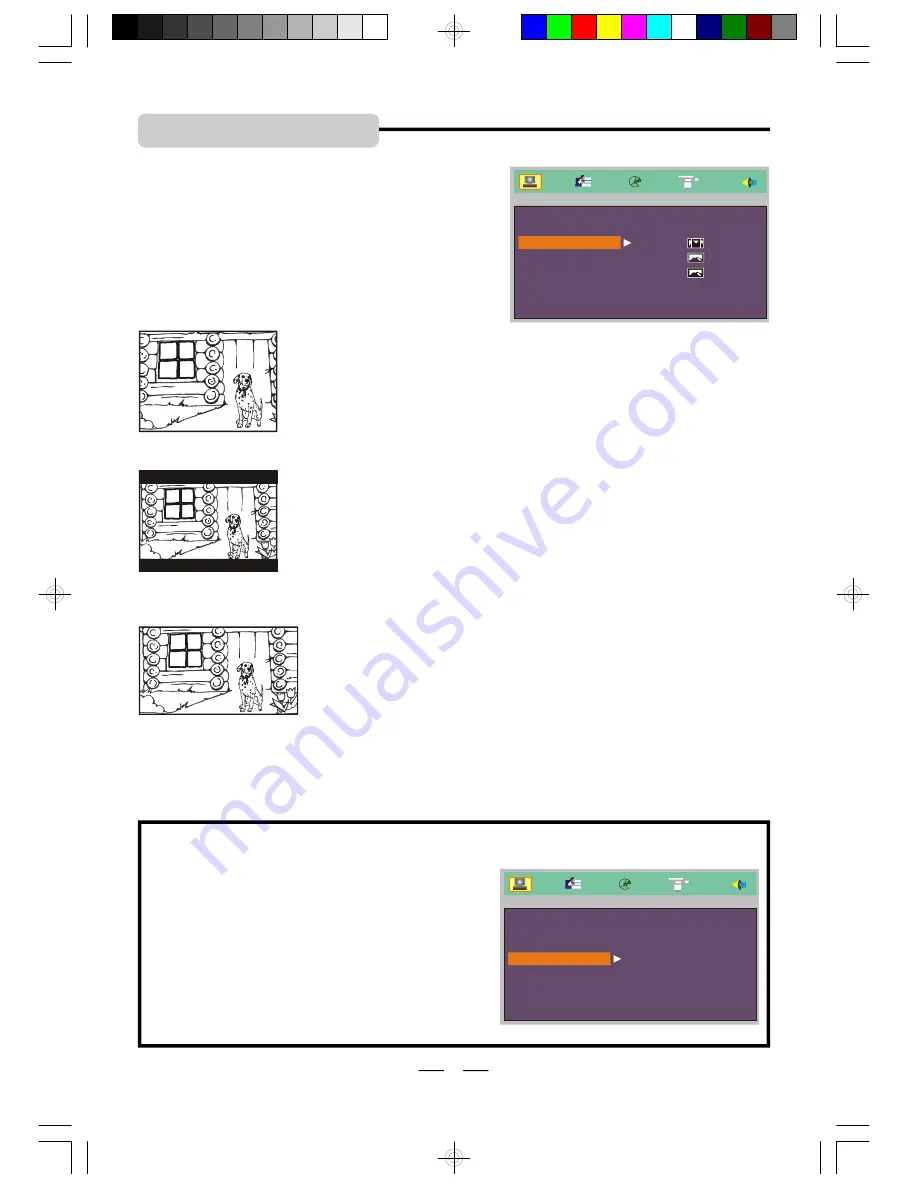
Selecting the TV TYPE

16  X  9  Widescreen  (16:9)

  -  Choose  this  setting  if  your  DVD

Player  is  connected  to  a  WIDESCREEN  TV.  If  you  choose  this
setting and you don

t have a widescreen TV, the images on the

screen may appear distorted due to vertical compression (faces
may seem long and thin).
If you play a disc recorded in 4 X 3 format on a widescreen TV, the
left  and  right  side  of  the  screen  will  appear  black.  Press  SETUP
button to change to 4:3 ratio or match the type of TV you have.

16X9 Widescreen

4X3 Standard

4X3 Letterbox

4 X 3 Letterbox (4:3 LB LETTER BOX)

 - Choose this setting if

you  want  to  see  movies  in  their  original  aspect  ratio  (width-to-
height ratio). You

ll see the entire frame of the movie, but it will

take up a smaller portion of the screen vertically. The movie will
appear with black bars at the top and bottom of the screen, but you
will see everything to the right & left of the centre as in a movie
cinema.

4 X 3 Standard (4:3 PS PAN and SCAN)

 - Choose this setting if

you want to see movies to fill the entire screen of your TV. This
might  mean  that  parts  of  the  picture  (the  left  and  right  edges)
won

t be seen.

Most discs produced in a WIDESCREEN format can

t be cropped

in this fashion.

NOTE:

If your DISC is not encoded to allow you to
change  the  aspect  ratio,  the  TV  display
cannot  be  changed.

SYSTEM  SETUP

TV SYSTEM
LCD MODE
TV TYPE
DEFAULT

EXIT SETUP

4:3 LB
16:9 

4:3 PS

Default - Resetting the functions to factory defaults

In case you fiddled around with your set

s controls

and you cannot return the set to its normal operation;
we  have  made  re-setting  the  major  options  on
this  set  very  easy  for  you.

NOTE:

If you set 

DEFAULT

, all items in the setup

menu will be reset to default setting.

SYSTEM  SETUP

TV SYSTEM

RESTORE

LCD MODE
TV TYPE
DEFAULT

EXIT SETUP

21

NOTE:  For  16:9  Widescreen  TV  TYPE,  you  need  to  adjust
both  the  LCD  mode  and  the  TV  TYPE  to  16:9  (see  page  20
for  Setting  the  LCD  MODE).

IB-PDV708U-WU-E-011706.pmd

2/20/2006, 2:07 PM

22

Summary of Contents for PDV-708U

Page 1: ...L AUDIO CDs PLAYS MP3 RECORDED DISCS PLAYS CD R CD RW DISCS PLAYS JPEG PHOTO DISCS INCLUDES RECHARGEABLE BATTERY FOR PORTABLE USE ANYWHERE CONNECTS TO YOUR LARGER SCREEN HOME TV PLEASE READ CAREFULLY...

Page 2: ...k of electric shock do not remove the cover No user serviceable parts inside the unit Refer all servicing to qualified personnel This unit operates on 100 240V 50 60Hz universal voltage If it is not t...

Page 3: ...ering or disassembly is prohibited CAUTION Use of controls or adjustments or performance of procedures other than those specified herein may result in hazardous radiation exposure Do not open covers a...

Page 4: ...gle 14 10 Selecting Audio Mode 14 11 Change Subtitle Language 14 12 Displaying Disc Information 15 13 MP3 Disc Operation 16 14 JPEG or Picture Disc Operation 16 Initial Setting System Setup TV System...

Page 5: ...off the LCD screen but keeps the set working for viewing DVDs on your TV when cable is connected 10 NEXT BUTTON Press to skip to the next title chapter or track 11 PREVIOUS BUTTON Press to skip to th...

Page 6: ...is not included 4 COAXIAL JACK Connects the DVD player to your home cinema system using a coaxial cable coaxial cable is not included 5 POWER ON OFF SWITCH Slide to switch the DVD player ON or OFF 6...

Page 7: ...s to enlarge or reduce the playing picture 15 SCREEN ON OFF BUTTON Press repeatedly to select the LCD colour and LCD brightness then press the left and right direction buttons to adjust the level Pres...

Page 8: ...harging and be steadily on when the battery becomes fully charged 3 Charging time is 12 hours for the first time then normally about 5 hours A fully charged battery delivers about 2 5 hours of use Att...

Page 9: ...nsor like laser pointers Do not place objects between the remote control unit and the remote control sensor Do not use this remote control while using the remote control unit of any other equipment at...

Page 10: ...ng computer software discs and game discs Data part of CD Extras DVD ROMs DVD Audio discs MPEG4 DVD discs HD layer on SACDs or discs recorded in another format such as SECAM and regions other than you...

Page 11: ...isc is upside down or the disc is badly scratched or dirty it will not play Please clean it or change the disc before use Also you can buy a disc polisher to try to repair the scratched disc 8 To resu...

Page 12: ...KWARD X4 BACKWARD X8 BACKWARD X20 PLAY Y 11 4 REPEAT PLAY Allows you to repeat the current track chapter title a chosen section A B or all of the disc Each time you press the REPEAT button on the remo...

Page 13: ...he NEXT button 5 To stop programmed playback press STOP button twice 2 Press the numeric button and the direction buttons to input the track number corresponding to the order of the tracks on the disc...

Page 14: ...3 input the second you want to jump to input the minute you want to jump to MP3 TRK 0016 154 00 01 21 track you want to jump to 7 ZOOM PLAY FOR DVD 13 1 Press the ZOOM button repeatedly to enlarge or...

Page 15: ...ot available on your DVD a hand will show in the top left corner 10 SELECTING AUDIO MODE 14 If a DVD disc contains a Multi Audio soundtrack feature you can select the desired audio language by pressin...

Page 16: ...ng time is shown The information display goes off For CD Play CD TRK 2 12 00 01 03 CD TRK 2 12 C 00 02 42 CD TRK 2 12 T 00 10 49 CD TRK 2 12 T 00 40 35 OFF The information about the current track elap...

Page 17: ...utton repeatedly to enlarge or reduce a picture The display will show as follows ZOOM 2 ZOOM 3 ZOOM 4 ZOOM 1 2 ZOOM1 3 ZOOM1 4 ZOOM OFF 7 Each picture in the current directory will be displayed consec...

Page 18: ...mm plug used on the cable supplied has 3 sections be sure to only use this A V cable otherwise there may be no picture in your TV s screen 1 Connecting the DVD player to your TV This DVD player can al...

Page 19: ...r s COAXIAL jack and your home system s COAXIAL jack by a coaxial cable with a 3 5 mm plug on one end VIDEO IN COAXIAL YOUR TV SYSTEM CONNECTIONS 18 For TV Connection 2 Connecting to your headphones T...

Page 20: ...me the display will show STOP and now your system is in the full STOP mode 11 To skip to another track chapter press the NEXT or PREVIOUS button repeatedly during playback 12 To access the disc menu o...

Page 21: ...be in accordance with the video signal of the disc When using the set for the first time you may need to set some of the settings and adjustments according to your TV and favorite preferences You can...

Page 22: ...black bars at the top and bottom of the screen but you will see everything to the right left of the centre as in a movie cinema 4 X 3 Standard 4 3 PS PAN and SCAN Choose this setting if you want to se...

Page 23: ...isc the original language designated by each disc will be selected NOTE 2 You can change the AUDIO or SUBTITLE language easily by pressing the AUDIO or SUBTITLE button refer to pages 14 LANGUAGE SETUP...

Page 24: ...s with a soft cloth slightly moistened with a very mild detergent solution or a plain damp cloth Do not use any type of abrasive pad scouring powder or solvent such as alcohol or benzine Never touch t...

Page 25: ...e it to ON 1 Ensure that the equipment is connected properly Double check all cables and AC power 2 Ensure that the A V cable you used is attached in the package other cables may not be suitable for t...

Page 26: ...ber of angles recorded these angles may be seen only on specific scenes General If a button is pressed too fast over and over the signals may jam the circuits inside To restore to normal press the STO...

Page 27: ...This cable can connect to your S Video input of your TV It allows for sharper pictures for TV sets with this jack TROUBLE SHOOTING You can t copy most commercial movie discs due to copy protection bu...

Page 28: ...em 1 Vrms 1 kHz 0dB Pickup Wave length 650nm 660nm Laser power Class 1 Power consumption AC 100 240V 50 60Hz 27 TFT LCD screen size 8 4 Because the products are subject to continuous improvement we re...

Reviews: