background image

7

EN

Rear View

1.

Power Cord

Connect to a standard AC outlet

2.

DIGITAL AUDIO OUT (OPTICAL, COAXIAL ) jacks (DVD 
only)

Connect to an amplifier with digital input jacks such as 
Dolby Digital decoder, etc.. Use a commercially available 
optical or coaxial cable.

3.

ANALOG AUDIO OUT jacks (DVD only)

Connect to the audio input jacks of your TV or stereo 
system. Use commercially available audio cables.

4.

S-VIDEO OUT jack (DVD only)

Connect to the S-VIDEO input jack on your TV. Use a 
commercially available S-VIDEO cable.

5.

AV1(TV) jack

Connect to the scart jack on your TV. Use the supplied 
scart cable.

6.

AV2(DECODER) jack (VCR only)

Connect a scart cable from another VCR, camcoder, or 
an audio/video source.

7.

AERIAL jack

Connect to an antenna or cable.

8.

RF OUT jack

Connect to the antenna in jack of your TV, cable box or 
direct broadcast system. Use the supplied RF cable.

CAUTION: Do not touch the inner pins of the 

jacks on the rear panel. 
Electrostatic discharge may cause 
permanent damage to the unit.

Setting up Your DVD/VCR

Before Connecting

• Please refer to the instruction books of your TV, DVD/

VCR, Stereo System or other devices as necessary to make 
the best connections.

• Make one of the following connections, depending on the 

capabilities of your existing equipment.

The following guidelines are options for the best picture and 
sound quality available on your DVD/VCR.

Picture

1)

Use SCART Output (DVD/VCR(AV1 TV)) for best 
picture quality (for DVD and VCR features).

2)

Use S-Video Output for the better picture quality (for 
DVD features only).

3)

If your TV only has a RF-style (Antenna IN or 75 ohm) 
input, use the RF OUT for connection and set your TV 
to channel 22 ~ 69 with the same channel for DVD/VCR 
is set (for DVD and VCR features).

Note: •

When your TV conforms to RGB input signal, the 
Euro AV (scart) connection ensures you the best 
picture and audio quality. However if your TV does 
not conform to RGB input signal, the S-VIDEO 
OUT and analog AUDIO OUT connection is better. 
(for DVD features only)

Sound

1)

Use SCART Output (DVD/VCR(AV1 TV)) for best 
sound quality (for DVD and VCR features).

2)

Digital audio connections provide the clearest sound. 
Connect the DVD/VCR’s DIGITAL AUDIO OUT 
(either COAXIAL or OPTICAL) to your amplifier or 
receiver (for DVD features only).

3)

If digital connections are not possible, connect the DVD/
VCR’s ANALOG AUDIO OUT(Left and Right) to your 
amplifier, receiver, stereo or TV (for DVD features only).

WARNING!

• Never make or change connections with the power 

switched on.

• Connect the DVD/VCR directly to your TV, instead of eg. 

a VCR,  to avoid distortion because DVD video discs are 
copy protected.

• Do not connect the ANALOG AUDIO OUT of DVD/

VCR  to PHONO IN of your amplifier or receiver.

• If you use the scart cable, it is not necessary to connect the 

analog audio cables.
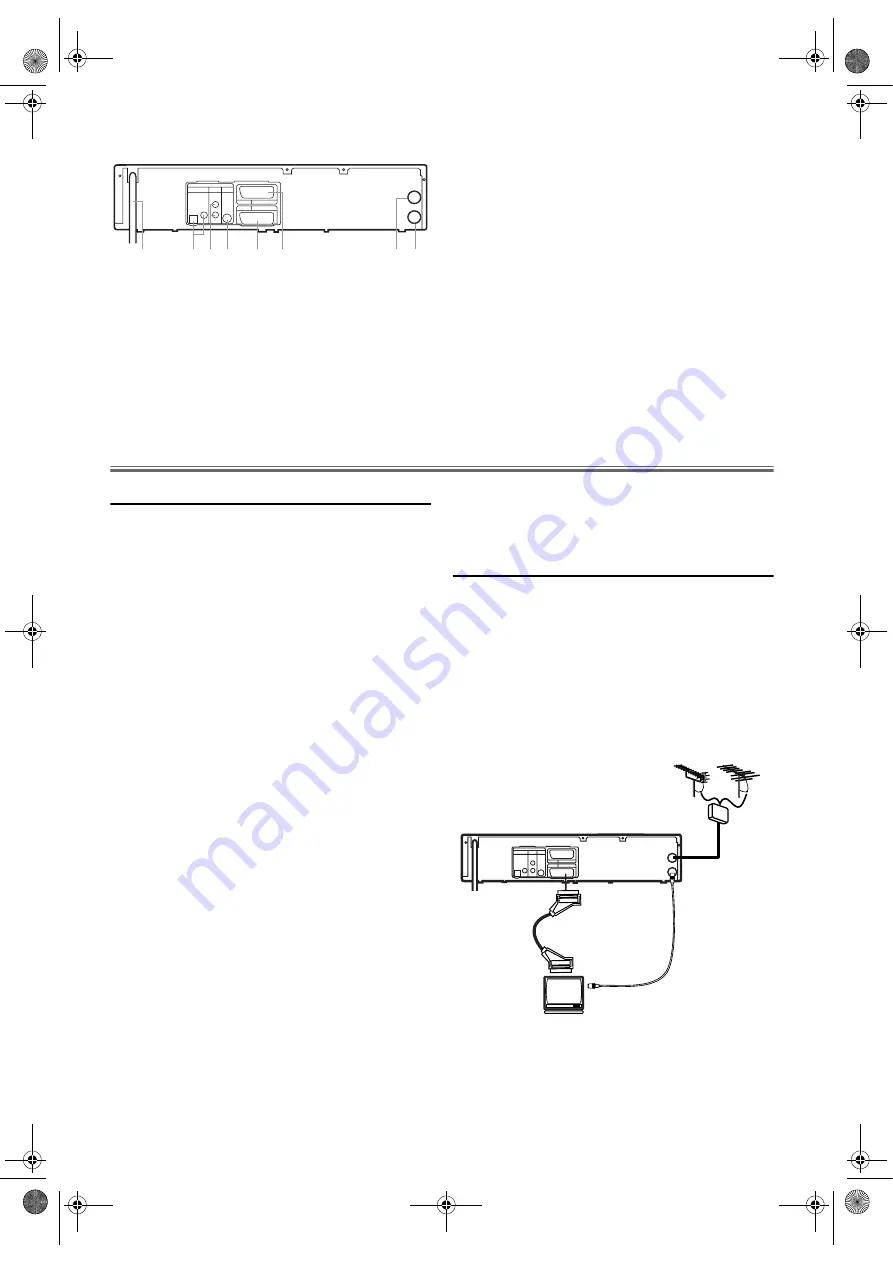
Connecting to a TV

1)

Disconnect the antenna or cable from your TV.

2)

Connect that antenna or cable to the AERIAL jack of this 
unit.

3)

Connect the RF OUT jack of this unit to the antenna in 
jack of your TV. Use the supplied RF cable.

4)

Connect the AV1 (TV) scart jack of this unit to the scart 
input jack of your TV. Use the supplied scart cable.

5)

Plug in the TV and this unit. 

Note: •

The TV must be connected to this unit through AV1 
(TV) jack. A connection to AV2 (DECODER) jack 
will not function correctly.

RF OUT

AERIAL

VCR

AV2 (DECODER)

DVD/VCR

AV1 (TV)

L

R

DVD

OPTICAL COAXIAL

DIGITAL

AUDIO OUT

ANALOG

AUDIO OUT

S-VIDEO

OUT

1

2

3 4

5

6

7

8

RF OUT

AERIAL

VCR

AV2 (DECODER)

DVD/VCR

AV1 (TV)

L

R

DVD

OPTICAL COAXIAL

DIGITAL

AUDIO OUT

ANALOG

AUDIO OUT

S-VIDEO

OUT

VHF/UHF

MIXER

UHF

VHF

to aerial socket

RF cable 

(supplied)

scart cable 

(supplied)

(TV)

to 21-pin 

scart jack

H9713BD(EN).fm  Page 7  Monday, July 5, 2004  7:00 PM

Summary of Contents for H9713BD

Page 1: ... Auto Return 16 Quick Find 16 Index Search 16 Time Search 16 Copying a Video Tape 17 Status Display 17 DVD Operation 18 Basic Playback 18 Disc Menus 18 Title Menu 18 Calling up a Menu Screen During Playback 18 About the PBC Function of Video CD 18 MP3 Playback 18 Resume 19 Pause 19 Step by Step Playback 19 Fast Forward Reverse Search 19 Slow Forward Reverse 19 Zoom 19 Audio Language 19 Subtitle La...

Page 2: ...not push objects of any kind into the DVD VCR through the cabinet slots or openings as they could touch electrically live parts or short circuit parts resulting in a fire or electric shock 6 Never spill liquid on this unit If liquid is spilled and penetrates into the unit consult qualified service personnel 7 Use this unit in a horizontal flat position only 8 Before attempting to operate the unit ...

Page 3: ...UTRAL BROWN LIVE Important As the colours of the wires in the mains lead of this appliance may not correspond with the coloured markings identifying the terminals in your plug proceed as follows The wire which is coloured blue must be connected to the terminal which is marked with the letter N or coloured black The wire which is coloured brown must be connected to the terminal which is marked with...

Page 4: ...portant Copyright Information DVD Unauthorized copying broadcasting public performance and lending of discs are prohibited This product incorporates copyright protection technology that is protected by method claims of certain U S patents and other intellectual property rights owned by Macrovision Corporation and other rights owners Use of this copyright protection technology must be authorized by...

Page 5: ... playback Press and hold this button for 1 5 seconds or more to search backward through the disc 15 CHANNEL VCR To change TV channels To adjust the tracking manually during playback 16 Remote Sensor 17 TIMER REC indicator Lights up when the timer recording or an OTR recording has been set 18 REC OTR indicator Lights up during a recording Flashes when a recording is paused 19 REC OTR VCR Press once...

Page 6: ... 23 g To search forward through the disc DVD To fast forward the tape VCR 24 PLAY To begin playback 25 DVD Press this button before using the remote control for DVD features 26 PAUSE To pause playback To advance playback one frame at a time DVD To pause playback or recording To advance playback one frame at a time VCR 27 SLOW VCR To view the tape in slow motion 28 CLEAR DVD To clear the markers To...

Page 7: ... TV conforms to RGB input signal the Euro AV scart connection ensures you the best picture and audio quality However if your TV does not conform to RGB input signal the S VIDEO OUT and analog AUDIO OUT connection is better for DVD features only Sound 1 Use SCART Output DVD VCR AV1 TV for best sound quality for DVD and VCR features 2 Digital audio connections provide the clearest sound Connect the ...

Page 8: ...e surround sound while producing the effecting of being in a movie theater or a concert hall If output is Dolby Digital encoded audio connect to a Dolby Digital decoder and set DOLBY DIGITAL to ON in the AUDIO menu Refer to page 23 If output is MPEG encoded audio connect to a MPEG decoder and set MPEG to ON in the AUDIO menu Refer to page 23 Hints for connecting to an MD deck or DAT deck The audio...

Page 9: ...etting will be necessary if your DVD VCR is connected to the TV via the coaxial cable Use the remote control for this procedure 1 Press VCR 2 Insert a pre recorded tape into the DVD VCR The DVD VCR will start playback automatically If playback does not start press PLAY 3 Select and adjust your TV to channel 35 If the playback picture appears on the TV screen continue with step 9 If channel 35 is s...

Page 10: ...s feature if you intend to use some of the pre tuned channels Use the Manual channel presetting function to tune in the additional channels you require Manual Channel Preset Each channel is tuned manually and individually Follow the steps laid out in the Manual Channel Preset Before you preset Channel It is necessary to set the video channel if this unit is connected to the TV via the coaxial cabl...

Page 11: ... Press VCR then MENU 2 Press K or L to select INITIAL then press B 3 Press K or L to select CH TUNING then press B 4 Press K or L to select MANUAL then press B 5 Press K or L to select POSITION then press B 6 Press the number buttons K or L to select relevant position number then press B 7 Press K or L to select SKIP then press B to select ON To memorize the channel again press B ON will change to...

Page 12: ...on the DVD VCR Just press PLAY on the DVD VCR Power will automatically turn on and playback will start Direct Button Operation Using the buttons on the remote control Press STANDBY ON to turn on and then press PLAY 4 Press STOP to stop playback Speed Search 1 Press D or h during playback to view a videotape at a high speed in either a forward or reverse direction In this mode the sound will be mut...

Page 13: ...terial During Recording 1 Press PAUSE when you want to temporarily halt recording You can check the remaining pause time with C marks on the TV screen Each C mark represents 1 minute After 5 minutes the DVD VCR will automatically switch to the Stop mode to prevent tape damage 2 Press PAUSE or REC OTR to resume recording Recording One Programme While Viewing Another You can record one programme whi...

Page 14: ... 3 Press K or L to select AUTO REPEAT 4 Press B so that ON appears next to AUTO REPEAT on the TV screen When in Stop mode Auto Repeat mode will start automatically If the on screen menu still remains press MENU to exit then press PLAY Note Once you select the Auto Repeat mode it stays in effect even after you turn off the DVD VCR To Stop Playback Press STOP To Exit the Auto Repeat Mode Repeat step...

Page 15: ...the minute digit 7 Press K or L repeatedly until the relevant end hour appears Next enter the minute digit 8 Press K or L repeatedly until the relevant channel number appears 9 Press K or L repeatedly until the desired tape speed appears 10 Press B Programme 1 is now completed To set another timer programme repeat steps 3 to 10 11 Press MENU to exit 12 Press T SET to activate a timer recording The...

Page 16: ...rded if PAUSE is pressed and released during recording The time gap between index marks on the tape should be greater than 1 minute for SP recording and 2 minutes for LP recording Use the remote control for this procedure 1 Press VCR then SEARCH MODE 2 Press K L repeatedly until the number of programmes that you want to skip appears 3 Press s or B The DVD VCR begins rewinding or fast forwarding to...

Page 17: ...ers violate copyright laws and may not record clearly Status Display To check the Counter or Clock Channel number press DISPLAY Each time you press DISPLAY TV screen will change as illustrated When you select the channel using the number buttons select the desired channel position number Note If the on screen display or indicators on the front panel show an abnormal reading or no reading unplug th...

Page 18: ...bol may appear on the TV screen 3 If disc menu is available on the disc audio languages subtitle options chapters for the title and other options will appear for selection 4 Press Arrow s B K L to select an item and ENTER to confirm selection Title Menu 1 Press TOP MENU The title menu will appear 2 If the feature is not available symbol may appear on the TV screen 3 Press Arrow s B K L to select a...

Page 19: ...rse speed For DVDs and Video CDs fast forward or reverse search speed is different depending on the disc For DVDs approximate speed is 1 x2 2 x8 3 x50 and 4 x100 For Video CDs approximate speed is 1 x2 2 x8 and 3 x30 If you are using FWD or REV on the front panel press and hold it for more than 1 5 sec When you reach the desired speed release the button For Audio CDs approximate speed is x16 For M...

Page 20: ...Mode 1 Press AUDIO repeatedly during playback to select one among STEREO L CH and R CH STEREO both right and left channels are active stereo L CH only left channel is active R CH only right channel is active Note If the Virtual Surround setting is ON the sound mode is fixed to STEREO and can not be changed Virtual Surround You can enjoy stereophonic virtual surround effects on your existing stereo...

Page 21: ... SEARCH MODE repeatedly until the Marker Setup screen appears and s or B to choose the desired marker then press ENTER Note Opening the disc tray turning off the power or selecting AC at step 2 and press ENTER will erase all markers To clear a marker using s or B position the cursor on to the marker number to be cleared and press CLEAR You can mark up to 10 points Press SEARCH MODE or RETURN to ex...

Page 22: ...the random selections press REPEAT repeatedly until TRACK appears during playback If you like to repeat the entire random selections press REPEAT repeatedly until ALL appears during playback On Screen Information You can check the information about the current playback by pressing DISPLAY 1 Press DISPLAY during playback Current chapter number total chapters elapsed time and remaining time of the c...

Page 23: ...with some discs Then use AUDIO or SUBTITLE Details are on pages 19 and 20 Audio Setting Choose the appropriate audio settings for your equipment It only affects during the playback of DVDs 1 Press SETUP in Stop mode 2 Press s or B to select CUSTOM then press ENTER CUSTOM mode screen will appear 3 Press s or B to select AUDIO then ENTER to confirm 4 Press K or L to select the below items 5 Press EN...

Page 24: ...NTER repeatedlly to select PAL or AUTO The default setting is AUTO Parental Control Parental Control limits the DVD viewing that exceeds your settings The password is required to change the PARENTAL LEVEL This feature prevents your children from viewing inappropriate materials 1 Press SETUP in Stop mode 2 Press s or B to select CUSTOM then press ENTER CUSTOM mode screen will appear 3 Press s or B ...

Page 25: ...Malayalam 5958 Maltese 5966 Maori 5955 Marathi 5964 Moldavian 5961 Mongolian 5960 Nauru 6047 Nepali 6051 Norwegian NOR 6061 O R Occitan 6149 Oriya 6164 Oromo Afan 6159 Panjabi 6247 Pashto Pushto 6265 Persian 5247 Polish 6258 Portuguese POR 6266 Quechua 6367 Rhaeto Romance 6459 Romanian RUM 6461 Russian RUS 6467 S Samoan 6559 Sangho 6553 Sanskrit 6547 Scots Gaelic 5350 Serbian 6564 Serbo Croatian 6...

Page 26: ...ace No return to start up screen when disc is removed Reset the unit by turning it off and on again This unit does not respond to the remote control Aim the remote control directly at the sensor on the front panel Reduce the distance to this unit Replace the batteries in the remote control Re insert the batteries with their polarities signs as indicated Buttons do not work or this unit stops respo...

Page 27: ... Discs When a disc becomes dirty clean it with a cleaning cloth Wipe the disc from the centre out Do not wipe in a circular motion Do not use solvents such as benzine thinner commercially available cleaners or antistatic spray intended for analogue records Cleaning the disc lens After prolonged use dirt or dust may accumulate at the disc lens To ensure good playback quality clean the disc lens wit...

Page 28: ...Marking 93 68 EEC We declare that the following product DVD VCR Model H9713BD is in compliance with following Regulations EN 55013 2001 EN55020 2002 EN61000 3 2 2000 EN61000 3 3 1995 A1 2001 EN60065 1998 EN60825 1 1994 A1 1996 A2 2001 IMPORTANT help phone number 0845 300 7775 Produced for ASDA Stores Ltd LEEDS LS11 5AD H9713BD EN fm Page 28 Monday July 5 2004 7 00 PM ...

Reviews: