background image

54

Printing Two Different Document Pages on One Page

■ 

2 IN 1 Function

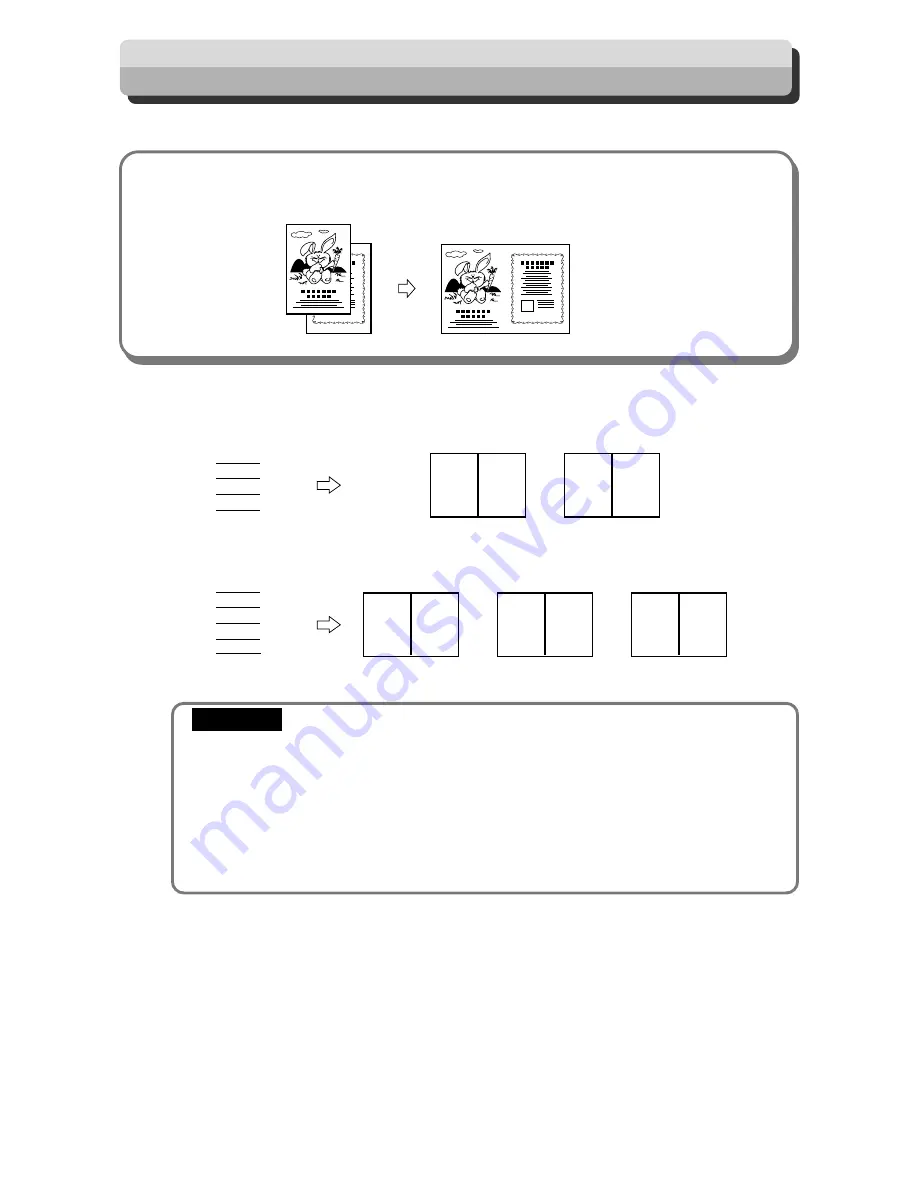
This mode prints two different document pages on one page.

Documents

Printout

Two-in-one (2-IN-1) Function allows you to print two small documents on one page and also easily print for
creating booklets that will be saddle stitched.
When you use 2-IN-1 Function, the layout is as follows:

• If you are printing the documents at 100%, select a printing paper that is the size of the two

documents.

• When you enlarge or reduce two documents size by side, select a zoom ratio so that the

documents fit exactly on one page.

•Select “2-IN-1 Function” before starting mastermaking.
• Correct layout may not be obtainable with other than standard size papers.
Note the following when using 2-IN-1 Function:

• You must load the document in the ADF in portrait orientation.
• You must select a paper size and zoom ratio that will accommodate two documents.

1

2

3

4

Documents (even number)

1

2

3

4

5

Documents (odd number)

Printout1

2

1

Printout2

4

3

Printout3

5

Printout1

2

1

Printout2

4

3

 IMPORTANT

Summary of Contents for DP - M300

Page 1: ...INSTRUCTION MANUAL DUPRINTER DP M300 310 320 Be sure to read this manual prior to use Please leave this manual at the site of use for easy reference...

Page 2: ...ou renseignez vous aupr s de votre fournisseur En veillant ce que ce produit soit limin correctement avec un traitement une collecte et un recyclage adapt s vous contribuez viter son action nocive po...

Page 3: ...l Paper money currency and bonds etc that are valid in foreign country cannot be duplicated Unused postage stamps and postcards cannot be duplicated without governmental consent Government issued pape...

Page 4: ...r sometimes a prohibited action Theinstruction itself is indicated by pictorialsymbols drawn in white on thedisc In the example shown here the instruction is Remove the plug from the outlet Precaution...

Page 5: ...is imperfect and electrical leakage occurs fire or electric shock could result WARNING Do not use a source voltage other than that specified Do not connect two or more loads to a single outlet Doing s...

Page 6: ...s over this could result in personal injury CAUTION Before moving the machine remove the power plug from the outlet If the cord is damaged this may result in fire or electric shock Do not place the ma...

Page 7: ...ile it is operating Hands could get caught up or crushed CAUTION M7 T3060 Do NOT remove this cover There is moving cutting machinery insibe that could injure you J3 T3200 WARNING Do not insert sharp o...

Page 8: ...stalling the machine in the direct sunlight or heat such as near a stove Ink may deteriorate and may cause bad prints while the machine may indicate errors due to overheating caused by sunlight Also a...

Page 9: ...7 Maintenance...

Page 10: ...ontact our service person Clean the exterior in the followingprocedures 1 Use soft cloth with water or mild detergent 2 Wipe the exterior 3 Wipe off the liquid withdry soft cloth Gently wipeoff the du...

Page 11: ...0 LGL LT 77 11 17 LT 74 11 17 LT 64 Notes on Safety Please Read and Observe Conventions Used in This Manual Each page of descriptions in this manual of how to operate the DP M300 M310 M320 is set up a...

Page 12: ...ntmaking 30 Loading and Replacing Paper 32 Loading Paper 32 Adjusting Paper Feed Pressure 33 Loading Documents 34 Positioning the Document 34 Loading Document 35 Enlargement and Reduction 36 Enlarging...

Page 13: ...ng Consumables Replacing the Ink Pack 72 Replacing the Master Roll 75 Replacing the Master Ejection Core 78 Replacing the Drum Unit 80 Removing the Drum Unit 80 Installing the Drum Unit 81 Chapter 6 T...

Page 14: ...12 Contents Chapter 7 Specifications and Maintenance Specifications 104 Appendix Index 108 Quick Operation Guide 110...

Page 15: ...the same standard paper size as the docu ment Text Photograph Text and Photograph Mode a P 43 This function selects the optimum print quality to match the document A4 Document A4 Printout 94 Function...

Page 16: ...ocument 1st set 5 copies x 2 sets 2nd set 3 copies x 4 sets 3rd set 2 copies x 5 sets 1 1 1 1 Changing Print Quantity per Document a P 61 This function changes the number of prints made from each docu...

Page 17: ...se be sure to read this chapter carefully before attempting to use the printer System Setup 16 Part Names and Their Functions 17 Printer Appearance 17 Control Panel 20 LCD Panel 22 Turning Power ON OF...

Page 18: ...re set up as follows Personal computer Duplo Direct Print System Documents prepared on a personal computer can be printed on this machine PC interface kit is required to connect this machine to a pers...

Page 19: ...just the paper feed pressure y Side guides Slide to match the width of the paper u Feed tray Load paper in this tray i Support tray Pull out when loading paper o Power switch Press to switch the power...

Page 20: ...it Ink pack Upper cover ADF cover Lever This lever releases the ink pack holder Master set switch When the master set switch is pushed the master is pulled in and set Lever This lever is locks or unlo...

Page 21: ...ay Holds the printed paper 8 Paper stopper Slide to match the size of printed paper 9 Paper stacker guides Slide to match the size of printed paper 0 Master ejection box Open to replace the master eje...

Page 22: ...the position of the lit lamp that indicates the selected document mode Document mode The lamp of the selected mode lights r LCD panel Displays the number of printed paper Also displays an error messa...

Page 23: ...er of sets for sectional prints 2 Key pad Use to enter the number of prints 3 CLEAR key Press to reset the displayed number of prints to 0 Only the number of prints is cleared 4 Printing speed indicat...

Page 24: ...isplays the number of prints to be made w Sets Displays the number of sets to be printed e Zoom ratio Displays the selected enlargement reduction ratio Reference page 31 59 0sht 1set q w e 1 0 0 LCD P...

Page 25: ...a wall outlet Switch the power switch to the position The power turns ON The message SET PRINT PAPER is displayed on the LCD panel The printer functions are now set in Standard Mode a page 24 When pap...

Page 26: ...printer power is first turned ON or ALL CLEAR key is pressed the functions are reset to standard mode The standard mode settings are as follows Print quantity 0 Print position Standard lit Print spee...

Page 27: ...r ON OFF ID PW 1sht 1set 1 0 0 operated as normal ENTER ID AND PASSWORD Use the PRINT key to confirm By using CLEAR key to delete the all that you inputted and then input it again again Please input I...

Page 28: ...es or marked folds Carbon backed documents Sticky documents Highly transparent documents such as OHP film Acceptable Printing Paper DP M300 DP M310 DP M320 Paper thickness Paper stacking capacity Pape...

Page 29: ...feeder roller and paper separator unit is pressed against the drum unit by the press roller There are small holes over only the image area of the master that is attached to the drum and ink that seep...

Page 30: ...28...

Page 31: ...acing Paper 32 Loading Paper 32 Adjusting Paper Feed Pressure 33 Loading Documents 34 Positioning the Document 34 Loading Document 35 Enlargement and Reduction 36 Enlarging Reducing from Standard Size...

Page 32: ...Place the document face down in the document tray Select the zoom ratio The zoom ratio is set to 100 Press ENLARGEMENT key or REDUCTION key to set a desired zoom ratio a See page 36 Enlargement and Re...

Page 33: ...on the LCD panel is decremented by one for each print made The printed pages are output to the print tray a See page 45 Print Output To stop a print run press STOP key To restart the print run press P...

Page 34: ...oximately 1 300 sheets in this printer Open the support tray Hold the lever and adjust the side guides to the paper size Load a stack of aligned sheets between the paper guides and press the stack lig...

Page 35: ...e paper feed pressure if an feeding error occurs when using thick or thin paper When no thick paper is fed Adjust the paper feed pressure adjuster lever to HIGH When two pieces of thin paper are fed A...

Page 36: ...e documents can be loaded in the portrait or landscape position Use the landscape position when enlarging or reducing from standard size documents to standard size paper such as A5 to A4 B4 and A4 doc...

Page 37: ...tray Place the document face down in the document tray Adjust the document guide to the size of Mastermaking starts with the bottom document in the tray Do not attempt to remove or add to the documen...

Page 38: ...5 A4 115 U S paper sizes DP M300 141 ST LT 129 121 DP M310 141 ST LT 129 121 Reductions You can reduce a standard size document onto standard size paper using the following zoom ratios European paper...

Page 39: ...this case all settings are reset to standard mode a page 24 94 Reduction In this mode the copy is printed at 94 the size of the document When it is not possible to print the edges of the document imag...

Page 40: ...o methods Set to OFF in the same procedure Press ALL CLEAR key In this case all settings are reset to standard mode a page 24 You can select 94 reduction even when you have selected other than 100 In...

Page 41: ...tual zoom ratio Use the keypad to enter the scaling ratio Example 70 You can enter a value for the scaling ratio within the range 50 to 200 If you enter a value smaller than 50 50 will automatically b...

Page 42: ...tmaking a a a a a page 30 Press FUNCTION SWITCH key The scaling ratio is set and press SELECT key several times You can return to 100 using the following methods Press ALL CLEAR key In this case all s...

Page 43: ...aper sizes LG A4 B5 A5 POST FOR DP M320 FOR DP M300 FOR DP M310 FOR DP M310 1 B4 B4 A4 B5 A5 LG LT ST B4 Press FUNCTION SWITCH key Press SELECT key several times to show the screen at right then press...

Page 44: ...42 MEMO...

Page 45: ...rint quality is adjusted to match the document Text mode Enhances the printing of text documents Documents suited for text mode Text documents Documents that include black and white photos that have a...

Page 46: ...ode indicator lamp changes as follows Text Text Photograph Photograph Text To return to Text mode use one of the following two methods Press DOCUMENT MODE SWITCH key to select Text Press ALL CLEAR key...

Page 47: ...int tray When you use the printer on a table install the print tray into the upper fitting Stacking capacity 900 sheets 55 gsm high grade paper When you use a cabinet option install the print tray int...

Page 48: ...46 Open out the paper stopper Adjust the paper stacker guides and paper stopper to the size of the printing paper Print Output...

Page 49: ...when the edges of the printed pages are not trued up Adjusting jump plate Adjust the plate according to the paper size Ex Expand the guides fully when using paper with B4 or larger size Truing up prin...

Page 50: ...48...

Page 51: ...tions Saving Settings 50 Saving Settings 50 Retrieving Settings 52 Clearing Settings 53 Printing Two Different Document Pages on One Page 54 Adjusting Master Darkness 56 Batch Printing 57 Batch Printi...

Page 52: ...ou want to store Press FUNCTION SWITCH key Press SELECT key several times to show the screen Press SELECT key several times select SAVE then press FUNCTION SWITCH key Each time SELECT key is pressed t...

Page 53: ...nges to the MEMORY MODE Any previous settings stored in the memory channel will be deleted when you save new settings Saving Settings 5 MEMORY MODE screen The settings are saved and press SELECT key s...

Page 54: ...to retrieve The saved number blinks Select the blinking number Retrieving Settings 5 MEMORY MODE 5 MEMORY MODE 5 MEMORY MODE RETRIEVE RETRIEVE 123456789 C Press FUNCTION SWITCH key Press SELECT key s...

Page 55: ...the keypad to select the number you want to delete 5 MEMORY MODE 5 MEMORY MODE CLEAR CLEAR 123456789 C Press FUNCTION SWITCH key Press SELECT key several times to show the screen at right 5 MEMORY MO...

Page 56: ...er that is the size of the two documents When you enlarge or reduce two documents size by side select a zoom ratio so that the documents fit exactly on one page Select 2 IN 1 Function before starting...

Page 57: ...to move the arrow on the LCD panel Press FUNCTION SWITCH key 2 IN 1 Function is set and press SELECT key several times Printing Two Different Document Pages on One Page 4 2IN1 4 2IN1 ON OFF 4 2IN1 the...

Page 58: ...ht Press FUNCTION SWITCH key The master darkness screen appears Press SELECT key several times to display the desired master darkness Each time SELECT key is pressed the display of the LCD panel chang...

Page 59: ...h Printing In this mode each set comprises the specified number of prints and the machine prints the specified number of sets stopping after each set You can enter up to 15 groups of the specified num...

Page 60: ...ar the number display Using the keypad enter the number of prints Example 25 If you make a mistake start over again by press C CLEAR key and start from the beginning When you press C CLEAR key both th...

Page 61: ...number of sets Example 3 sets If you make a mistake start over again by press C CLEAR key and start from the beginning When you press C CLEAR key both the number of prints and the number of sets are c...

Page 62: ...s PRINT key The print run starts Repeat steps 8 and 9 until all entered sets have been printed MASTER MAKING key will not work until all the sets have been printed Press STOP key then C CLEAR key to a...

Page 63: ...e from each document You can separate the number of prints for up to 15 documents Select Batch Printing before starting mastermaking Press C CLEAR key to clear the number display Press X key sht and s...

Page 64: ...and the number of sets are cancelled Press X key The number of prints is set Use the keypad to enter the number of sets Example 3 sets If you make a mistake start over again by press C CLEAR key and s...

Page 65: ...stermaking of the next document and printing will automatically start Using the optional tape cluster you can successively perform the mastermaking and collating of prints of multiple documents Batch...

Page 66: ...o move the arrow on the LCD panel Press FUNCTION SWITCH key Ink save Function is set and press SELECT key several times 7 INK SAVE MODE ON OFF the standard screen appears 7 INK SAVE MODE 7 INK SAVE MO...

Page 67: ...confidential safeguard function and the print speed and print position adjustments Confidential Safeguard Function 66 Total Counter Display Function 67 Print Speed Adjustment Function 68 Printing Pos...

Page 68: ...ntial Safeguard function is cleared Mastermaking still functions even if the Confidential Safeguard function in ON Press STOP key while also pressing C CLEAR key The machine beeps and the Confidential...

Page 69: ...ts is 444868 and the total number of masters is 245 P F the limited number of prints is displayed after the limited number of prints is 455132 and the limited number of masters is 755 IMPORTANT P F Wh...

Page 70: ...ter at high printing speeds and slightly darker at slow printing speeds You can adjust the printing speed while the machine is printing Press or keys to adjust the speed Press key to decelerate printi...

Page 71: ...position To move the printing position to the left press key The printing position indicator lamp moves to the left To move the printing position to the right press key The printing position indicator...

Page 72: ...ter applications according to the manual Mastermaking and printing start automatically When mastermaking ends and printing starts you can again use the keys on the control panel IMPORTANT REFERENCE En...

Page 73: ...les This chapter describes how to supply paper ink pack and other consumables Replacing the Ink Pack 72 Replacing the Master Roll 75 Replacing the Master Ejection Core 78 Replacing the Drum Unit 80 Re...

Page 74: ...d on the LCD panel when the remaining ink is low Replace the ink pack using the following procedure Only use ink packs designed for this machine Open the front cover Grasp the lever and pull it toward...

Page 75: ...cessary Insert the ink pack so that the groove on the lip fits onto the U groove of the holder Push the ink pack in to the set line on the ink pack Press the back of the holder in with the palm of you...

Page 76: ...74 Close the front cover Replacing the Ink Pack Front cover...

Page 77: ...e Upper cover Do not touch the heat generator of thermal head Doing so may cause damages leading to a malfunction of master making Turn off the power Pull out the master Lift out the master roll then...

Page 78: ...master roll Holders are interchangeable Insert the master roll into the machine so that the ID mark line on the roll is facing the control panel Peel off the seal Pull out the master and insert the f...

Page 79: ...nnel may be injured by the movable cutter inside the machine Replacing the Master Roll THERMAL HEAD ESCAPE LEVER If the master is wrinkled push down the thermal head escape lever 2 or 3 times When the...

Page 80: ...wing procedure Use only a master ejection core designed for use in this machine Press the master ejection box release lever to open the master ejection box Open the master ejection box until it stops...

Page 81: ...it Ink adheres to the master ejection core Take care to prevent ink from getting onto your clothing Insert a new master ejection core Gently close the master ejection box cover pressing it until it l...

Page 82: ...in or nipped Open the front cover toward you Lift the drum securing lever toward you and holding it there then pull out the drum handle straight toward you until it stops Hold the handle on the far e...

Page 83: ...n the machine Release the handle at the far end of the drum and press the drum in about 10cm while lifting up the front end slightly Hold the drum level and press it in gently until it comes to a stop...

Page 84: ...82 Lower the lever Close the front cover Replacing the Drum Unit Lever Front cover...

Page 85: ...astermaking Printing is Not Possible 84 Error Messages 85 Supplying or Changing Paper While Printing 88 If Paper Runs Out During Printing 88 Adding Paper While Printing 88 Changing Paper Selection Whi...

Page 86: ...t the power plug securely Turn the power switch ON Please contact your service person NO YES NO YES Mastermaking Printing is Not Possible If mastermaking printing is not possible check the following I...

Page 87: ...ls see page 75 Replacing the Master Roll The master ejection core is full Replace the core with a new one a For details see page 78 Replacing the Master Ejection Core There is no drum Install a drum i...

Page 88: ...m a For details see page 96 When MASTER EJECT MISS is Displayed There is an error during master setting Open the top cover and remove the master that is left in the master feeder aFor details see page...

Page 89: ...is no document Set a document The printer is not ready Wait a while with the power turned ON If this message does not disappear after several minutes turn the power OFF and contact servicepersons The...

Page 90: ...ered automatically Load paper a a a a a See page 32 Loading and Replacing Paper Press PRINT key Printing resumes Adding Paper While Printing Press STOP key Printing stops Press the feed tray descend s...

Page 91: ...roller ring pull it out and align it with the stack Align the stack to be added and place it on top of the existing stack Press the stack lightly toward the machine Press PRINT key The feed tray will...

Page 92: ...elease the switch when the paper tray is at the proper height The feed tray will stop If the sheet is still in the feed roller ring pull it out and align it with the stack Remove paper from the feed t...

Page 93: ...1 6 2 1 Troubleshooting Supplying or Changing Paper While Printing When the feed tray comes to a stop reset the paper size Press PRINT key The feed tray will rise automatically and printing will resum...

Page 94: ...the feed tray slightly The feed tray is lowered for the time that the switch is pressed Pull out the jammed paper as shown in the diagram Press the JOG switch until the drum comes to a stop with a be...

Page 95: ...anel Follow the procedure below to remove the jammed paper Press the master ejection box release lever to open the master ejection box Open the master ejection box until it stops Remove the jammed pap...

Page 96: ...n the master ejection box Open the master ejection box until it stops Press the JOG switch to find the edge of the paper then stop the drum at the position shown in the diagram WARNING Do not touch th...

Page 97: ...de while pressing the JOG switch to peel the paper off Make sure that the peeled paper does not stick to your clothing Hold the JOG switch down until the drum comes to a stop with a beep Close the mas...

Page 98: ...en the master ejection box until it stops Press the JOG switch to find the edge of the paper then stop the drum at the position shown in the diagram WARNING Do not touch the drum or rollers when you o...

Page 99: ...the lever Pull the front end of the master toward you and press the JOG switch intermittently Hold the switch down until the master peels off Discard the old master making sure that it does not touch...

Page 100: ...98 Press STOP key The message is deleted Make another master When MASTER EJECT MISS is Displayed...

Page 101: ...er by following the procedure below Open the upper cover Remove the master left in the master feeder Gently close the upper cover When PLATE EJECTION ERROR is Displayed When MASTER SET MISS is Display...

Page 102: ...message is deleted Make a new master and start printing The message PLS MASTER MAKING is displayed on the LCD panel when PRINT key is pressed without mastermaking being carried out When MASTER SET MIS...

Page 103: ...101 6 2 1 Troubleshooting MEMO...

Page 104: ...102 MEMO...

Page 105: ...7 Specifications and Maintenance Chapter 7 Specifications and Maintenance This chapter lists the machine specifications and describes maintenance etc Specifications 104...

Page 106: ...m speed vertical registration adjustment paper weight is limited Paper thickness 45gsm 210gsm 40kg to 180kg Printing speed 130 pages per minute 60 to 130 pages per minute 3 step adjustment Print enlar...

Page 107: ...r E TAP 14 Tape cluster Korean I F 43 USB interface kit FS 100U Optional USB I F kit is necessary UID PC connector CAB 13 Cabinet Automatic power off kit power is turned off by time specified AC 100 2...

Page 108: ...106...

Page 109: ...Appendix Appendix This section contains an index and quick reference diagrams for basic operations Index 108 Quick Operation Guide 110...

Page 110: ...and Printing is Performed 27 If Paper Runs Out During Printing 88 ink pack 18 72 Installing the Drum Unit 81 Installing Print Tray 46 JOG switch 19 80 92 93 95 97 Key pad 21 Lateral Placement 34 LCD...

Page 111: ...d indicator lamp 21 68 Quick Operation Guide 110 Reductions 36 Removing the Drum Unit 80 Replacing the Drum Unit 80 Replacing the Ink Pack 72 Replacing the Master Ejection Core 78 Replacing the Master...

Page 112: ...0 Quick Operation Guide Mastermaking Open the supplemental paper tray Hold the lever and adjust the side guides to the paper size Place a stack of aligned sheets in the feed tray Install the print tra...

Page 113: ...nother test print press T TEST PRINT key Print Enter the number of prints on the key pad To change the number of prints press C CLEAR key and enter the desired number of prints Press PRINT key To stop...

Page 114: ...112...

Page 115: ...www duplo com TEL 81 42 775 3602 FAX 81 42 775 3606 E mail info duplo com U6 Y1012 2010 10 4 1 6 Oyama Chuo ku Sagamihara shi Kanagawa 252 5280 Japan...

Reviews: