background image

22

2.6.5

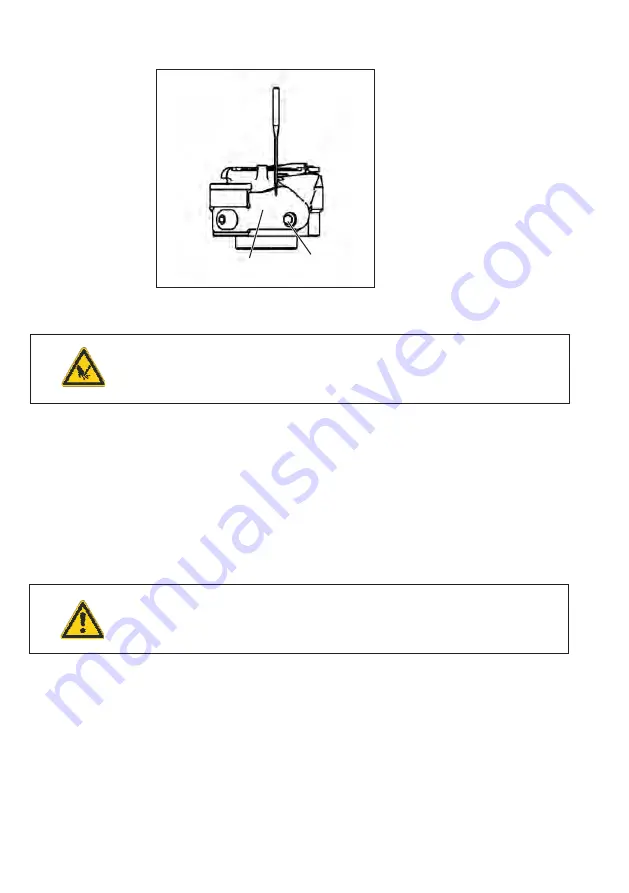
Needle guard

Caution: Risk of injury!

Turn off the main switch.

Check and set the needle guard only when the machine is switched
off.

Standard checking

The needle guard 2 is to prevent a contact of the needle with the hook
tip.
In looping stroke position the needle should be slightly dislocated.

Check the needle guard.

Correction

Turn the machine into looping stroke position.

Adjust the needle guard by twisting the screw 1.

ATTENTION!

The needle guard must be adjusted after changing the needle bar
height, correcting the looping stroke and changing the needle size.

2

1

Summary of Contents for 550-867 s

Page 1: ...Betriebsanleitung 550 867 Service Instructions ...

Page 2: ......

Page 3: ... fabric waste Service maintenance inspection repair and or Transport The user also has to assure that only authorized personnel work on the machine The user is obliged to check the machine at least once per shift for apparent damages and to immediatly report any changes including the performance in service which impair the safety The user company must ensure that the machine is only operated in pe...

Page 4: ...ersons with appropriate training 7 For service or repair work on pneumatic systems disconnect the machine from the compressed air supply system max 7 10 bar Before disconnecting reduce the pressure of the maintenance unit Exceptions to this are only adjustments and functions checks made by appropriately trained technicians 8 Work on the electrical equipment must be carried out only by electricians...

Page 5: ... 2 3 5 Feed dog height 14 2 3 6 Balance weight 15 2 4 Transmission lever 16 2 5 Needle bar linkage 17 2 5 1 Align the needle bar linkage laterally 17 2 5 2 Needle penetration in feeding direction 18 2 6 Hook looping stroke and needle bar height 19 2 6 1 Looping stroke 19 2 6 2 Needle bar height 20 2 6 4 Distance between hook and needle 21 2 6 5 Needle guard 22 2 7 Bobbin case opening 23 2 7 1 Gene...

Page 6: ...1 Hook lubrication 48 3 2 Maintenance 49 4 Setting of the tearing seam visualization software 4 1 General 50 4 1 1 Security levels 50 4 1 2 Data backup 51 4 1 3 Accessing the system for the first time 51 4 1 4 Logging in with scanner and barcode 52 4 2 Exiting the system 53 4 3 Setting a new operator 54 4 4 Deleting an operator 55 4 5 Displaying an operator 56 4 6 Seam patterns 57 4 6 1 Creating a...

Page 7: ...riate sequence Please observe in this connection that various setting positions are interdependent Therefore it is absolutely necessary to do the adjustment following the described order For all setting operations of parts involved in the stitch formation a new needle without damage has to be inserted Machine covers having to be screwed off and on again for checking and adjusting operations are no...

Page 8: ...and 3 in the arm shaft crank 4 the sewing machine can be arrested in two adjusting positions Position I Locking pin Ø 5 mm for large groove Looping stroke needle bar height Position II Locking pin Ø 3 mm for small groove Needle bar at its upper dead center graduation on the handwheel 4 2 4 1 3 ...

Page 9: ...t Setting the handwheel Set the handwheel to the degree mark 50 Loosen the threaded pin for the handwheel through opening 1 Set the handwheel to 0 Arrest the machine in position II with the locking pin Ø 3 mm Loosen the threaded pin for the handwheel through opening 1 Turn the handwheel 2 so that the degree mark 0 points to the middle of the index 3 Tighten the threaded pin for the handwheel throu...

Page 10: ...f Standard checking The arm shaft crank 1 is fastened on the arm shaft 4 with three threaded pins 2 The threaded pins must sit on the flat spot 3 Correction Loosen the threaded pins 2 on the arm shaft crank Twist the arm shaft crank 1 on the shaft until the threaded pins 2 sit on the flat spot 3 Push the arm shaft crank axially to the right as far as it will go Tighten the threaded pins 2 6 2 1 1 ...

Page 11: ...ot 1 The distance between the toothed belt wheel 2 and the bobbin winder wheel 3 must amount to 0 8 mm when the bobbin winder is switched off Check distance between toothed belt wheel 2 and bobbin winder wheel 3 by means of a thickness gauge Correction Loosen the threaded pins in the toothed belt wheel Turn the toothed belt wheel until the threaded pins sit on the flat spot 1 of the arm shaft 4 Se...

Page 12: ...ithout being dislocated Check the position of the toothed belt wheel Correction Pull out the toothed belt from the lower toothed belt wheel Loosen the threaded pins in the toothed belt wheel Turn the toothed belt wheel 2 until the screws sit on the flat spot of the lower shaft 5 Tighten the threaded pins in the toothed belt wheel Mount the toothed belt on the toothed belt wheel Check the course of...

Page 13: ...Adjust the basic setting only with the sewing machine switched off Pre setting Fix the screws 1 and 3 on the flat spots of the shaft 2 Loosen screw 4 Bring the gear tongues 5 into parallel position and align the markings 6 and 7 Tighten screw 4 Fine adjustment see software chapter 4 14 9 1 2 3 4 6 7 5 ...

Page 14: ...haft 7 with the adjustment rings 8 and 9 and tighten the screws Loosen threaded pin 10 and screw 2 Loosen the threaded pins on the thrust eccentric 4 Align the positioning frame 14 laterally so that it comes to sit in the center between the cutouts on the shaft 7 Arrest the positioning frame 14 axially with the bearing bolt 6 fixed with screw 10 and the adjustment ring 2 Tighten the threaded pins ...

Page 15: ...he block 12 Align the feed dog in longitudinal direction in the center of the throat plate cutout Tighten screw 5 see picture on page 10 Fit in the spring 1 see picture on page 10 on the positioning frame and the fastening bracket ATTENTION Danger of breakage The shaft 11 must not reach so far into the positioning frame 14 that the tongues are hindered in their movements 11 11 12 13 ...

Page 16: ...t Set the maximum stitch length Turn the machine to position 190 Move the stitch regulator by switching the step motor from forwards to backwards stitches and check whether the feed dog stands still see software chapter XXX Correction Loosen the threaded pin on the thrust eccentric 1 Adjust thrust eccentric 1 Tighten the threaded pin on the thrust eccentric 1 Move the stitch regulator by switching...

Page 17: ...n the machine is switched off Standard checking The feed dog should stand at the same height at the needle s entering and leaving the throat plate Turn the handwheel and check the movement of the feed dog Correction Loosen the threaded pin on the lifting cam 1 Turn the lifting cam Tighten the screws on the lifting cam 1 Check the setting 13 1 ...

Page 18: ... for machines with KFA short thread cutter 0 8 mm above the throat plate surface Turn the handwheel until the feed dog 2 has reached its highest position Check the height of the feed dog 2 Correction Turn the handwheel until the feed dog 2 has reached its highest position Loosen the screws on the lever 1 Turn the lever 1 so that the feed dog stands 0 8 mm with KFA short thread cutter above the thr...

Page 19: ...d checking The balance weight 1 has to be positioned in a way that with the handwheel in position 210 a stuck in Allen key 3 stands parallel to the bed plate 2 Check the position of the balance weight Correction Loosen the screws on the balance weight 1 Turn the balance weight 1 accordingly Tighten the threaded pin on the balance weight 1 15 1 3 2 ...

Page 20: ...way the distance between the surface of the arm 1 and the center of the bolt 2 amounts to 123 6 mm with the stitch length set to 0 Set the stitch length to 0 by aligning the markings 6 and 7 Check the distance between the top edge 1 and the bolt center 2 Correction Loosen the threaded pin 4 at the lower transmission lever Loosen the screw 5 at the upper transmission lever Adjust the lever 3 to fit...

Page 21: ...Loosen the screws on the adjustment rings 3 and 4 Adjust the lateral position of the needle bar linkage so that the needle stands in the center of the stitch hole Fix the adjustment rings 3 and 4 and tighten the screws Loosen the threaded pins 1 Adjust the thread lever laterally in a way that the clearance of the traction rod 2 on the cross head is identical to both sides Tighten the threaded pins...

Page 22: ...ter of the feed dog s stitch hole with the stitch length set to 0 Insert a new needle Set the stitch length to 0 by aligning the markings 4 and 5 Turn down the needle bar with the handwheel Check the position of the needle in the needle hole Correction Loosen the screw 3 at the upper transmission lever Adjust the needle bar linkage 2 so that the needle 1 stands in the center of the stitch hole Tig...

Page 23: ...e head in position I Locking pin Ø 5 mm in the large groove Set the stitch length to 0 by aligning the markings 4 and 5 Check the position of the hook tip in relation to the needle Correction Arrest the machine head in position I by putting the locking pin Ø 5 mm into the large groove Set the stitch length to 0 Loosen the screws on the clamping ring 3 Turn the hook in a way that the hook tip 2 sta...

Page 24: ...e position Check the position of the needle in relation to the hook tip Correction Set the stitch length to 0 Loosen the needle bar fastening screw 2 Shift the needle bar 1 with needle 3 Upon shifting the needle bar must not be turned The needle scarf must be directed to the hook tip Tighten the needle bar fastening screw A wrong setting of the needle bar height can have the following consequences...

Page 25: ...Correction Check whether the needle is dislocated by the hook guard 5 in looping stroke position If this is the case the hook guard 5 must be readjusted accordingly see chapter 2 6 4 Check the distance The distance between the needle 3 and the hook should be max 0 1 mm Loosen the screws 1 and 2 Loosen the screws on the clamping ring 4 Shift the hook turret laterally to fit Tighten the screws 1 and...

Page 26: ...vent a contact of the needle with the hook tip In looping stroke position the needle should be slightly dislocated Check the needle guard Correction Turn the machine into looping stroke position Adjust the needle guard by twisting the screw 1 ATTENTION The needle guard must be adjusted after changing the needle bar height correcting the looping stroke and changing the needle size 2 1 ...

Page 27: ...hread breakage Eyes on the seam s bottom side Loud noises 2 7 2 Setting of the bobbin case opening Caution Risk of injury Turn off the main switch Check and set the bobbin case opener only when the machine is switched off Standard checking The bobbin case opener 3 has to open the hook center 2 just enough for the sewing thread to pass unimpededly between the bobbin case dog 1 and the gap of the st...

Page 28: ...Correction Loosen screw 4 Shift the cover on the hook housing downward Loosen screw 5 Adjust the bobbing case opener 3 Tighten screw 5 again Put the cover back again Tighten screw 4 24 3 2 1 5 4 ...

Page 29: ... sewing thread should be able to slip through unimpededly between the bobbin case opening finger 3 and the bobbin case 1 Turn the handwheel to position 350 Check whether the bobbin case opening finger has opened wide enough for the sewing thread to be pulled through unimpededly Correction Remove the plug 6 from off the hook housing 4 Loosen the screw 7 in the control cam 8 using the Allen key 5 Tw...

Page 30: ...ed the tongues 4 of the stitch regulator gear have to be flush When actuating the multi position cylinder and when turning the handwheel the stroke of the sewing feet 1 and 2 should be identical Correction Remove the arm cover Turn the handwheel to position 0 Loosen screw 3 Push the feeding foot 2 completely onto the throat plate Tighten screw 3 Put the arm cover back on again Actuate the cylinder...

Page 31: ...cending feeding foot 2 is with max sewing foot stroke and max stitch length supposed to touch down on the feed dog when the needle 1 is descending and the needle tip has reached the upper edge of the feeding foot 95 on the handwheel Set the maximum stitch length Set the maximum sewing foot stroke Turn the handwheel and check the stroke motion Correction Loosen the screws on the lifting cam 3 2 pie...

Page 32: ...material to be sewn must not float It should not be exerted more pressure than necessary Correction Set the sewing foot pressure by turning screw 1 Increase the pressure Turn screw 1 clockwise Decrease the pressure Turn screw 1 counter clockwise 28 1 ...

Page 33: ... the sewing feet Turn the handwheel until the presser foot touches down Move the lifting shaft 6 and check its clearance Correction Tightening the lifting shaft Unscrew the electric and pneumatic unit 5 Loosen the screw on the setting ring 3 Push the lifting shaft 6 completely to the right see the arrow push the adjustment ring 3 close to the bearing bush and tighten it ATTENTION The shaft must st...

Page 34: ...hout any material or to wind up the hook thread When arrested in lifted position with the hand lever the sewing feet 4 are supposed to have a distance of 10 mm to the throat plate Bring both sewing feet to the same level Lift the sewing feet with the hand lever and arrest them Check the lifting height Correction Lift the sewing feet Put a distance keeper 10 mm under the sewing feet 4 Loosen the sc...

Page 35: ...g feet 4 are supposed to have a distance of 20 mm to the throat plate when the needle bar is in its upper dead center The screw 2 limits the travel of the lifting lever 3 Lower the sewing feet Turn the handwheel until the needle bar is in its upper dead center Lift the sewing feet pneumatically or via knee lever and check the lifting height Correction Loosen the lock nut 1 Twist the stop screw 2 a...

Page 36: ...set so that the thread is guided around the hook and kept under control In position 1 occurs the highest thread output as needed with particularly large stitch lengths and thick sewing threads Open the throat plate slide Thread in the needle and hook thread Insert the material Sew a few stitches Turn the handwheel slowly and observe how tight the thread is guided around the hook Correction Loosen ...

Page 37: ...o achieve a regular seam with a low thread tension the travel of the thread take up spring may be increased The thread take up spring must only meet the stop when the needle eye has penetrated the material Spring tension The spring tension should be lower than the thread tension Correction Spring travel Loosen screw 2 Turn the stopping collar 4 Turning counter clockwise larger travel Turning clock...

Page 38: ...y the measuring system for thread tension has to be checked and calibrated at least once a year Proceeding Dismount the thread tension sensor 2 and the associated PCB 3 and send it to the following address Dürkopp Adler AG Department T Q Potsdamer Straße 190 33719 Bielefeld You will receive a thread tension sensor newly calibrated for one year Checked measuring systems for thread tension are ident...

Page 39: ... knife 1 cannot be shifted on the knife carrier 3 This allows to exchange of the thread pulling knife 1 without having to reset the trimming pressure In its resting position the thread pulling knife 1 has to cover completely the knife edge of the counter knife in order to avoid damage on the upper thread The swing range of the thread pulling knife measures 23 and is defined by the control cam s 4 ...

Page 40: ...1 should not be a distance of more than 0 1mm Turn the handwheel until the roller 7 stands in the highest point of the control cam 4 Push the roller 7 against the control cam 4 In this position the locking latch 10 should be able to swing out without hindrance and the distance between the locking latch 10 and the locking bolt 11 should not be more than max 0 1mm Correction Loosen the locknut 12 Tu...

Page 41: ...ition the distance between the control cam 4 highest point and the roller 7 should be 0 1 mm At the same time the control cam 4 has to bear on the clamping ring 5 In the resting position the marking 14 of the thread pulling knife 1 should face the blade of the counter knife 2 The thread pulling knife carrier 3 must not have any end play but should move freely Check whether the control cam 4 bears ...

Page 42: ...he screws 2x on the control cam 4 again Loosen the clamping screw 8 on the control lever 6 Twist the thread pulling knife 1 so that the marking 14 of the thread pulling knife faces the blade of the counter knife 2 Tighten the clamping screw 8 Make sure not to allow any end play Loosen the screws 4x on the clamping ring 5 and shift it until it stops against the control cam 4 Fasten the screws x4 on...

Page 43: ...reads simultaneously Turn the handwheel until the thread pulling knife can be swung out after releasing the latch Swing out the thread pulling knife manually In order to do so push the bolt with the roller 7 to the right against the control cam 4 Insert two threads to be trimmed into the thread pulling knife 1 Continue turning the handwheel until the knife has swung back Check whether the sewing t...

Page 44: ...19 stands next to the blade of the counter knife 2 Loosen screw 20 Turn the counter knife 2 against the thread pulling knife 1 Tighten the screw 20 Note Through the eccentric cut of the thread pulling knife 1 a cutting pressure is automatically exerted when the two blades superpose 40 1 2 20 19 20 1 2 19 ...

Page 45: ...andwheel until the thread is cut Check whether the cutting took place in the position thread lever in its upper dead center 65 on the handwheel Correction Loosen the screws 2x on the control cam 4 Swing out the thread pulling knife 1 until the blade of thread pulling knife 1 comes flush with the blade of the counter knife 2 Bring the machine into the position thread lever in its upper dead center ...

Page 46: ...rist wraps that you can connect for grounding on the mass of any unpainted metal piece of the machine head or on the switch cabinet Handle the PCBs with utmost caution They are very sensitive towards electrostatic discharges Hold the PCBs only at their edges Put the PCBs after unwrapping or after dismounting with their components upside onto a grounded statically discharged surface We recommend to...

Page 47: ...f the main switch Set the potentiometer only with the sewing machine switched off Pull out the plug 3 of the potentiometer on the PCB 4 Check the resistance on the terminals 2 and 3 of the potentiometer with an ohmmeter Terminal 3 green wire Terminal 2 brown wire Measuring value 7 1 to 7 3 kOhm If the values mentioned are not correct the position of the potentiometer 2 has to be adjusted Loosen sc...

Page 48: ...ssed and turn on the main switch Enter the technician level Select the parameter F 188 Actuate the key E The current Speedomat grade for example 11 and the corresponding sewing speed limitation for example 2860 are displayed Turn the potentiometer shaft until the Speedomat grade 07 and the corresponding maximum sewing speed of 3800 rpm resp 3400 rpm depending on the subclass are indicated on the d...

Page 49: ...X12 Y2 Valve stroke position 1 HP1 X13 Y3 Valve stroke position 1 HP2 X14 Y4 Valve stroke position 1 HP3 X15 Y5 Valve foot lifting FL X16 Y6 Valve blow clean residual thread monitor RFW X17 Y7 Valve needle cooler NK X18 Y8 Valve thread tension lifting FS X19 P1 Speedomat X20 A34 Key Block X21 A36 Light barrier edge detection X22 1 24 40V X22 2 Solenoid Y1 thread cutter FA X22 3 Signal Foot lifting...

Page 50: ... only with the sewing machine switched off The factory setting of the sliding clutch is at about 8 Nm and is marked with the point 1 on the sliding clutch Loosen screw 3 Twist the sliding clutch 2 accordingly Direction increasing the torque Direction decreasing the torque Tighten screw 3 again 46 3 2 1 ...

Page 51: ... equivalent oil with the following specifications Viscosity at 40 C 10 mm s Ignition point 150 C DA 10 is available from DÜRKOPP ADLER AG retail outlets under the following parts number 250 ml Container 9047 000011 1 liter Container 9047 000012 2 liter Container 9047 000013 5 liter Container 9047 000014 Lubrication of the machine head The sewing machine is equipped with a central oil wick lubricat...

Page 52: ...It may be modified only in exceptional cases The required oil quantity depends on the sewing threads to be processed and on the fabric A piece of paper preferably blotting paper held below the hook has to be slightly sprayed with oil when sewing approx 1 m of sewing thread and fabric Correction Adjust the oil quantity with the regulating screw 1 Turn screw counter clockwise increase the oil quanti...

Page 53: ...t is only listed in the following table for the sake of completeness Maintenance work to be carried out Operating hours 8 40 160 500 Sewing machine head Sewing dust lint und thread waste Check oil level in the oil reservoir for the lubrication of the machine head X Sewing drive Clean motor fan grill X Check condition and tension of the V belt X Pneumatic system Check water level in the pressure re...

Page 54: ...manager The following menu items of the software can be operated Level Menu item 0 Access Sewing 1 Access Sewing Seam patterns Database 2 Access Sewing Seam patterns Database Check In the Setup screen of the software the security levels can be slightly modified Log in Product manager Press the Check button Press the Setup button The following screen will appear Modify the security levels for the u...

Page 55: ...ettings factory settings are additionally delivered in the form of a computer backup Dürkopp Adler uses as backup software the program Acronis Backup Recovery see http www acronis de Since the Dürkopp Adler SAB software only saves the data that is relevant to sewing a backup of the complete system should be effectuated regularly 4 1 3 Accessing the system for the first time Insert the dongle 2 int...

Page 56: ...in with scanner and barcode Press the switch 2 underneath the table top The integrated lamp lights up Scan in the barcode of the operator using the hand scanner 3 The corresponding security level is activated 52 2 3 ...

Page 57: ...d The following screen will appear Press the button PC off The system will be shut down and the PC switched off Note Exiting by pressing the Yes will lead the user to the Windows graphic user interface only possible with the security level 2 53 ...

Page 58: ...e of the new operator and determine his security level Enter the personnel id number Enter the password Repeat the password entry Press the Print BC button A barcode for the log in via scanner will be printed for the new operator Press the Log in key Enter the Barcode via hand scanner The number will be displayed in the field Id number Press the Button OK The entry will be adopted Memorize Note Th...

Page 59: ... level 2 Log in to the system Press the Access button Press the button Delete The following screen will appear Select the corresponding operator for example Operator name Andree Press the button Delete operator The following screen will appear Press the button Yes The operator will be deleted from the list 55 ...

Page 60: ... the Disp op button The following screen will appear Press Operator screen The following screen will appear Select an operator symbol from the list Press Open The symbol will be loaded Note The operator symbols are memorized in the file SABSoft SystemDB Format JPEG Size 150 KB 56 ...

Page 61: ... Seam patterns Upon pressing the button seam patterns new seam patterns can be created or existing seam patterns can be edited or deleted Press the button Seam patterns The following screen will appear 57 ...

Page 62: ...l appear Press Seam pattern code 2 The following input screen will appear Return Enter the seam pattern code Press the Return button Press Seam pattern name 1 The following input screen will appear Enter the name of the seam pattern Press the Return button The list of all existing seam patterns and their alteration status will be displayed 58 2 1 ...

Page 63: ... Press the OK button An input screen for the number of seam sections will appear Select the number of seam sections for example 3 Press the OK button The new seam pattern will be displayed 59 ...

Page 64: ...th Distance between the two strips on the sewing material Thread tension Tolerance range lower value top value and number of tolerance stitches Thread tens Value of power supply in only with ETT Stop at strip stitch counting or manually Pedal 2 GB thread ten Komp file Selection of a Teach in file only with ETT Lift Stroke Lift stroke of the alternating sewing feet Lift stroke knee Lift stroke upon...

Page 65: ...is to be inserted Press the Insert button The following screen will appear Press the OK button The inserted seam section 1 will be displayed Select the new seam section by clicking and enter the corresponding seam parameters After setting the seam parameters press the button Memorize 61 1 ...

Page 66: ...n Press the seam section that is to be deleted For example Seam section 1 Press the button Delete The following screen will appear Press the OK button The seam section will be deleted Three seam patterns are displayed 62 1 ...

Page 67: ... existing seam patterns and their alteration status will be displayed Enter the seam pattern code Press the OK button The selected seam pattern will be displayed on the screen Call up the individual seam sections and effectuate the desired alterations Press the button Memorize 63 ...

Page 68: ...de of the seam pattern that is to be copied For example Seam pattern 003 Press seam pattern code Enter a new number for the seam pattern code For example 004 Press the OK button Press seam pattern name and enter a new name Press the OK button The following screen will appear Press the OK button The seam pattern 003 has been copied to the new seam pattern 004 64 ...

Page 69: ...ern A list of all existing seam patterns and their alteration status will be displayed Enter the seam pattern code For example Seam pattern 004 Press the button OK A confirmation request will appear Confirm the request with Yes The seam pattern 004 will be deleted 65 ...

Page 70: ...nted and copied The selection of the desired data takes place via button 1 File Each day a new file is created With the Files button an older file can be displayed Press the Files button The following menu will appear Press the requested file Press Open Printing If a printer is connected the selected file can be printed by pressing the button Print 66 1 ...

Page 71: ...ill be copied to a previously determined directory Help A list of the error codes will appear see chapter 6 7 Thread Tens File that indicates the thread tension values of each individual stitch within the documented seam sections 67 ...

Page 72: ...d restore files to inform about sewing materials and sewing parameters as well as to test adjust and set up the integrated sewing station Backup System When this function is activated all system relevant settings will be saved Press Backup system The following screen will appear 68 ...

Page 73: ...ndow will appear Select the backup location Press OK The backup will be saved Restore System System relevant data are imported into the system The requested parameters can be set previously For the way of proceeding see Backup System 69 ...

Page 74: ...the corresponding machine number For the way of proceeding see Backup System Data import Backup files of older software versions will be imported For the way of proceeding see Backup System Copy dump files When this function is activated all dump files will be copied For the way of proceeding see Backup System Connections When this function is activated all connections of the computer will be list...

Page 75: ...the printing of barcode labels during the sewing process existing not existing Protocoll printer optional for the printing of recorded data after sewing existing not existing With batch mode Allows for repeated sewing after one time scanning activated deactivated Scanner needle thread Reading the needle thread barcode with a fixed scanner optional existing not existing Scanner hook thread Reading ...

Page 76: ...ange of the needle activated deactivated Multibarcode switch Automatic entering of additional barcodes with batch mode activated deactivated Save individual stitch data of Saving the thread tension values SAB seam in a TXT file ON OFF Stitch counting with PC card The stitch counting of the PC not of Efka is being considered activated deactivated Efka decorative bartack Make selection according to ...

Page 77: ...ctivated in the Components field the number of stitches for the additional seam can be set via the function Number of stitches of label sewing In order to prevent that each thread that gets into the light barrier simulates a strip the sensibility of the light barrier can be adjusted in the function Strip detection filter stitches If the value 2 is entered the size of the strip must be extended ove...

Page 78: ... read 0 The digit of the barcode will be ignored Entry of the nominal values Changing the barcode definition Press the corresponding barcode row 1 An input screen will appear Enter the barcode definition Press the OK button The new definition is adopted Press the button Memorize Loading a barcode definition Press the Load button A selection window will appear Select a file Press Open The file will...

Page 79: ...utton the layout of the end label can be determined The barcode information that will be printed is determined Via the button Define ext label print additional information can be included on the end label 1 Determining the end label barcode type See chapter 4 9 2 Determining the end label layout See chapter 4 10 3 Determining the label text to be printed 75 1 2 3 ...

Page 80: ...en The file will be loaded Save Via this button a barcode definition can be memorized Press Save A selection window will appear Enter a file name Press Save The file will be memorized Define ext label print Via this button an extended label print can be edited With this function variable information can be printed on the endlabel 76 ...

Page 81: ...abase can be determined as well as the intervals between automatic saving Press Change path The following screen will appear Select the path Press OK The path will be adopted Note When using a network connection the path for the automatic copy of the record data base will be changed to the desired path 77 ...

Page 82: ...nd existing threads can be deleted Important note Upon entering a new thread the Ident No has to be entered Through the Ident No the system recognizes the thread It is made up of the predefined digits of the thread barcode Entering a new thread type Press the button New thread The thread type data base editor will appear Enter the thread barcode or Scan the thread barcode 78 ...

Page 83: ...the hand scanner Press OK The thread barcode is adopted Enter further thread data and confirm with OK Modify thread type When this function is activated the selected thread type can be modified Delete thread type When this function is activated the selected thread type can be deleted 79 ...

Page 84: ...tivated the seam database will be printed only if a file printer is connected and has been activated in the setup Display DB When this function is activated the seam data base will be opened and all seam parameters will be displayed 80 ...

Page 85: ...ated all registered bobbins will be displayed By pressing the Delete button preselected bobbins can be deleted Press the bobbin that is to be deleted Press Delete A confirmation request will appear Press OK The bobbins will be deleted 81 ...

Page 86: ...ctivated the operator will be asked in certain intervals to check the needle and replace it if necessary These activities are recorded in the needle replacement data base Press Replacement The following screen will appear Press Checked The following screen will appear 82 ...

Page 87: ...trol has been activated the operator will be asked in certain intervals to check the settings of the step motor and the thread tension sensor or to recalibrate them These activities are recorded in the thread tension and step motor calibration data base SM Cali Cali 83 ...

Page 88: ...ecked Checking the stitch lengths Pull the needle thread out of the needle Put a piece of cardboard 1 under the sewing foot Press the button Check 2 mm Press the foot pedal A predetermined section will be sewn Measure the stitch length Proceed as described for the other stitch lengths 84 1 ...

Page 89: ...ing foot Press the button Cali 1 The following screen will appear Press the button Enter 100 stitches length The following screen will appear Press the foot pedal A predetermined section will be sewn Measure the stitch length and enter it with the keyboard Press Return Repeat the procedure for Cali 2 Memorize 85 ...

Page 90: ... I O When this function is activated the inputs and outputs of the system can be checked Scanner When this function is activated the barcode scanners can be tested 86 ...

Page 91: ...hecked The preset settings like initial bartack end bartack speed stitch length and so forth will be transmitted to the control unit via pressing the Send button and a seam will be seam will be triggered Note These entries can only be carried out via external operating panel of the type V820 87 ...

Page 92: ...lerance limits the sewing speed the lift stroke as well as the stitch length and for the checking of the thread tension after a Teach in process in connection with a ETT See chapter 6 6 Tolerance range of the thread tension Thread tens file After pressing this button a thread tension file can be loaded 88 ...

Page 93: ...nction Thread tension the upper and lower limits for the needle thread tension can be set Step 1 Setting the thread tension at the operating point and at the limits Enter the corresponding values for the tearing seam into the field for lower limit upper limit and target value Manufacturer s data Enter the maximum speed Enter stitch length and lift stroke Press Set Fa The thread tension value is ad...

Page 94: ...m The following screen will appear The determined values for step 2 will be displayed Press the button next step Carry out step 3 and 4 A screen displaying all registered values will appear With the field File name NB number the determined values can be memorized 90 ...

Page 95: ...a free seam EC25700 Edge detection upper limit overran EC25800 Edge detection lower limit overran EC26000 Did not read the extra bar code label additional bar code EC27000 Hardware error Efka control unit does not react properly EC27500 Hardware error Thread tension measuring device does not react properly EC28000 Remained below the allowed stitch area EC29000 Exceeded the allowed stitch area EC31...

Page 96: ... 20 051 H2 Current hour two digits for example 8 52 13 08 U2 Current minute two digits for example 8 52 13 52 S2 Current second two digits for example 8 52 13 13 P1 Current personnel number one digit for example 1234 1 P2 Current personnel number two digits for example 1234 12 P3 Current personnel number three digits for example 1234 123 P4 Current personnel number four digits for example 1234 123...

Page 97: ...ng are defined by the mask that is specified under Needle thread mask label 1 the digit will be read 0 the digit will be ignored TL Number of digits and coding are defined by the mask that is specified under Hook thread mask label 1 the digit will be read 0 the digit will be ignored WE Calender week 1 53 WD Weekday from 1 Sunday to 7 Saturday MB Element from multi barcode KX Constant sign LR Ident...

Page 98: ...s MB1 MB9 scanned mutli barcodes 1 9 ONM operator name OPN operator personel number FAB manufacturer code MAC machine number TRN needle thread barcode TRB bobbin thread barcode DPC daily piece number DNF daily piece number formatted to 4 digits DNT daily piece number formatted to 3 digits ERC actual error code SNM seam record name SRN seam record number 00 99 DAT date TIM time JDY Julean Day YR2 Y...

Page 99: ... Enter the desired label text into the fields 1 for example Endlabel text 1 Manufacturer Endlabel text 2 Model Endlabel text left Left hand seat Endlabel text right Right hand seat Set the origin for the text coordinates in the fields 2 Set the position of the endlabel text 1 in the fields Pos text 1 X and Pos text 1 Y Set the position of the endlabel text 2 in the fields Pos text 2 X and Pos text...

Page 100: ...ing type in the field Thread barcode type This selection applies to both needle and hook thread Select the corresponding type in the field Endlabel barcode type In the following fields masks can be defined to transmit system relevant information entry 1 and ignore unimportant information entry 0 Prim barcode identifier A barcode for material and colour Prim barcode identifier B barcode for the top...

Page 101: ...ent B field determines whether the piece is a top middle or bottom piece For example Primary barcode read via hand scanner 11112233001234567890 Primary barcode identification in the field Prim barcode ident B 00001100000000000000 ID number 22 The ID number must be defined in one of the fields ID piece 1 ID piece 2 and ID piece 3 It is not possible to enter the same ID number in more than one of th...

Page 102: ... barcode mask L R 00000000110000000000 ID number 00 The corresponding ID number must be defined in the fields ID left and ID right Example with two pieces 11112233001234567890 11112333001234567890 Prim barcode ident A 11110000000000000000 11110000000000000000 ID number 1111 1111 The ID numbers are identical OK 11112233001234567890 11112333001234567890 Prim barcode ident B 00001100000000000000 0000...

Page 103: ...d seat will be printed on the endlabel Via the field Prim barcode mask label information from the initial barcode can be printed onto the endlabel Via the field Mask multi barcode on is determined how many additional barcodes multi barcodes should be scanned and memorized The desired number of barcodes is realized by selecting the corresponding digit of the primary barcode Via the field Mask multi...

Page 104: ...ndows printer screen 1 two printer drivers Zebra GK420t ZPL and Zebra GK420t are displayed Zebra GK420t ZPL is a printer driver that the Windows operating system recognizes and installs automatically Zebra GK420t is the printer driver that is needed by the printer and is installed by the printer installation program Note Both printer drivers may only be removed by using the program Uninstall that ...

Page 105: ...k C Select the directory Printer Driver Doubleclick the program Driver Uninstall exe The following screen appears Press the Next button The installed printer drivers will be displayed Select the driver Zebra GK420T Press the Remove button 101 ...

Page 106: ...s Press the OK button The selected printer drivers will be deleted Select the driver Zebra GK420t ZPL Press the Remove button Press the OK button The following screen will appear Press the Next button Press the Finish button 102 ...

Page 107: ...been successfully completed Doubleclick the program Setup exe in the directory PrinterDriver The following screen will appear Select the desired language Press the OK button The following screen will appear Press the Next button The screen depicted on the next page will appear 103 ...

Page 108: ... the correct printer appellation see printer type label Example Zebra GK420t EPL Press the button Next The following note will appear Press the Continue Anyway button The screen for the printer connection will appear Click the connection USB001 Press the Next button 104 2 1 ...

Page 109: ... sure that between the word Zebra and the model number GK420t there are two blank spaces Press the Next button The configuration assistant will appear Press the Next button The setup for the barcode label will appear Press the Customize button The screen for the paper size will appear 105 ...

Page 110: ... the field 2 Width Enter the label height in the field 3 Height Press the OK button The following screen will appear Press the Next button The screen for the printer mode will appear Select None Press the Next button The screen for the media type will appear 106 1 2 3 ...

Page 111: ...n The screen for the calibration of the label will appear Press the Next button Press the Finish button The screen for the printer test will appear Press the Finish button On the Windows printer screen the installed printer driver will appear 107 ...

Page 112: ...operating system will find a new printer The hardware assistant will be launched Select No not this time Press the Next button The screen for the installation wizard will appear Select Install the software automatically Press the Next button The screen depicted on the next page will appear 108 ...

Page 113: ...es from the path c PrinterDriver Press the OK button Press the Finish button The automatic installation has been successfully completed On the Windows printer screen the installed printer driver will appear Zebra GK420t Copy1 together with the notice that the new hardware has been installed successfully 109 1 ...

Page 114: ...driver Zebra GK420T Copy1 Right click with the mouse Click rename Rename the driver to Zebra GK420t ZPL 4 13 3 Printer calibration With its built in light barrier the label printer sets itself automatically to the correct distance between the labels on the support material If the correct distance is not recognized automatically the printer has to be recalibrated For further information please cons...

Page 115: ......

Page 116: ... AG Potsdamer Str 190 33719 Bielefeld Germany Phone 49 0 521 925 00 E Mail service duerkopp adler com www duerkopp adler com Subject to design changes Printed in Germany Dürkopp Adler AG 0791 550691 00 0 EN 12 2011 ...

Reviews: