background image

25

and other fuel system components serviced or replaced. 

The  length  of  time  that  gasoline  can  be  left  in  your  fuel  tank  and  carburetor 
without causing functional problems will vary with such factors as gasoline blend, 
your  storage  temperatures,  and  whether  the  fuel  tank  is  partially  or  completely 
filled. The air in a partially filled fuel tank promotes fuel deterioration. Very warm 
storage/temperatures  accelerate  fuel  deterioration.  Fuel  deterioration  problems 
may occur within a few months, or even less if the gasoline was not fresh when 
you filled the fuel tank.   

The Distributor’s Limited Warranty does not cover fuel system damage or engine 
performance problems resulting from neglected storage preparation.   

You can extend fuel storage life by adding a fuel stabilizer that is formulated for 
that  purpose,  or  you  can  avoid  fuel  deterioration  problems  by  draining  the  fuel 
tank and carburetor.   

Adding a Fuel Stabilizer to Extend Fuel Storage Life 

When adding a fuel stabilizer, fill the fuel tank with fresh gasoline. If only partially 
filled, air in the tank will promote fuel deterioration during storage. If you keep a 
container of gasoline for refueling, be sure that it contains only fresh gasoline.   

1. Add fuel stabilizer following the manufacturer’s instructions.

2. After adding a fuel stabilizer, run the engine outdoors for 10 minutes to be sure

that treated gasoline has replaced the untreated gasoline in the carburetor.

Dry operation will damage the pump seal. Be sure the pump 

chamber is filled with water before starting the engine.   

3. Stop the engine, and move the fuel valve lever to the OFF position.

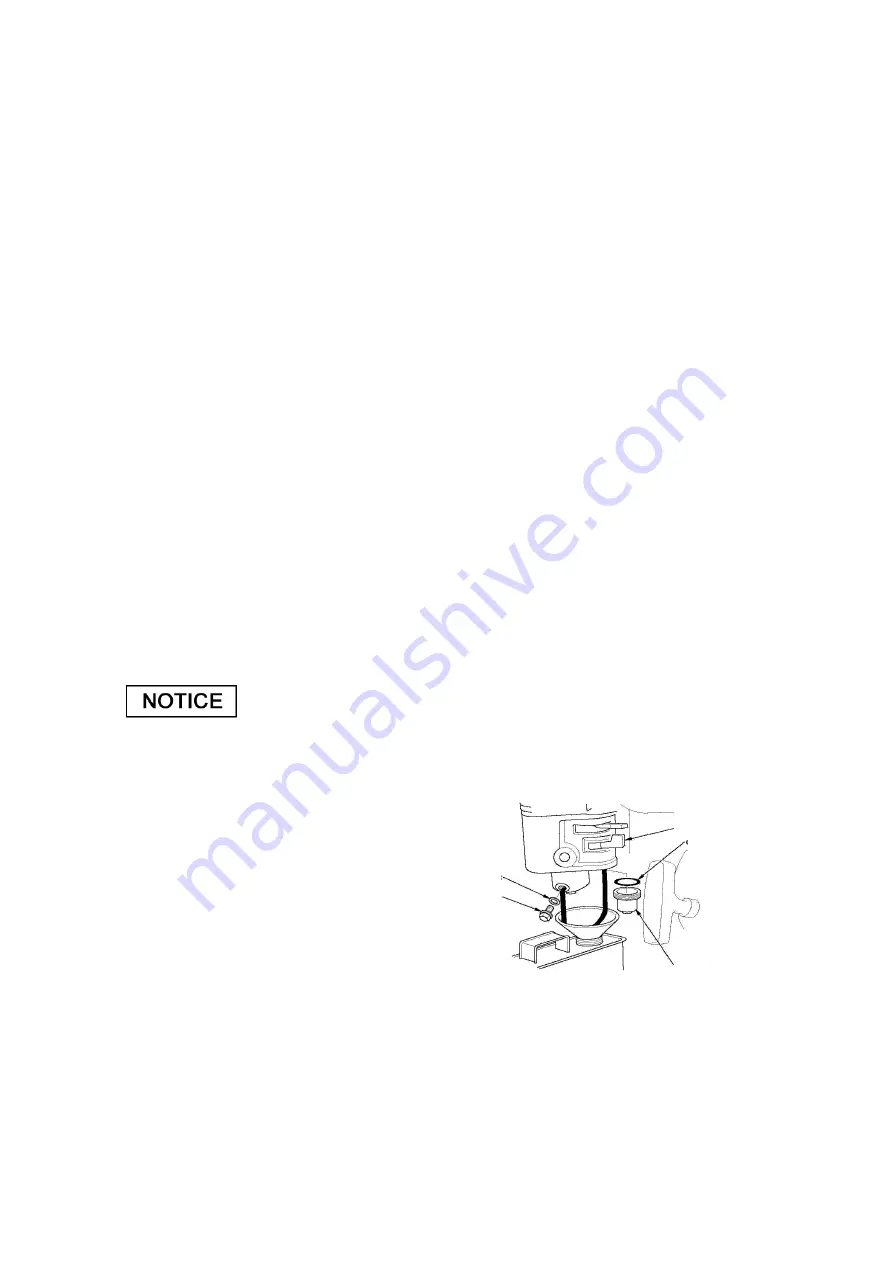
Draining the Fuel Tank and Carburetor

1. Place an approved gasoline container

below the carburetor, and use a

funnel to avoid spilling fuel. 

2. Remove the carburetor drain

bolt and sediment cup, and

then move the fuel valve lever

to the ON position.

3. After all the fuel has drained into the container, reinstall the drain bolt and

sediment cup. Tighten them securely.

O-RING

FUEL VALVE LEVEL

WASHER

DRAIN BOLT

SEDIMENT CAP

Summary of Contents for DPT50

Page 1: ...Trash Pump MODEL DPT50 DPT80 Original Instructions CHONGQING DAJIANG POWER EQUIPMENT CO LTD OWNER S MANUAL ...

Page 2: ...ion This manual should be considered a permanent part of the pump and should remain with the pump if it is resold The illustrations in this manual are based in DPT80 The illustration may vary according to the type Keep this owner s manual handy so you can refer to it at any time This owner s manual is considered a permanent part of the water pump and should remain with the water pump if resold If ...

Page 3: ...Y INFORMATION 4 COMPONENTS CONTROL LOCATIONS 6 CHECK BEFORE OPERATION 7 OPERATION 11 STARTING THE ENGINE 14 STOPPONG THE ENGINE 17 MAITENANCE 18 MAITENANCE SCHEDULE 20 TRANSPORTING STORAGE 24 TROUBLESHOOTING 28 SPECIFICATION 30 ...

Page 4: ...ne of three signal words DANGER WARNING or CAUTION These signal words mean You WILL be KILLED or SERIOUSLY HURT if you don t follow instructions You CAN be KILLED or SERIOUSLY HURT if you don t follow instructions You CAN be HURT if you don t follow instructions Your pump or other property could be damaged if you don t follow instructions Safety Headings such as IMPORTANT SAFETY INFORMATION Safety...

Page 5: ...e and gasoline vapor can explode Refuel outdoors in a well ventilated area with the engine stopped and the pump on a level surface Do not fill the fuel tank above the fuel strainer shoulder Never smoke near gasoline and keep other flames and sparks away Always store gasoline in an approved container Make sure that any spilled fuel has been wiped up before starting the engine After refueling make s...

Page 6: ...OCATIONS PRIMING WATER FILLER CAP FRAME AIR CLEANER MUFFLER SUCTION PORT PUMP DRAIN CAP OIL DRAIN PLUG FUEL FILLER THROTTLE LEVER DISCHARGE PORT CHOKE LEVER FUEL VALVE LEVER STARTER GRIP ENGINE SWITCH OIL FILLER CAP DIPSTICK ...

Page 7: ...t 3 feet 1 meter away from building walls and other equipment during operation Do not place flammable objects close to the engine Before beginning your pre operation checks be sure the pump is on a level surface and the ignition switch is in the OFF position Check the General Condition of the Pump Look around and underneath the pump for signs of oil or gasoline leaks Remove any excessive dirt or d...

Page 8: ...urely Running the engine with a low oil level can cause engine damage Engine oil capacities DPT80 0 6L Air Filter Inspection A dirty air filter will restrict air flow to the carburetor reducing engine and pump performance Remove the air cleaner cover and inspect the filter Clean or replace dirty filter elements Always replace damaged filter elements If equipped with an oil bath air cleaner also ch...

Page 9: ...ngine stopped and on a level surface remove the fuel tank cap and check the fuel level Refill the tank if the fuel level is low After refueling tighten the fuel tank cap securely Gasoline is highly flammable and explosive You can be burned or seriously injured when handling fuel Stop the engine and keep heat sparks and flame away Handle fuel only outdoors Wipe up spills immediately MAXIMUM FUEL PA...

Page 10: ...void getting dirt or water in the fuel tank Occasionally you may hear a light spark knock or pinging metallic rapping noise while operating under heavy loads This is no cause for concern If spark knock or pinging occurs at a steady engine speed under normal load change brands of gasoline If spark knock or pinging persists see an authorized servicing dealer Running the engine with persistent spark ...

Page 11: ...g serious injury Pumping sea water beverages acids chemical solutions or any other liquid that promotes corrosion can damage the pump PUMP PLACEMENT For best pump performance place the pump near the water level and use hoses that are no longer than necessary That will enable the pump to produce the greatest output with the least self priming time As head pumping height increases pump output decrea...

Page 12: ...Use a hose clamp to securely fasten the hose connector to the suction hose in order to prevent air leakage and loss of suction Verify that the hose connector sealing washer is in good condition Install the strainer provided with the pump on the other end of the suction hose and secure it with a hose clamp The strainer will help to prevent the pump from becoming clogged or damaged by debris Securel...

Page 13: ...tput Tighten the hose clamp securely to prevent the discharge hose from disconnecting under pressure PRIMING THE PUMP Before starting the engine remove the filler cap from the pump chamber and completely fill the pump chamber with water Reinstall the filler cap and tighten it securely Operating the pump dry will destroy the pump seal If the pump has been operated dry stop the engine immediately an...

Page 14: ... start a cold engine move the choke lever to the CLOSED position To restart a warm engine leave the choke lever in the OPEN position 3 Move the throttle lever away from the SLOW position about 1 3 of the way toward the FAST position FUEL VALVE LEVER ON CHOKE LEVER CLOSED SLOW THROTTLE LEVER ...

Page 15: ...nst the engine Return it gently to prevent damage to the starter 6 If the choke lever was moved to the CLOSED position to start the engine gradually move it to the OPEN position as the engine warms up 7 setting engine speed After starting the engine move the throttle lever to the FAST position for self priming and check pump output RECOIL STARTER GRIP IGNITION SWITCH ON CHOKE LEVEL OPEN ...

Page 16: ...is controlled by adjusting engine speed Moving the throttle lever in the FAST direction will increase pump output and moving the throttle lever in the SLOW direction will decrease pump output SLOW THROTTLE LEVEL FAST ...

Page 17: ...he SLOW position 2 Turn the ignition switch to the OFF position 3 Turn the fuel valve lever to the OFF position After use remove the pump drain plug and drain the pump chamber Remove the filler cap and flush the pump chamber with clean fresh water Allow the water to drain from the pump chamber then reinstall the filler cap and drain plug IGNITION SWITCH OFF SLOW THROTTLE LEVEL OFF FUEL LEVEL ...

Page 18: ... in unusually wet or dusty conditions consult your servicing dealer for recommendations applicable to your individual needs and use Remember that your servicing dealer knows your pump best and is fully equipped to maintain and repair it To ensure the best quality and reliability use only new genuine parts or their equivalents for repair and replacement Maintenance replacement or repair of emission...

Page 19: ...ving parts Do not run the engine unless instructed to do so Read the instructions before you begin and make sure you have the tools and skills required To reduce the possibility of fire or explosion be careful when working around gasoline Use only a nonflammable solvent not gasoline to clean parts Keep cigarettes sparks and flames away from all fuel related parts ...

Page 20: ...djust 2 Fuel tank and strainer Clean 2 Fuel tube Check Every 2 years Replace if necessary 2 Impeller Check 2 Impeller clearance Check 2 Pump inlet valve Check 2 Emission related items 1 Service more frequently when used in dusty areas 2 These items should be serviced by your servicing dealer unless you have the proper tools and are mechanically proficient Refer to shop manual for service procedure...

Page 21: ...ks Keep gasoline away from appliance pilot lights barbecues electric appliances power tools etc Spilled fuel is not only a fire hazard it also causes environmental damage Wipe up spills immediately Fuel can damage paint and plastic Be careful not to spill fuel when filling your fuel tank Damage caused by spilled fuel is not covered under warranty ENGINE OIL CHANGE Drain the used oil while the engi...

Page 22: ...e SAE oil viscosity and service classification are in the API label on the oil container We recommend that you use API SERVICE category SJ oil The recommended operating range of this pump is 23 F to 104 F 5 C to 40 C AIR FILTER CLEANING A dirty air filter will restrict air flow to the carburetor reducing engine performance If you operate the pump in very dusty areas clean the air filter more frequ...

Page 23: ... the spark plug area 2 Remove the spark plug with a spark plug wrench 3 Inspect the spark plug Replace it if the electrodes are worn or if the insulator is cracked or chipped 4 Measure the spark plug electrode gap with a suitable gauge Correct the gap if necessary by carefully bending the side electrode The gap should be 0 028 0 031 in 0 70 0 80 mm 5 Install the spark plug carefully by hand to avo...

Page 24: ...use damage If the engine has been running allow it to cool for at least half an hour before washing 2 Wipe dry all accessible surfaces 3 Fill the pump chamber with clean fresh water start the engine outdoors and let it run until it reaches normal operating temperature to evaporate any external water Dry operation will damage the pump seal Be sure the pump chamber is filled with water before starti...

Page 25: ...tabilizer to Extend Fuel Storage Life When adding a fuel stabilizer fill the fuel tank with fresh gasoline If only partially filled air in the tank will promote fuel deterioration during storage If you keep a container of gasoline for refueling be sure that it contains only fresh gasoline 1 Add fuel stabilizer following the manufacturer s instructions 2 After adding a fuel stabilizer run the engin...

Page 26: ...rrosion Unless all fuel has been drained from the fuel tank leave the fuel valve lever in the OFF position to reduce the possibility of fuel leakage Place the pump on a level surface Tilting can cause fuel or oil leakage With the engine and exhaust system cool cover the pump to keep out dust A hot engine and exhaust system can ignite or melt some materials Do not use sheet plastic as a dust cover ...

Page 27: ...27 system can burn you and can ignite some materials Keep the pump level when transporting to reduce the possibility of fuel leakage Move the fuel valve lever to the OFF position ...

Page 28: ...h fuel flooded engine Dry and reinstall spark plug Start engine with throttle lever in FAST position 4 Take engine to an authorized servicing dealer or refer to shop manual Fuel filter clogged carburetor malfunction ignition malfunction valves stuck etc Replace or repair faulty components as necessary Engine Lacks Power Possible Cause Correction 1 Check air filter Air filter clogged Clean or repla...

Page 29: ...ure suction and discharge head Excessive head Relocate pump and or hoses to reduce head 4 Check engine Engine lacks power See page 26 Low Pump Output Possible Cause Correction 1 Check suction hose Hose collapsed damaged too long or diameter too small Replace suction hose Air leak at connector Replace sealing washer if missing or damaged Tighten hose connector and clamp Strainer clogged Clean debri...

Page 30: ... inch Discharge port diameter 80mm 3 inch Suck Grade m 7 5 Lift m 60 25 Pump Volume of Flow m h Model DH212 Type 4 Stroke Displacement cc 212cc Fuel tank capacity L 3 6 Oil capacity L 0 6 Engine DPT50 50mm 2 inch 50mm 2 inch 7 5 30 30 DH212 4 Stroke 212cc 3 6 0 6 ...

Reviews: