background image

XDVDN8190

 OPERATION

29

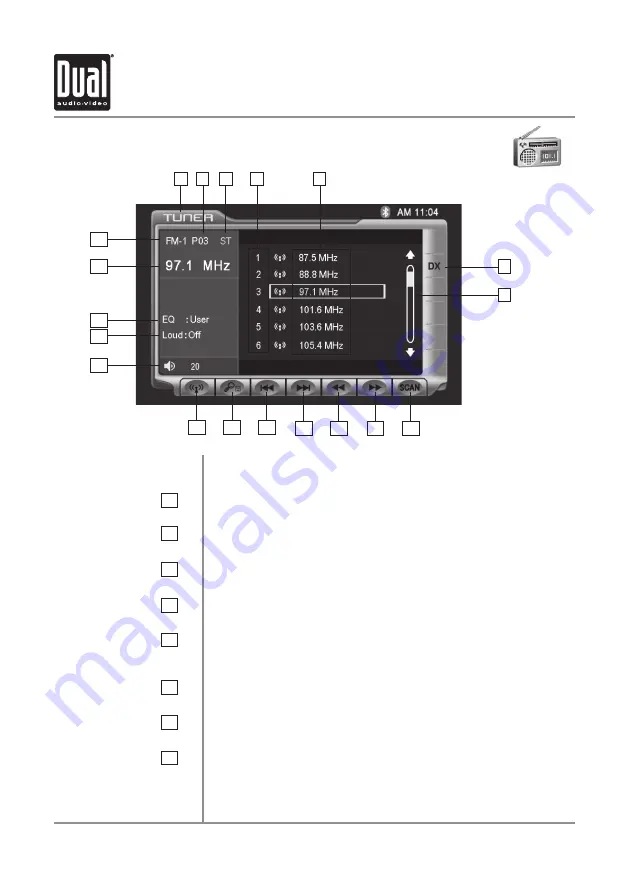
Tuner Mode

From the main menu, touch TUNER icon on the screen to select AM/FM Tuner 

mode.

Current Source Indicator


Displays source currently playing.

Preset Number Indicator


Shows what preset has been selected.

Stereo Indicator


Shows that the frequency selected is received in stereo.

Preset Number List Display


Shows the preset list by preset number.

Preset Station List Display


Shows the preset station list by frequency. Touch frequency to  


select a preset. Touch and hold frequency to store presets.

Local / DX Tuning Mode


Shows when local or distance tuning is on.

Preset Display Scroll Bar


Allows scrolling of preset list.

Tuner Scan


Touching this icon will scan through all available stations in the  


current band.

10

1

6

7

2

3

4

5

11

12

13

14

15

17

18

19

1

6

7

2

8

3

4

5

16

AM/FM Tuner Operation - OSD Overview

8

9

Summary of Contents for XDVDN8190

Page 1: ...splay of the in dash unit will not operate while the vehicle is moving This is a safety feature to prevent driver distraction In dash DVD video functions will only operate when vehicle is in Park and the parking brake is engaged It is illegal in most states for the driver to view video while the vehicle is in motion Safety Notes TOUCH ...

Page 2: ...ION INC including its licensors assignees subsidiaries affiliated companies and the respective officers directors employees shareholders agents authorized dealers or sales agents and representatives of each of them from and against any liability loss injury demand cost expense or claim of any kind of character including but not limited to attorney s fees arising out of a any use or possession of t...

Page 3: ...losed Control Locations Monitor Open Control Locations Remote General Operation General Setup Menu Setting the Clock Anti theft Code Screen Setup ASP Configuration AM FM Tuner Operation Warning Statement DVD Operation DVD Setup CD Operation MP3 WMA Operation SD Card JPEG Operation Media Compatibility Information iPod Operation Bluetooth Operation Navigation Operation Rear Zone Audio Operation Warr...

Page 4: ...k and or the parking brake is not fully engaged When installing this unit the installer must connect the parking brake detect wire Yellow Blue Lead to the parking brake mechanism in order to make the parking brake lock out feature operable DO NOT simply ground the parking brake detect wire to a metal portion of the vehicle Failure to properly install the parking brake lock out feature could lead t...

Page 5: ...e the vehicle is moving Find a safe place to park and engage the parking brake 9 If you experience problems during installation consult your nearest DUAL dealer 10 If the unit malfunctions reset the unit as described on page 10 first If the problem still persists consult your nearest DUAL dealer or call tech assistance 1 866 382 5476 11 To clean the monitor wipe only with a dry silicone cloth or s...

Page 6: ...tabs to secure Connect wiring harness and antenna as shown on pages 6 7 Consult a qualified technician if you are unsure Certain vehicles may require an installation kit and or wiring harness adapter sold separately Test for correct operation and slide unit into mounting sleeve Attach unit to mounting sleeve using supplied 1 Phillips screws Snap trim ring into place Mount the iplug adapter to any ...

Page 7: ...lean the mounting location thoroughly before attaching the antenna The antenna uses a powerful magnet and requires no adhesive to apply Do not slide the antenna during positioning as damage to the painted surface can occur Once the antenna is mounted carefully plan the cable route to the XDVDN8190 Notes Do not install the GPS antenna inside the vehicle as this will reduce reception significantly T...

Page 8: ...ll audio modes and must be connected to an external amplifier Center output The CENTER audio output Gray RCA is only active in DVD 5 1 6 channel audio modes and must be connected to an external amplifier Rear view camera A rear view camera not included can be used with the CAMERA input Need help Call our Technical Service Hotline 1 866 382 5476 ...

Page 9: ...t use the IR Remote control you must first pull the battery insulation tape out To insert or replace the battery Remove the battery holder Remove the battery from the battery holder Install the new battery Make sure to keep the side up Insert the battery holder CAUTION Do not store battery with metallic objects or materials IR Remote Preparation ...

Page 10: ... Mute Mode Rear Zone Audio On Off Infrared Sensor Power Volume 8 10 11 12 13 14 15 Control Locations Monitor Closed 16 17 18 2 6 5 4 7 8 9 1 18 17 15 14 13 12 16 10 11 3 9 NOTE Secondary LCD only functions when TFT monitor is closed LOCAL indicator icon will be off when DISTANCE DX is selected STEREO radio station indicator Displays TRACK time TUNING frequency MP3 ID3 info CLOCK information LOUDNE...

Page 11: ...ormal operation or if the unit is inoperable press the RESET button located on the front bottom right corner of the unit The unit will reset the main processor but not the default settings Note Use the tip of a pen to access the reset button To restore the factory default settings refer to page 19 Insert SD card to access Navigation software MP3 WMA or JPEG files The card will click into place whe...

Page 12: ...rotary while the volume is muted will cancel the mute function Note To program the default volume level only up to level 20 when the unit is turned on turn the rotary to the desired level then push and hold the rotary for 3 seconds to program the current volume level Monitor OPEN Notes The angle can also be manually selected via the screen setup menu The color of the LCD monitor varies between vie...

Page 13: ... Press CLOSE to open or close the monitor Be careful not to not touch or obstruct the monitor movement during the open close sequence or permanent damage could occur Press to display DVD disc information in DVD mode Holding this button for 3 seconds brings up the Brightness setting which can be adjusted by pressing the ANGLE p q buttons turning the rotary encoder or by pressing the t or u buttons ...

Page 14: ...own 16 17 18 19 20 21 22 23 24 25 26 27 28 29 30 Root Repeat Chapter Track Seek Tune Down Chapter Track Seek Tune Up Fast Reverse Manual Tune Down Fast Forward Manual Tune Up Zoom Audio Angle Music mode iPod only Sub Title Video mode iPod only 31 32 33 34 35 36 37 38 39 40 4 3 2 1 The remote control uses one 3 volt Lithium CR2025 battery For best performance replace only with CR2025 or equivalent ...

Page 15: ... DVD mode Press to increment BAND or to STOP while in DVD MP3 mode Enter AUDIO Setup mode Exit current menu Navigating system and DVD SD JPEG menus Enter the MAIN system menu BRIGHTNESS parameter setting for TFT Starts pauses playback or confirms settings Repeat playback from time frame A to time frame B Enters the title menu on DVD activates thumbnail view for JPEG Enters the main menu of the DVD...

Page 16: ...justment menu Press volume knob momentarily to advance to desired parameter to be changed Turn volume knob Q or P to adjust to desired level Press volume knob to advance to next selection or press and hold to exit Note 6 Channel audio is only adjustable when Full 6CH mode is selected Refer to page 47 for more details Press the SEL button Press the p or q buttons on the remote to select an item to ...

Page 17: ...rn volume knob Q or P to adjust the sharpness 0 minimum 20 maximum Turn volume knob Q or P to adjust the color 0 minimum 20 maximum Turn volume knob Q or P to adjust the contrast 0 minimum 20 maximum Turn volume knob Q or P to adjust the brightness 0 minimum 20 maximum Turn volume knob Q or P to adjust the tint 0 minimum 20 maximum Note Adjustments to Sharpness Color Contrast Brightness or Tint ar...

Page 18: ...ode Touch to access AUXILIARY A V INPUT mode Touch to access SD mode optional SD card must be inserted Touch to access SCREEN SETUP menu Touch to access GENERAL SETUP menu Touch to access ASP Config menu Touch to access CD DVD SETUP menu CD DVD must be inserted to function Touch to access REAR ZONE menu Touch to access MAIN menu The rotary encoder on the right side can also control touch screen fu...

Page 19: ...iate setting for your country S Amer1 S Amer2 Europe Clock adjust AM 00 00 See adjusting the clock on page 21 for more details Clock Mode 12Hr 12Hr PM 6 00 24Hr 18 00 Camera Image Normal Normal Normal Image Reverse Mirror camera input image 180 degrees Video Format Auto Auto System will auto detect NTSC or PAL NTSC For NTSC compatibility PAL For PAL compatibility TFT Auto Open Off On TFT panel wil...

Page 20: ...unction Bluetooth Off Off Turns off the Bluetooth functionality On Enables Bluetooth functionality Anti theft Code 0000 Must enter password to turn anti theft on or off Anti theft active Off On System will require a password if main battery power is removed for more then 40 seconds Off No password will be required if power is removed Load Factory defaults Yes Are you sure Yes Cancel Load all facto...

Page 21: ...ing Radio Frequency Step 1 Step 2 Step 3 Step 4 Step 5 Touch top left corner of screen Touch GENERAL icon Touch USA Touch the setting for your region Touch RETURN to exit L GENERAL Setup Adjusting Radio Frequency L L L 3 4 5 1 L 2 ...

Page 22: ...Clock Mode 1 Touch top left corner of screen 2 Touch GENERAL icon 3 Touch 00 00 area in the CLOCK row 4 Keypad will appear 5 Enter HOURS touch OK 6 Enter MINUTES touch OK 7 Touch AM or PM to set 8 Touch RETURN to exit For 24Hr format select 24Hr from CLOCK MODE then follow steps 1 8 L L L L 3 5 1 2 L 8 L 7 L 6 ...

Page 23: ...p 9 10 1 Touch top left corner of screen 2 Touch GENERAL icon 3 Touch down arrow icon 4 Touch 5 Enter 0000 then press OK 6 Touch Off 7 Touch On 8 Touch again 9 Enter your new 4 digit password then press OK 10 Touch RETURN to exit L L 1 2 L 3 L 4 Note it is recommended that you choose your own 4 digit password carefully write it down somewhere and keep in a safe location In the event you ever lose ...

Page 24: ...all other operations continue to operate Press any button except VOLUME or MUTE or touch the screen again to return to normal viewing L SCREEN Setup Menu L Settings Default Options Function Brightness 10 0 20 Press or on the remote or press the right side rotary once and rotate clockwise counter clockwise to adjust the Brightness to the desired setting Screen Tilt 4 1 6 Select 1 to 6 to adjust the...

Page 25: ...splay brightness This can also be set by pressing the INFO button on the front TFT panel Step 1 Step 2 Step 3 Step 4 Step 5 1 Touch top left corner of screen 2 Touch SCREEN icon 3 Touch to reduce brightness 4 Touch to increase brightness 0 20 is possible Default 10 5 Touch RETURN to exit L L 1 2 L 3 L 4 L 5 ...

Page 26: ...ng angle for your vehicle Step 1 Step 2 Step 3 Step 4 Step 5 1 Touch top left corner of screen 2 Touch SCREEN icon 3 Touch a number displayed in SCREEN TILT row 4 Touch desired angle for best viewing angle 1 6 is possible Default 4 5 Touch RETURN to exit L L 1 2 L 3 L 4 L 5 ...

Page 27: ... of screen 2 Touch SCREEN icon 3 Touch No in TS Calibration row 4 Then touch Yes 5 Touch and hold the pointers as indicated on the screen for 2 seconds each 6 Screen will automatically return to MAIN MENU touch RETURN to exit L L L L 3 4 1 2 Notes For proper calibration you must touch each pointer for 2 seconds If pointers are not touched properly the calibration sequence will start over until the...

Page 28: ...g the left side rotary Sets the bass center frequency for optimal bass effect Choices are 60 80 100 and 200Hz Sets the treble center frequency for optimal treble effect Choices are 10 12 5 15 and 17KHz Sets the subwoofer crossover frequency which affects the subwoofer s low pass filter and the SMALL speakers high pass filter Choices are 80 120 and 160Hz Notes This setting has no effect when the su...

Page 29: ...being the reference point default level Adjusts the relative volume in AM FM Tuner mode Adjusts the relative volume in DVD CD MP3 WMA mode Adjusts the relative volume in iPod mode Adjusts the relative volume in Bluetooth mode Adjusts the relative volume in Aux In mode Adjusts the relative volume in SD Card mode Adjusts the relative volume in Navigation mode Note that Aux In Gain SD Card Gain and N...

Page 30: ...ber List Display Shows the preset list by preset number Preset Station List Display Shows the preset station list by frequency Touch frequency to select a preset Touch and hold frequency to store presets Local DX Tuning Mode Shows when local or distance tuning is on Preset Display Scroll Bar Allows scrolling of preset list Tuner Scan Touching this icon will scan through all available stations in t...

Page 31: ...t strong station at a lower frequency This function can also be performed by pressing the corresponding key on the front panel or remote control Preset Scan Auto Station Tune Touching this icon will scan through all presets in the current band This function can also performed by pressing the AS PS button Holding this button for more than 2 seconds will automatically program the 12 strongest statio...

Page 32: ... continue tuning across multiple stations From the remote control Touch or to perform manual tuning Touch to tune to the next higher strong station Touch to tune to the next lower strong station From the remote control Press to tune to the next higher strong station Press to tune to the next lower strong station There are 36 FM and 12 AM presets available in 4 bands After finding a frequency that ...

Page 33: ... Press or to scroll through the presets When the correct preset is highlighted press OK Use the numeric keypad to enter the desired preset number Touch SCAN on the screen and it will tune you to all stations available with good reception for 10 seconds at a time Touch SCAN again to disable This function can also be performed by pressing the corresponding key on the front panel Local tuning lets yo...

Page 34: ... if the vehicle is not in Park and or the parking brake is not fully engaged When installing this unit the installer must connect the parking brake detect wire Yellow Blue Lead to the parking brake mechanism in order to make the parking brake lock out feature operable DO NOT simply ground the parking brake detect wire to a metal portion of the vehicle Failure to properly install the parking brake ...

Page 35: ... be heard while the vehicle is in motion without engaging the parking brake Follow these two initialization procedures carefully to allow video playback on on the XDVDN8190 front monitor There are two situations that start the PARKING BRAKE sequence First situation if vehicle is moving 1 Stop vehicle put in Park make sure PARKING BRAKE is off released 2 Depress PARKING BRAKE for 1 second 3 Release...

Page 36: ...ware encoded for other region areas than the region areas for which it has been designed The XDVDN8190 will play discs labeled Region 1 or All DVD region codes 1 USA Canada 2 Japan Europe South Africa Middle East 3 Rep of Korea Taiwan Hong Kong Parts of Southeast Asia 4 Australia New Zealand Mexico South America 5 Eastern Europe Russia India Africa 6 China Notes Some DVD discs can be played only i...

Page 37: ...f your specific DVD disc for other features Note If PARENTAL Lock is activated and the disc inserted is not authorized a 4 digit code must be entered and or the disc be authorized See RATING MENU on page 49 Note Only one disc can be inserted at a time Press the EJECT button If the disc loads abnormally or an system error occurs press and hold the eject button for 3 seconds to reset the loading mec...

Page 38: ...CH SCREEN areas as outlined below A area can be used in any mode to access MAIN menu A F areas can be used in DVD mode to access A Displays MAIN menu B Displays DVD disc information C Selects PREVIOUS chapter D Selects NEXT chapter E Displays the full DVD transport controls F Displays GOTO search menu L DVD Operation Touch Screen Controls L ...

Page 39: ...pter E Displays the full DVD transport controls F GOTO search menu L L L L L L AREA A Access MAIN Menu AREA B Displays Disc Information AREA C Selects PREVIOUS Chapter AREA D Selects NEXT Chapter AREA E Displays DVD Transport Controls AREA F DVD Search Note A DVD disc must be inserted to access these functions and features DVD Operation Touch Screen Controls ...

Page 40: ...ch touch changes speed from 2x to 4x to 8x to 20x then back to 1x play Fast Forward Touch the icon to fast forward at 2x speed Each touch changes speed from 2x to 4x to 8x to 20x then back to 1x play Repeat Touch the icon to repeat the current chapter or title This icon will remain highlighted until touched a third time to disable Repeat A B Touch the A B icon once to select a start point Touch it...

Page 41: ...he area and an on screen keyboard will pop up Use the keyboard to enter a title and chapter and touch OK This can be used to select a specific chapter in the current title a new title or a specific chapter in a new title For example to skip to a specific chapter within the current title touch the on the right and use the keyboard to enter a chapter number then touch OK To skip to a different title...

Page 42: ...des Note The Repeat Mode can only be changed while the DVD is playing Touch the A B icon once to select a start point Touch it a second time to select and end point The A B icon will illuminate and the DVD will then loop from the start point to the end point until touched a third time From the remote control Press A B to select a start point and stop point Press a third time to deactivate Touching...

Page 43: ... playing Touch Area B to bring up the DVD Disc Information which includes Current Total Titles and Chapters elapsed time for current title EQ Mode and Loudness setting current time and Rear Zone Indicator Press the PIC button to bring up the DVD Disc Information From the remote control Press the INFO button to bring up the DVD Disc Information From the remote control Press the ZOOM button to activ...

Page 44: ...lect LANGUAGE setup page Press to select desired disc subtitle language English French Spanish Auto Off DEFAULT Press to select desired disc audio language English DEFAULT French Spanish Press to select desired disc menu language English DEFAULT French Spanish LANGUAGE Setup Menu Disc Subtitle Audio Language DVD Menu L L L L Note A DVD disc must be inserted to access these functions and features L...

Page 45: ...desired channel The pink noise generator is used to set the relative speaker levels for multi channel playback Select On to activate dynamic range control Audio Setup Menu Pink Noise Dynamic Range Control Note A DVD disc must be inserted to access these functions and features L L Downmix 2 channel Settings Off DEFAULT Left Right L Off DEFAULT On L L DVD Setup Menu Audio Full 6CH 6 channel Settings...

Page 46: ...ired rear channel time delay The distance is defined in milliseconds Select On to activate audio down sampling The DVD audio output will be downsampled to 48kHz The original sampling frequency is preserved when Off is selected Center Control Rear Control Down Sampling L 5ms 4ms 3ms 2ms 1ms 0ms DEFAULT L 15ms 12ms 9ms 6ms 3ms 0ms DEFAULT L Off DEFAULT On ...

Page 47: ...m the following menus Press to select desired TV shape Select On to activate angle mark Press to select desired view mode Video Setup Menu TV Shape Angle Mark View Mode DVD Setup Menu Video Note A DVD disc must be inserted to access these functions and features NORMAL 4 3 WIDE 16 9 L L L L On DEFAULT Off FILL Original H FIT W FIT FIT to Screen DEFAULT Pan Scan 4 3 16 9 DEFAULT L L ...

Page 48: ...to select from the following menus Select desired speaker output mode Select size of front speaker Note Full 6CH mode must be selected to adjust the front speaker size Speaker Setup Menu Speaker Mode Front Speaker Size Note A DVD disc must be inserted to access these functions and features L L Full 6CH DownMix DEFAULT L Large DEFAULT Small L L DVD Setup Menu Speaker ...

Page 49: ...ker Note Full 6CH mode must be selected to adjust the surround speaker size subwoofer speaker and center speaker size Surround Speaker Size Subwoofer Speaker Center Speaker Size DVD Setup Menu Speaker Note A DVD disc must be inserted to access these functions and features L Large DEFAULT Small None L Present None DEFAULT L Large Small None DEFAULT ...

Page 50: ...Write the code down 3 Save in a safe place When unlock symbol is displayed select desired rating 1 Kid Safe 2 G 3 PG 4 PG 13 5 PG R 6 R 7 NC 17 8 Adult DEFAULT In the event you forget or loose your PARENTAL LOCK password enter 9991 L L L L Rating Setup Menu Enable Parental Lock Password Setting Parental Lock Password Rating Setting Parental Password Override Note A DVD disc must be inserted to acc...

Page 51: ...of tracks on the disc Disc Title Indicator Displays current disc title when available Track Title List Displays up to 6 tracks on the disc in order with track title when available Repeat Touch the icon to repeat current track This icon will remain highlighted until touched to disable Shuffle Touch the icon to shuffle all tracks on the disc This icon will remain highlighted until touched to disable...

Page 52: ... fast reverse at 2x speed Each touch changes speed from 2x to 4x to 8x to 20x then to 1x play Page Up Touch the icon to see the next 6 tracks on the disc Page Down Touch the icon to see the previous 6 tracks on the disc Stop Touch the icon to stop the song where it is Play Pause Touch the icon to temporarily stop or resume playback Volume Indicator Indicates current volume level controlled by rota...

Page 53: ...rack Access Previous Next Page After inserting a CD disc files will play in numerical order in the directory Touch to display keypad Enter desired track number and press OK Touch desired track for DIRECT TRACK access Touch to view UP DOWN pages of available tracks L L L L CD Operation ...

Page 54: ...racks Once highlighted simply touch the screen at the appropriate track Use the Rapid Dial rotary encoder to select desired track by rotating the right side rotary clockwise or counter clockwise Press to confirm ENTER From the remote control Press or to scroll through the tracks When the correct track is highlighted press OK Touch the icon to display a numeric keyboard Enter desired track number a...

Page 55: ...peat modes can not be used simultaneously and engaging one mode will cancel the other mode if active Touch SCAN on the screen to listen to all tracks on the CD for 10 seconds at a time starting from the first track on the CD The Scan button will be illuminated while Scan Mode is active When the button is illuminated touching it a second time will disable Scan Mode From the remote control Press TIT...

Page 56: ...older Displays the name of the currently selected folder Filename List Displays up to 6 songs in the current folder in order with filename File Type Indicator Displays type of song file either MP3 or WMA Repeat Touch icon to repeat current song or folder This icon will remain highlighted until touched a third time to disable Shuffle Touch icon to shuffle all songs on the disc This icon will remain...

Page 57: ... next 6 songs in the folder Page Down Touch the icon to see the previous 6 songs in the folder Information Displays available information for the current song Stop Touch icon to stop the song where it is Play Pause Touch icon to temporarily stop or resume playback Volume Indicator Indicates current volume level controlled by rotary encoder Rear Zone Indicator Displays current status of Rear Zone m...

Page 58: ...s to skip to the previous song Note Pressing once will return to the beginning of the current song Pressing it a second time will skip to the previous song To select a desired song from the filename list touch any of the displayed filenames from the list Use the up and down arrows on screen to scroll through the songs Once highlighted simply touch the screen at the appropriate name Use the Rapid D...

Page 59: ... song while Previous Song will return to the start of the current song and then a second press will return to the previously played song Touch the icon to repeat either a song or folder The first touch activates Song Repeat mode and a second touch activates Folder Repeat mode When either mode is active the icon will be illuminated and touching it a third time will disable Repeat Mode From the remo...

Page 60: ...splays the name of the currently selected folder Filename List Displays up to 6 songs in the current folder in order with filename File Type Indicator Displays type of song file either MP3 or WMA Repeat Touch the icon to repeat current song or folder This icon will remain highlighted until touched a third time to disable Shuffle Touch the icon to shuffle all songs on the disc This icon will remain...

Page 61: ...lable folder Page Up Touch the icon to see the next 6 songs in the folder Page Down Touch the icon to see the previous 6 songs in the folder Information Displays available information for the current song Stop Touch the icon to stop the song where it is Play Pause Touch the icon to temporarily stop or resume playback Volume Indicator Indicates current volume level controlled by rotary encoder Loud...

Page 62: ...ess to skip to the previous song Note Pressing once will return to the beginning of the current song Pressing it a second time will skip to the previous song To select a desired song from the filename list touch any of the displayed filenames from the list Use the up and down arrows on screen to scroll through the songs Once highlighted simply touch the screen at the appropriate name Use the Rapid...

Page 63: ...ng while Previous Song will return to the start of the current song and then a second press will return to the previously played song Touch the icon to repeat either a song or folder The first touch activates Song Repeat mode and a second touch activates Folder Repeat mode When either mode is active the icon will be illuminated and touching it a third time will disable Repeat Mode From the remote ...

Page 64: ... unless paused JPEG mode will automatically exit when the next file is not a picture or when STOP is pressed Touching this zone will bring up the Main Menu for the unit Touching this zone will skip to the previous file Stop Touch to stop viewing at the current file Rotate Right Touch to rotate the image 90º clockwise Rotate Left Touch to rotate the image 90º counterclockwise Touching this zone wil...

Page 65: ...ed a second time then playback stops completely and will restart from the beginning of the disc SD card From the remote control Press to stop the viewer Touch or to rotate the image 90º clockwise or counterclockwise From the remote control Press ANGLE to rotate the image 90º clockwise From the remote control Press the ZOOM button to activate Zoom Mode Each subsequent press of the button will chang...

Page 66: ...folders or folders that do not include MP3 WMA files are skipped This unit may not play files in the order they were recorded in Refer to your recording software s user s manual for more information ISO9660 level 1 ISO9660 level 2 Yellow Book MODE 1 Yellow Book MODE 2 FORM 1 Multi session Maximum files 1500 Maximum folder levels 8 MPEG 1 2 Audio Layer 3 ISO9660 standards Maximum nested folder dept...

Page 67: ...rst turned on MP3 files begin playback from the last position of the song when the unit is turned on 32kHz 48kHz 32kHz 48kHz 40kbps 320kbps constant Variable bit rates 40kbps 192kbps constant Variable bit rates Note Some files may not play or be displayed correctly depending on sampling rates and bit rates For best results use the following settings when burning an MP3 disc 128kbps or higher const...

Page 68: ...r and total number of songs groups Song Number List Shows the number of the song relative to the current group Artist Displays the name of the artist of the current song Song group List Displays up to 6 songs groups in order Scroll bar Allows scrolling of song or group list Video Mode Allows viewing of video files Repeat Touch the icon to repeat current song 15 14 1 2 3 5 16 17 19 20 21 22 23 24 4...

Page 69: ...Rewind Touch the icon to rewind at 2x speed Page Up Touch the icon to see the next 6 songs in the folder Page Down Touch the icon to see the previous 6 songs in the folder Album Displays the name of the album for the current song Stop Touch the icon to stop the song where it is Play Pause Touch the icon to temporarily stop or resume playback Volume Indicator Indicates current volume level controll...

Page 70: ...e Down on screen buttons can be used to preview the next previous pages From the remote control Press to display the next page Press to display the previous page Note that the Page Up Down buttons will not select a song but simply display more songs in the group and if another song is not selected within 5 seconds of the last press then the screen will return to the currently playing song group Fr...

Page 71: ... illuminated while Shuffle Mode is active When the is illuminated touching it a second time will disable Shuffle Mode Touch the icon to repeat a song When Repeat mode is active the icon will be illuminated and touching it again will disable Repeat Mode From the remote control Press to select Repeat Press it a second time to disable Repeat Note Shuffle and Repeat modes can not be used simultaneousl...

Page 72: ...r iPod photos or video will appear on the TFT Touch AREA F upper right screen to reconnect iPod to play music again L Notes VIDEO PHOTO FILES are only compatible with G5 iPod The iPod photo video display of the in dash unit will not operate while the vehicle is moving This is a safety feature to prevent driver distraction iPod photo video functions will only operate when vehicle is in Park and the...

Page 73: ... included with the song The following models are supported Third generation iPod Version 2 3 Fourth generation iPod Version 3 1 1 Fifth generation iPod Version 1 1 2 iPod Classic Version 1 1 2 iPod Touch Version 1 1 4 iPod Nano Third Generation Version 1 1 2 iPod Photo Version 1 2 1 iPod Mini Version 1 4 1 iPod Nano Version 1 2 0 Refer to your iPod instruction manual for details on how to obtain t...

Page 74: ... Indicator Displays source or current mode Talk button Press to answer an incoming call or to place an outgoing call Display Indicator Phone number display and call status indicator Bluetooth status indicator When the Bluetooth function is Off the indicator is black When the Bluetooth function is On and no phone is connected paired to the unit the indicator will flash blue When the Bluetooth funct...

Page 75: ...to cancel the pairing process See page 75 for more details Auto Answer Off Off You must press the Talk button to answer an incoming call On The head unit will automatically answer incoming calls Connect Manual Manual You must connect the phone to the head unit manually each time Auto The head unit will automatically connect to a previously paired phone See page 75 for more details Bluetooth Setup ...

Page 76: ...ed devices To search for this head unit from another device when already connected press Yes under the Pairing function The currently connected device will be disconnected and pairing to the new device will be possible It may also be possible to disconnect this head unit from another mobile device This unit can remember the last 4 paired mobile devices It is only possible to connect to one Bluetoo...

Page 77: ...isplayed during the retrieval process followed by The phone book is done Touch the desired name to call Press the page up down buttons to navigate through the pages It is possible to make a phone call three different ways 1 Enter the desired phone number using the keypad interface then press the Talk button 2 Enter the desired phone number using the numeric keypad on the remote control then press ...

Page 78: ...point 3 Arrive at destination The following options are found on the main navigation screen After several seconds of no activity the system will auto hide the Menu Bar to maximize the map view Press at any time to display the Menu Bar XDVDN8190 OPERATION Navigation Zoom in the map to show smaller area Zoom out the map to show larger area Return to the map to the current vehicle location Change the...

Page 79: ...nce the city and street name are selected start the route Go To or enter a specific street address House Number or cross street Intersection At this time the Setup Routing Criteria or Find POI Near Destination options can be utilized To start immediately select Start Route and navigation will begin Follow the voice prompts and highlighted maps to the destination The screen will also display the ti...

Page 80: ...is option to select a home address as the destination To set up a home address select Edit Favorites from the Navigation Main Menu see page 80 for detailed instructions Select this option to select an office address as the destination To set up an office address select Edit Favorites from the Navigation Main Menu see page 80 for detailed instructions Navigate to a specific location previously stor...

Page 81: ...f Interest search for a Point of Interest to set as the office address Address Book select an address book entry to set as the office address Leave a trail from the start point to the end point and name save the trail for future reference with the Trail Book option Choose Add and the unit will prompt for a trail name to be entered Once the name is confirmed the unit will remember the trail as it i...

Page 82: ...Heading Up North Up Display Clock ETA On Display Status Bar Display GPS Icon Display Scale Icon Display Compass Icon Display Next Maneuver Enlarged Intersection The following user input options can be controlled from this screen The icon indicates the option is turned on Day Night Settings Auto Day Night POI Icon Setup 1 32 mi 1 16 mi 1 8 mi Distance Unit Settings Miles Kilometers meters Miles yar...

Page 83: ...ith average speed and maximum speed Press to view the following trip information Average Speed Maximum Speed Total Trip Time Stopped Time Drive Time Elevation ETA Trip Odometer Digital Clock Current Speed Select this option to directly access the preset home address and the following options Start Route Setup Routing Criteria or Find POI Near Destination Select this option to directly access the p...

Page 84: ...lay the A V info bar for tuner mode for example If tuner mode is playing and the map is currently being displayed turn the left side rotary clockwise or counter clockwise Anytime the left side rotary is turned the following information is displayed at the top of the navigation mode Turn the left side rotary to display the current station preset number on the lefty if preset the current station fre...

Page 85: ...enu CD DVD must be inserted to function Touch to access REAR ZONE audio menu Touch to access MAIN source menu Rear Zone on off is only for the audio signal connected to the REAR ZONE RCA audio outputs Refer to page 6 for connection details The REAR ZONE video signal is always active and is the same signal as the in dash monitor except for Navigation mode Navigation can only be displayed on the in ...

Page 86: ... the product What to do 1 Before you call for service check the troubleshooting guide in your owner s manual A slight adjustment of any custom controls may save you a service call 2 If you require service during the warranty period you must carefully pack the product preferably in the original package and ship it by prepaid transportation with a copy of the original receipt from the retailer to an...

Page 87: ...8 mm diagonal measurement View angle up down left right 30 60 60 60 Resolution 480 W x 234 H Brightness cd m2 350 Contrast ratio 350 1 Elements 336 960 Operating voltage 11 16 VDC negative ground Speaker output impedance 4 8 ohms Line output voltage 2 Volts Line output impedance 200 ohms Chassis dimensions 7 x 7 x 2 178 x 178 x 51 mm Design and specifications subject to change without notice CEA 2...

Page 88: ...as audio but no video Parking brake safety circuit not connected Parking brake not applied Check connections at parking brake Apply parking brake as described on page 34 No video display when in reverse Reverse circuit not connected Vehicle is not in reverse Check connections at reverse lamp Select reverse gear DVD does not start playback Physical defect in media Wrong region Check media for scrat...

Page 89: ...ng tone volume is turned down Increase the volume of the ring tone using the rotary encoder during the ringing process MUTE function is activated on the head unit Press MUTE to cancel the mute function and resume audio Echo or noise is heard during a phone call Possible road noise or interior interference Close all open windows and turn off any fans or A C Microphone opening on the front panel is ...

Page 90: ...ted in the SD card slot Insert the proper navigation SD card into the SD card slot No GPS signal red icon The GPS antenna is not connected Check GPS antenna connection The GPS antenna cable is damaged Check for pinched or cut antenna cable The GPS signal is blocked such as inside a tunnel or garage Make sure the antenna has an unobstructed view of the horizon ...

Page 91: ...XDVDN8190 OPERATION 90 Notes ...

Page 92: ...Dual Electronics Corp Toll Free 1 866 382 5476 www dualav com 2008 Dual Electronics Corp All rights reserved NSA0708 V01 Printed in China ...

Reviews: