background image

XDVD8265 

OPERATION

27

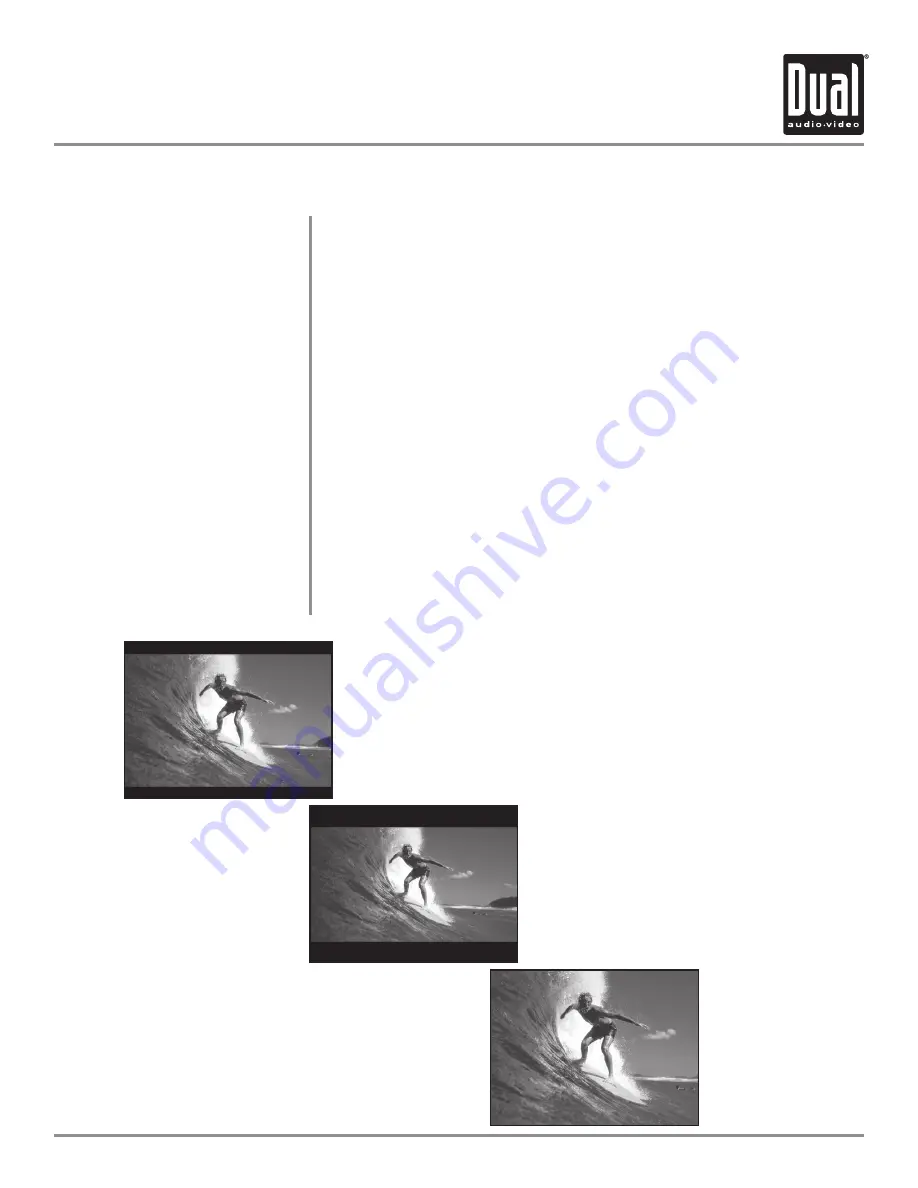
L-4:3 - Letterbox

Press 

DISP

 to select between the following:

TT --/-- CH ---/--- with elapsed title time
TT --/-- CH ---/--- with remaining title time
TT --/-- CH ---/--- with elapsed chapter time
TT --/-- CH ---/--- with remaining chapter time
Display Off

Press 

ZOOM

 to increase/decrease the image size from 2X, 3X, 4X or 1/2, 1/3, 

1/4 size. 

When the disc is stopped, use 1~0 on the remote control to enter the desired 
title.
 
When the disc is playing, use 1~0 on the remote control to enter the desired 
chapter. 

Press 

WIDE

 (default) or current aspect ratio to select between 

WIDE

L-4:3

, or 

P-4:3 

aspect ratio. Changing the aspect ratio affects the in-dash monitor and 

the video output signal. 

Display Status

Zoom

Direct Title Access

Direct Chapter Access

Aspect Ratio

DVD Operation

WIDE - 16:9

P-4:3 - Pan & Scan

Summary of Contents for XDVD8265

Page 1: ...he in dash unit will not operate while the vehicle is moving This is a safety feature to prevent driver distraction In dash DVD video functions will only operate when vehicle is in Park and the parking brake is engaged It is illegal in most states for the driver to view video while the vehicle is in motion Safety Note ...

Page 2: ...ll play discs labeled Region 1 or All DVD region codes 1 USA Canada 2 Japan Europe South Africa Middle East 3 Rep of Korea Taiwan Hong Kong Parts of Southeast Asia 4 Australia New Zealand Mexico South America 5 Eastern Europe Russia India Africa 6 China 2 3 4 8 9 10 11 12 16 17 19 20 21 22 23 24 27 28 29 30 31 32 33 34 35 Back Cover Page DVD Region Management Safety Information Precautions Mountin...

Page 3: ...e is moving Find a safe place to park and engage the parking brake 9 If you experience problems during installation consult your nearest DUAL dealer 10 If the unit malfunctions press the reset button first If the problem still persists consult your nearest DUAL dealer or call tech assistance 1 866 382 5476 11 To clean the monitor wipe only with a dry silicone cloth or soft cloth Do not use a stiff...

Page 4: ...ed universal mounting brackets Attach left and right mounting brackets to the left and right sides of the XDVD8265 chassis See diagram on page 5 3 Front load using mounting sleeve Install mounting sleeve into opening bending tabs to secure Connect wiring harness and antenna as shown on pages 6 7 Consult a qualified technician if you are unsure Certain vehicles may require a wiring harness adapter ...

Page 5: ...s TYPICAL REAR LOAD ISO DIN MOUNTING TYPICAL REAR LOAD MOUNTING USING UNIVERSAL MOUNTING BRACKETS TYPICAL FRONT LOAD MOUNTING USING MOUNTING SLEEVE AND TRIM RING Mount factory radio brackets to the chassis using the supplied M5 x 6 mm screws ...

Page 6: ...ernal amplifier not included to hear center channel audio Subwoofer output The subwoofer audio output Black RCA is active in all audio modes Video output The video output Yellow RCA provides composite video output for rear monitors etc Rear view camera The rear camera input Black RCA can be connected to an optional rear view camera Wiring Notes ...

Page 7: ... Brown lead connects to the vehicle reverse lamp circuit optional When reverse gear is selected the unit will automatically select rear view mode and display the image on screen This will allow the driver to view images from a back up camera optional connected to the dedicated rear camera input Note The Rear View camera must be set to ON to view images when reverse gear is selected See page 20 for...

Page 8: ...eparate Audio Video inputs allow the connection of a DVD player or game console A dedicated video output provides video signal for external monitors while a rear view camera can be connected to provide assistance when backing up your vehicle Visit your local DUAL dealer for more details All items shown above are optional and sold separately ...

Page 9: ...e Up Press to increase the volume level Volume Down Press to decrease the volume level Power Press to turn the unit on off Infrared Sensor TFT Touch Screen LCD 1 6 2 3 4 5 XDVD8265 OPERATION Control Locations Receiver 3 4 5 6 7 8 9 10 1 7 8 9 Caution Due to its highly technological design the XDVD8265 faceplate is NOT removable Do not attempt to remove the faceplate This model incorporates a motor...

Page 10: ... Aux 1 Band Display Aux 2 Setup Menu Radio DVD Zoom 14 15 16 17 18 19 20 21 22 23 24 25 26 Subtitle Volume Down Fast Forward Manual Tune Down 4 Way Left Play Pause Angle Key 9 Preset 5 Preset 6 Preset 1 Preset 2 27 28 29 30 31 32 33 34 35 36 37 The remote control uses one 3 volt Lithium CR2025 battery For best performance replace only with CR2025 or equivalent 1 2 3 4 5 6 7 8 9 10 11 12 13 14 15 1...

Page 11: ...2 inputs Modes of operation are indicated in the OSD Using the touch screen Gently press the upper right corner of the screen to display the OSD menu bar and press RADIO DVD AV1 or AV2 in the OSD menu bar to select the desired source The OSD menu bar appears all the time in radio mode Notes The vehicle must be in park and the parking brake applied to view video on the in dash monitor As a safety f...

Page 12: ...OSD menu bar Press the SETUP icon to enter general setup menu Press BACK or OK to exit the general SETUP menu The OSD menu bar appears all the time in radio mode OSD On Screen Display Menu Bar Radio Mode DVD CD Mode Navigation Mode Auxiliary Mode Setup Mode Auxiliary Mode Selection Volume Level Bar Volume Mute Icon Setup Menu Back OK ...

Page 13: ...m Press S RED to adjust the sub red color 15 minimum 15 maximum Press S BLUE to adjust the sub blue color 15 minimum 15 maximum Press DEFAULT to load default factory settings Press BACK to return to the previous menu page Press OK to save settings and exit the system setup menu Screen Menu Page Brightness Contrast Sub Red Color Sub Blue Color Default Settings XDVD8265 OPERATION General Setup Menu ...

Page 14: ...elected the menu item will be highlighted in blue The current bass treble level is indicated by a red bar Press BASS to adjust the bass 6 minimum 6 maximum Press TREBLE to adjust the treble 6 minimum 6 maximum Press BACK to return to the previous menu page Press OK to save settings and exit the system setup menu Audio Menu Page Bass Treble Audio Menu Page Bass Treble Adjustment Page ...

Page 15: ...R to hear Rear Right output only Press ALL to hear all channels default setting Press BACK to return to the previous menu page Press OK to save settings and exit the system setup menu Use the OSD 4 way navi to adjust the balance and fader From the remote control Use to move yellow box to POS Press OK to select POS then use to adjust the balance and fader Balance Fader Optional Adjustment Method Ba...

Page 16: ...s ON to hear confirmation beeps Press LOUDNESS to access the loudness adjustment page Press ON to activate the loudness curve at low volumes Press BACK to return to the previous menu page Press OK to save settings and exit the system setup menu Equalizer Adjustment Page General Setup Menu Equalizer Confirmation Beep Loudness Confirmation Beep Adjustment Page Loudness Adjustment Page ...

Page 17: ... page Press adjustment bar to select between LO RO LT RT 3D SURROUND and OFF Press SPDIF to access SPDIF adjustment page Press desired digital output mode OFF RAW or PCM Press BACK to return to the previous menu page Press OK to save settings and exit the system setup menu DVD Menu Page DVD Audio Downmix SPDIF DVD Menu Page DVD Audio Adjustment Page SPDIF Adjustment Page ...

Page 18: ...SE JAPANESE KOREAN RUSSIAN or THAI Notes Some DVD discs can be played only in certain playback modes according to the intentions of the software As the XDVD8265 plays discs according to their intentions some functions may not work as intended Please be sure to read the instructions provided with each disc DVD Preference Disc Audio Disc Menu DVD Setup Menu DVD Preference Page Disc Audio Adjustment ...

Page 19: ... PGB PGR R NC17 or ADULT The default password is 1234 Press PARENTAL then N to change the password 1 Enter old 4 digit password then enter a new 4 digit password 2 Enter the new 4 digit password again to confirm Press C to clear the entry Press BACK to return to the previous menu page Press OK to save settings and exit the system setup menu Parental Control Page Change Password Page Confirm Passwo...

Page 20: ...ystem reset function resets the DVD settings only See page 9 to reset the main unit Press DIMMER to access the dimmer adjustment page Press ON to decrease the level of TFT LCD backlighting Press NAVI to access the navigation operation page Press INTEGRATED to simultaneously view map and listen to another audio source Press SEPARATE for independent operation XNAV9525 sold separately Press GRID to a...

Page 21: ...21 System Setup Menu XDVD8265 OPERATION Mirror Image Adjustment Page System Reset Page Navigation Operation Page Revision Page Dimmer Adjustment Page Grid OSD Adjustment Page ...

Page 22: ...ily to seek the next strong station SEEK will illuminate blue Press or more than 2 seconds then release Press or momentarily to move radio frequency up or down one step at a time TUNE will illuminate blue From the remote control Press or to perform manual tuning Press FM1 FM2 or AM to select desired band From the remote control Press BAND to select desired band AM FM Tuner Mode Tune Down Station P...

Page 23: ...Press and hold the desired preset button 1 8 for more than 2 seconds The station can be recalled anytime by pressing the corresponding preset button 1 8 Press BSM in the OSD to automatically store the eight strongest stations in the current band Press FLAT default or current equalization curve to select desired preset EQ curve POP JAZZ CLASSIC ROCK or FLAT Storing and Recalling Station Presets Bes...

Page 24: ...matically when inserted The OSD grid menu appears for 5 seconds after the OSD menu providing an overview of the screen controls Gently press the screen in the appropriate area to perform desired function The OSD grid menu can be turned off in the system setup menu See page 20 for details may appear on the display during operation means that feature or operation is not permitted by the DVD player a...

Page 25: ... to perform the I function Press to perform the I function Press or to fast forward or fast reverse in 2x 4x 8x 16x and 32x modes Press II to cancel fast forward or fast reverse There is no audio output during fast forward or reverse modes Press II then press or to activate slow playback Slow playback speed includes I 1 2 1 4 1 8 and 1 16 in forward and I 1 2 1 4 1 8 and 1 16 in reverse Press II t...

Page 26: ...itle languages Press SUBTITLE from the remote control Press ANG while playing to switch between available viewing angles Press AUDIO while playing to switch between available audio languages Notes The subtitle language view angle and audio language features are only available when they are included on the disc The language and subtitle functions may not work with some discs and they may require so...

Page 27: ... 4X or 1 2 1 3 1 4 size When the disc is stopped use 1 0 on the remote control to enter the desired title When the disc is playing use 1 0 on the remote control to enter the desired chapter Press WIDE default or current aspect ratio to select between WIDE L 4 3 or P 4 3 aspect ratio Changing the aspect ratio affects the in dash monitor and the video output signal Display Status Zoom Direct Title A...

Page 28: ...playback Press I to skip to the beginning of the next track Press I to skip to the beginning of the previous track From the remote control Press to perform the I functions Press to perform the I functions Press to select desired track and press OK to confirm Gently press the screen to select desired track From the remote control Enter the desired track using the 1 0 buttons on the remote Play Stop...

Page 29: ...selecting between modes and when the unit is turned on off Press or to select desired page Press or to highlight desired track in blue and press ENTER to confirm The currently playing track is shown in green and highlighted in blue Some CD Rs and CD RWs may be incompatible with this unit depending on media type and recording method Fast Forward and Reverse Repeat Random Track Repeat Track Random O...

Page 30: ...rrent filename is displayed at the top of the screen MP3 WMA operation is similar to normal CD operation See pages 28 29 for details Press or to select desired page Press or to highlight desired file in blue and press ENTER to confirm The currently playing file is shown in green and highlighted in blue Press to navigate up one level Press NORM default or current playback mode to select between NOR...

Page 31: ...rs or folders that do not include MP3 WMA files are skipped This unit may not play files in the order they were recorded in Refer to your recording software s user s manual for more information ISO9660 level 1 ISO9660 level 2 Yellow Book MODE 1 Yellow Book MODE 2 FORM 1 Multi session Maximum files 999 Maximum folder levels 15 MPEG 1 2 Audio Layer 3 ISO9660 standards Maximum nested folder depth is ...

Page 32: ...kbps 320kbps constant Variable bit rates 64kbps 192 kbps constant Variable bit rates Note Some files may not play or be displayed correctly depending on sampling rates and bit rates This model does not display MP3 WMA tag information For best results use the following settings when burning an MP3 disc 128kbps or higher constant bit rate 44 1kHz or higher sampling frequency For best results use the...

Page 33: ...s NAVI Mode AUX Mode Navigation Mode NAVI Mode Press AUX icon to select auxiliary input mode From the remote control Press AUX 1 or AUX 2 to select an auxiliary input Notes The vehicle must be in park and the parking brake applied to view video on the in dash monitor As a safety feature WARNING PICTURE OFF FOR YOUR SAFETY will show on the display when the vehicle s parking brake is not engaged AV1...

Page 34: ...f the product What to do 1 Before you call for service check the troubleshooting guide in your owner s manual A slight adjustment of any custom controls may save you a service call 2 If you require service during the warranty period you must carefully pack the product preferably in the original package and ship it by prepaid transportation with a copy of the original receipt from the retailer to a...

Page 35: ...e the parental lock level Default password is 1234 Use discs labeled Region 1 or All only IR remote does not work Dead battery Replace battery Excessive skipping Unit is not mounted correctly Check mounting sleeve Physical defect in media Check media for scratches BAD DISC appears on display Mechanism error Press eject or RESET WRONG DISC appears on display Focus error or disc is in upside down Pr...

Page 36: ...x R G B x 234 Brightness cd m2 500 Contrast ratio 300 1 Elements 280 800 Operating voltage 11 16 VDC negative ground Speaker output impedance 4 8 ohms Line output voltage 2 Volts Line output impedance 200 ohms Chassis dimensions 7 13 x 6 57 x 4 181 x 167 x 101 mm Faceplate dimensions 6 85 x 67 x 3 85 174 x 17 x 97 5 mm Design and specifications subject to change without notice CEA 2006 Power Stand...

Reviews: