background image


5.


Channel configuration 

1)


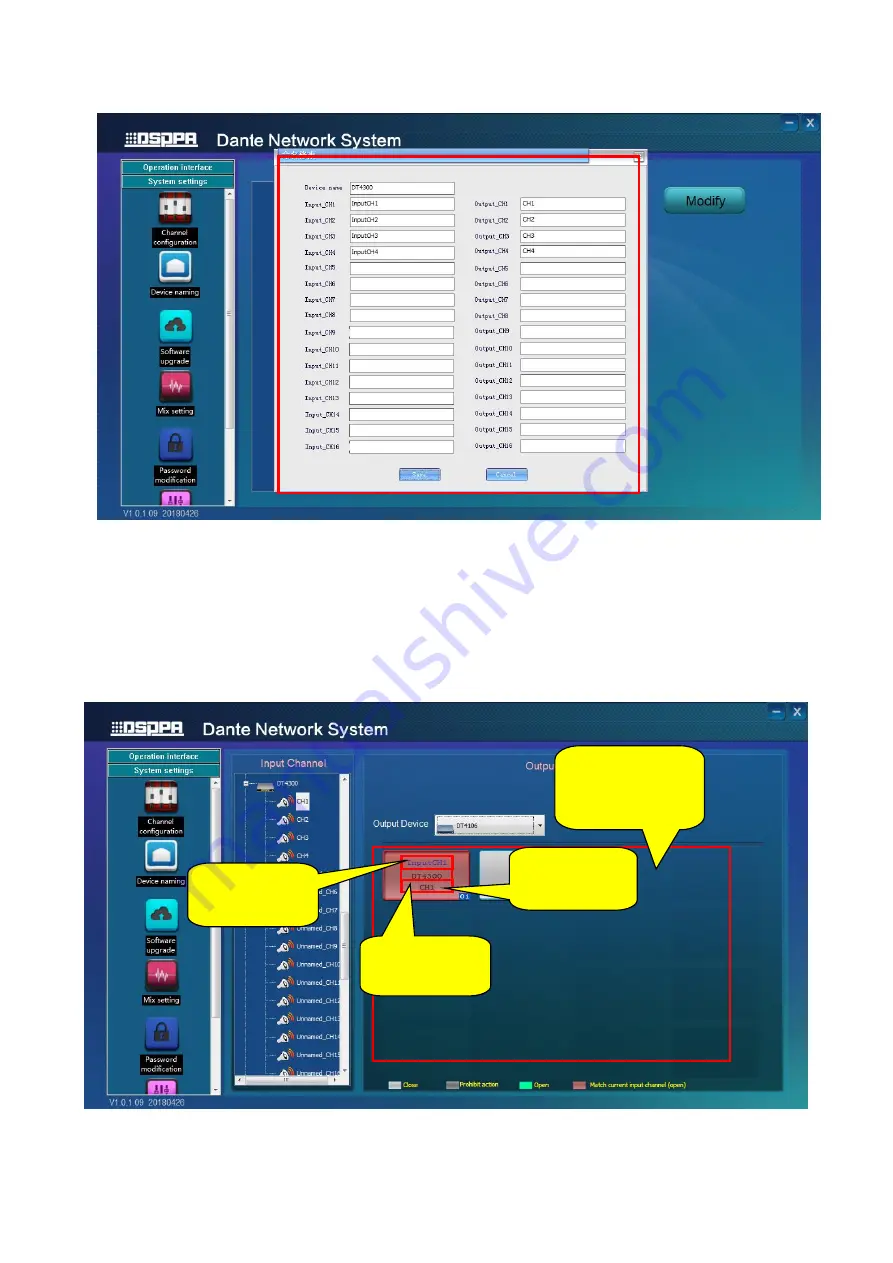
When configuring channels, you need to choose audio input channel of device in input channel (such as input 

CH1  of  DT4300  in  the  following  picture)  and  then  choose  corresponding  device  name  of  output  channel 

(DT4106 in the following picture). Next, click audio output CH1 to export the audio of CH1 of DT4300 to 

output channel CH1 of DT4106. 


2)


Input channel and output channel cannot be of the same device. If doing so, you will see “Prohibit action” 

3  


Corresponding 

device name 

Name  of  input 

channel 

Use your mouse 

wheel to switch 

output channel 

Name  of  current 

output channel 

Summary of Contents for DT4106

Page 1: ...ME CHANNEL B TREBLE BASS 12 15 18 6 0dB 3 27 VOLUME 9 21 TREBLE 24 CHANNEL A 0 2 2 6 10 8 6 10 8 BASS 4 4 Public Address Amplifier DT4106 CLIP SIGNAL PROT OPEN 电源 POWER I O User s Manual Welcome to use DSPPA public address system For the better use of this product please read this instruction carefully prior to use Guangzhou DSPPA Audio Co Ltd http www dsppatech com ...

Page 2: ...mely cold or hot Please do NOT place any heavy article on this equipment Please operate switches buttons or external audio source carefully Please prevent foreign matters such as paper metal etc entering the equipment through the gaps or opening in such cases please cut off the power supply immediately Do NOT attempt to remove any internal component from the equipment or to modify the equipment in...

Page 3: ... panel 2 3 Connection Diagram 3 3 1 System connection 3 3 2 Device connection 4 4 Operation Instruction 4 4 1 PC interface operation instruction of Dante control system 4 4 2 PC Dante ID setting 17 5 Connection Instruction 20 5 1 Connection diagram 20 5 2 Input connection 20 5 3 Output connection 20 Safety Precautions 21 Matters needing attention 21 Packing List 22 Specification 22 ...

Page 4: ...splay of working status Compulsory input interface short circuit three wire output Dual network interface support cascade with other amplifiers Signals of 2 2 4 4 and 16 16 Dante network interfaces and Dante MIC could be transferred to this device through network 2 Description of Appearance 2 1 Description of front panel 24 21 9 27 3 0dB 6 18 15 12 4 4 8 10 6 8 10 6 2 2 0 4 4 8 10 6 8 10 6 2 2 0 4...

Page 5: ...o Co Ltd PRIMARY SECONDARY 3 2 1 4 5 6 7 8 9 10 11 12 1314 15 16 1 Channel B output compulsory input terminal R 2 Channel B output hot end HOT 3 Channel B output public side COM 4 Channel A output public side COM 5 Channel A output hot end HOT 6 Channel A output compulsory input terminal R 7 Heat dissipation port 8 Channel B compulsory input terminal 9 Channel B audio input TRA 10 Channel B audio ...

Page 6: ...50V F4AL250V 200V 70V RISK OF ELECTRIC SHOCK DO NOT OPEN 请勿打开 以免触电 广州市迪士普 音响科技有限公司 Guangzhou DSPPA Audio Co Ltd PRIMARY SECONDARY CH9 CH10 CH11 CH12 CH13 CH14 CH15 CH16 G CH9 CH10 CH11 CH12 CH13 CH14 CH15 CH16 G CH1 CH2 CH3 CH4 CH5 CH6 CH7 CH8 CH1 CH2 CH3 CH4 CH5 CH6 CH7 CH8 220V 50Hz 40W F1AL250V PRIMARY SECONDARY G G G G G G G G G G G G G G G G G G G G G G G G G G G G G G Dante Amplifier DT4106 ...

Page 7: ...e Then input password original password 123456 You can check remember password and click Log in Use machine code provided by manufacturer to gain registration code unless there are only 7 days for trial Note 1 Please make sure that network is connected before connecting Dante amplifiers 2 If the switch or router has group play disabling function please enable this function before use For example p...

Page 8: ......

Page 9: ...cted then you can follow steps in the following picture 2 System setting You need to enter password before entering System setting interface Double click any menu to enter corresponding interface Click to enter system setting interface Menu To choose audio output channel Double click to enter the interface To choose audio input channel ...

Page 10: ...3 Binding IP address Please binding IP address before operating Steps are as follows 1 Click on the right corner of your computer and open Network and Sharing Center 2 Click Local connection ...

Page 11: ...3 Click Details to see your IP address 4 IPv4 address is the IP address of your computer ...

Page 12: ... will take effect after rebooting Next restart the software After restarting please pay attention whether the IP is the same as that of your computer Note you can also set language in this interface Click the Inverted triangle to choose between Chinese and English Then restart the software to make it effective ...

Page 13: ...ouble click Channel naming to name channels Beforehand you need to select corresponding device and click change After that click Save to save changes If you click Cancel your change will not be saved 点 击 对 话 框 的倒三角 1 2 3 ...

Page 14: ...nding device name of output channel DT4106 in the following picture Next click audio output CH1 to export the audio of CH1 of DT4300 to output channel CH1 of DT4106 2 Input channel and output channel cannot be of the same device If doing so you will see Prohibit action 3 Corresponding device name Name of input channel Use your mouse wheel to switch output channel Name of current output channel ...

Page 15: ...Both red and green indicate that the channel is open Red specially represents all matching output channel of current input channel Open ...

Page 16: ...p choose 16 16 network interface and check devices that need to be updated Then click Update Other devices please make sure that there is newest update package under update 16x16 Step choose other devices and check devices that need to be updated Then click Update To choose device type Open status of matching channel ...

Page 17: ... device unit and check the channel need to be set up Click Mix to open 16th channel Note only 16 16 network interface has mixing function 8 Change password Double click Change password to enter the interface Password is 6 bit ...

Page 18: ...ice You can adjust volume of selected devices in audio setting 2 Select the amplifier or speaker recognized by LAN and click to select device to the right side Then you can adjust the volume of DT4106 Note is to make all device on the left to be volume adjustable is to move single device to the All amplifiers and speakers recognized by LAN All available devices All selected devices ...

Page 19: ...cted device to the left and make its volume not adjustable is to move all selected devices to the left and make their volume not adjustable 3 Then go back to operation interface and click Amplifier audio adjustment to adjust volume of devices read by LAN ...

Page 20: ...ck DT4106 on the right list Then click and the volume of DT4106 will not be adjustable 4 2 PC Dante ID setting 1 IP setup Step1 After installing DanteSetID software right click and choose run as administrator to enter IP modify interface Current volume is at maximum level Volume adjustment button ...

Page 21: ...to make the change effective When you open the software again please check whether the IP of software is the same as that of your computer Setp3 IP of device should be in the same network segment with IP of PC If not you can change in the dialog box behind IP address and then click Set System will restart to make change effective You can change IP directly ...

Page 22: ...ed successfully Two devices cannot use the same ID address You can change ID after the device is detected by software First place your mouse in the dialog box Next input ID and then click Set Click Sure when you see Success Range of ID is 1 65535 Range of ID 1 65535 ...

Page 23: ...through Ethernet When this amplifier receive digital signal it will convert it into analog signal and export to speakers 5 3 Output connection Output terminal is on rear panel Cables could be connected by banana plug or shovel plug If speakers do not have controller you can connect to COM or HOT output terminals If it has connect R and HOT terminals of audio controller to corresponding terminals o...

Page 24: ...pair without permission from a professional personnel to avoid accident or additional damages to the device Please do NOT place any corrosive chemicals near or on the device 2 Matters needing attention Our company provides a three year free warranty service including free replacement parts over quality issues as from the date of purchase provided that the device is installed and used in accordance...

Page 25: ...ther notification Specification DT4106 DT4112 DT4125 DT4135 Rated output power 60W 120W 250W 350W Minimum electromotive force 1000mV SNR 85dB A weighted Adjustment rated of output voltage From full load to no load 3dB Frequency response 100Hz 20KHz 3dB Pitch 100Hz 12dB 10kHz 12dB THD 0 3 1KHz normal working status DT4300 INPUT CH1 900 1100mV Use PC software to operate Normal Indicator Power Clippi...

Page 26: ...emove the cover of the equipment otherwise you may get an electric shock Where necessary repair to the equipment should be conducted by qualified professionals All terminals on the device marked with are live and dangerous and should be connected by trained personnel This is connected to power source via the plug and any failure or danger occurs the user can disconnect the device from power source...

Reviews: