


17
PROGRAMMING GUIDE
Introduction
The PC2585 is fully keypad-programmable, and also supports downloading programming functions. The system’s
EEPROM memory can be reprogrammed thousands of times and will not lose program data even after total loss of
power. This section of the manual describes how to program the PC2585 using the system’s keypad.
Programming
With the system disarmed, enter [
Q
][8][Installer’s Code]; note that the system can only be programmed while it is
disarmed. The default Installer’s Code is 2585; the Installer’s Code should always be changed once programming
is complete. Be sure to record the new Installer’s Code for future reference! If the Installer’s Code is forgotten, the
system’s factory programming may be restored; refer to Programming Section [99] Factory Default.
When the Installer’s Programming Command is entered, the “Armed” light will come ON and the “Program” light will
FLASH to indicate that the system is ready for programming. If no keys are pressed for two minutes, the system will
return to the “Ready” mode. Enter the Installer’s Programming Command to re-enter the Programming Mode.
With the “Armed” light ON, enter 2 digits for the Section to be programmed. Note that Section [00] is reserved for
binary programming and is normally only entered on instruction from factory technical personnel. When the section
to be programmed is entered, the “Armed” light will be OFF, the “Ready” light will come ON, and the keypad will beep
3 times. The system is now ready to accept program data.
For sections containing 2- and 3-digit numbers, Zone Lights 1 through 4 will indicate, in binary format, the value of
the first digit in the section. Refer to “Binary Data Display” for instructions on reading the binary display.
To change the first digit, enter the new digit from the keypad. To leave the first digit unchanged, enter the same
number or press the [F] key to skip the digit. Once the first digit has been entered or skipped, Zone Lights 1 through
4 will display the value of the second digit. When all digits in a number have been programmed, the keypad will beep
twice and display the value of the first digit in the next number.
When all required data for a section is entered, the keypad will beep several times and the “Armed” light will come
ON. Enter the number of the next Section to be programmed.
It is not necessary to program all 2-digit numbers in a section. After entering a section, use the [F] key to skip to the
desired data; program the data, the press [#] to return to the Programming Mode. For 2-digit and 3-digit numbers,
all digits must be programmed before pressing the [#] key. Only data entered before pressing [#] will be changed.
AFTER EXITING THE INSTALLER’S PROGRAMMING MODE, THE SYSTEM MUST BE ARMED AND THEN
DISARMED TO ENSURE PROPER OPERATION.
Reviewing Programmed Data
• Enter the section to be programmed by entering the 2-digit section number.
• Zone Lights 1 through 4 will represent the value, in binary format, of the first digit in the section.
• Press the [F] key to advance the display to the next digit.
• At the end of the section, the keypad will beep several times and then return to the Program Mode so that another
section can be selected for review or programming.
Sections [20] through [26], [44] and [49]
These sections allow system options to be selected. Refer to the Programming Worksheets for information on which
options are represented by the Zone Lights in each section.
These sections are programmed by turning the Zone Lights ON and OFF. To turn a light ON or OFF, press a number
from 1 to 8. All lights in a section may be turned OFF at once by pressing [0]. When all programming selections have
been made, press [#] to save the changes and return to the program mode.
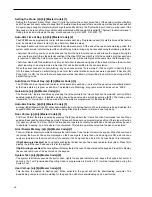
Binary Data Display
Zone Lights 1 through 4 are used to display the value, in binary format,
of the data at each digit as shown in the table shown here.
HEX Data Programming
Certain Programming Sections may require the entry of data in HEX
(hexadecimal, or base 16) format. HEX numbering uses the numbers 0 through 9 and the letters A through F.
The letters A through F are represented by the number keys 1 through 6. To enter data in HEX format, first press the
[
Q
] key; the “Ready” light will FLASH. Enter the HEX value, then press the [
Q
] key again to return to the normal entry
mode; the “Ready” light will stop flashing.
To enter HEX numbers: A
Enter [
Q
][1][
Q
]
D
Enter [
Q
][4][
Q
]
B
Enter [
Q
][2][
Q
]
E
Enter [
Q
][5][
Q
]
C
Enter [
Q
][3][
Q
]
F
Enter [
Q
][6][
Q
]
Enter [
Q
] before and after each digit. Note that the last digit in each section does not require the final asterisk ([
Q
]) to be
entered.
1
0
2 3 4 5 6 7 8 9 A B C D E F
Zone Light ON
Zone Light OFF
HEX data entry
Refer to HEX Data Programming
Zone 1
Zone 2
Zone 3
Zone 4
Value
Summary of Contents for PC2585
Page 55: ......