EN
Instructions
Customer Service / Importer:
DS Produkte GmbH, Am Heisterbusch 1, 19258 Gallin, Germany •
✆
+49 38851 314650 *)
*) Calls subject to a charge. The cost varies depending on the service provider.
All rights reserved.
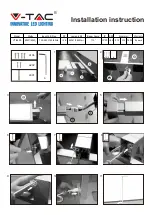
Set-Up
1. Unpack all parts and check the items supplied for complete-
ness (see the "Items Supplied and Article Overview" section)
and transport damage. If you
fi
nd any damage to the compo-
nents, do not use them (!), but contact our customer service
department.
2. Before using the article, remove all packaging materials and
any labels that may be on the article and are used for protection
during transportation or for advertising.
3. Place the lamp down carefully on a
table or on the
fl
oor. Cover this with
a cloth or similar item beforehand to
prevent damage.
4. Slightly undo the screw on the cable
hole (
D
) on the base so that you can
pull through the cable.
5. Screw the neck of the lamp onto the
fi
rst tube of the central pole (
A
).
6. Screw the other tubes of the central
pole together (
B
). Make sure when
you do this that you do not twist the
cable and repeatedly pull it through.
7. Place the central pole onto the base
(
C
). Make sure that no cable is
trapped.
8. Pull the cable so that you can screw
the middle bar onto the support foot.
Make sure that the cable protector is
also pulled through.
9. Pull the cable through the cable hole
until there is no longer any cable
getting in the way in the base.
10. Close up the cable hole with the
screw tightened on it (
D
).
Putting Into Operation
1. Place the lamp on a level,
fi
rm and dry surface.
2. Turn the lamp head to the position you want. You can adjust
the lamp to any position you want using the
fl
exible lamp neck.
3. Insert the mains plug into a properly installed mains socket that
is easily accessible.
4. You can now switch the lamp on and off using the On/Off
switch. To do this, press the switch once to switch on the lamp
and press it again to switch it off again.
Cleaning and Storage
CAUTION!
• Remove the mains plug from the plug socket before doing any
cleaning.
• Always allow the lamp to cool down completely before you
clean it or store it away.
• Do not use corrosive or abrasive cleaning agents or cleaning
pads for cleaning. These can damage the surface.
• Clean the lamp if necessary using a soft, dry cloth.
• Store the lamp in a dry, clean place that is not accessible to
children.
Technical Data
Article number: Z 06470
Model:
1400307-5W-PW-01
Mains voltage: 230 V ~ 50 Hz
Protection class: II
Disposal
The packaging material is recyclable. Please dispose of
it in an environmentally friendly manner and take it to a
recycling centre.
Dispose of the lamp in an environmentally friendly
manner. The lamp should not be disposed of alongside
general household waste. The light
fi
tting also must not be
disposed of alongside general household waste. Remove
it from the lamp and take it to a recycling centre.
You can obtain more information from your local authorities.
A
B
C
D
Z 06470_V2_10_2015