background image

safety instructions

•  Use only as a walking aid!
•  Use only on even and solid surfaces.
•  Maximum user weight: 300 lbs.
•  Regularly check the screws and fasteners on the I-Walker and retighten if 

necessary.

•  Use bag only for transport of objects and do not overload.  Maximum load: 11 lbs.
•  Do not expose the product to temperatures above 104°F for an extended period 

of time, as this can cause the I-Walker parts to overheat and burn the user.  

•  Please make sure the Rollator is fully opened, seat is down and the folding bar 

under seat is locked in the down position.

•  Be sure that both knobs are fully tightened and are at equal heights.  Test 

Rollator for stability before applying full weight to hand grips.

•  Test the brake lever before operating the Rollator.  When wheels are locked, lock 

bar on rear wheels should prevent wheels from turning.  When locks are released, 
the wheels should turn freely.

•  Always lock the brake lever before sitting and do not use seat when unit is on an 

incline or uneven ground.

•  Replace tires when significantly worn or damaged.

•  DO NOT MOVE ROLLATOR WHILE SEATED.  

This is a walking aid only 

and is not to be used as a transportation device.

cleaning / maintenance

Clean regularly by hand with a damp cloth.  Do not use aggressive detergents.

Rev.1.07.21.14

Summary of Contents for i-ambulateur

Page 1: ...i walker i rollator i ambulateur item s RTL10555BL RTL10555RD RTL10555SL www drivemedical com Rev 1 07 21 14...

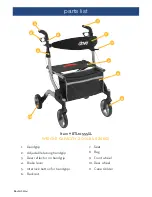
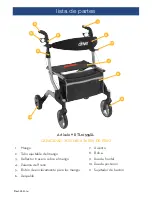
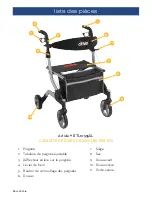
Page 2: ...g handgrip 3 Rear reflector on handgrip 4 Brake lever 5 Interlock button for handgrips 6 Backrest 7 Seat 8 Bag 9 Front wheel 10 Rear wheel 11 Cane Holder Rev 1 07 21 14 Item RTL10555SL WEIGHT CAPACITY...

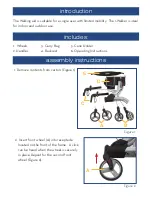
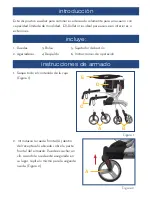
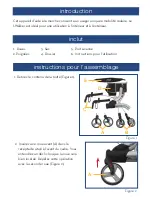
Page 3: ...ne Holder 2 Handles 4 Backrest 6 Operating Instructions introduction includes 1 Remove contents from carton Figure 1 assembly instructions 2 Insert front wheel A into receptacle located on the front o...

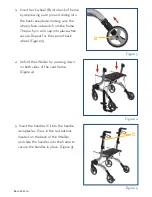
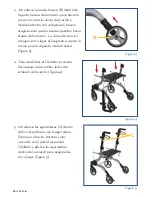
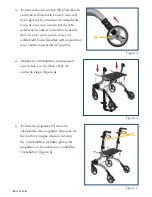
Page 4: ...to place when secure Repeat for the second back wheel Figure 3 4 Unfold the I Walker by pressing down on both sides of the seat frame Figure 4 5 Insert the handles C into the handle receptacles Press...

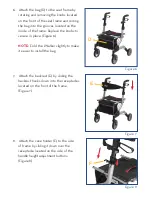
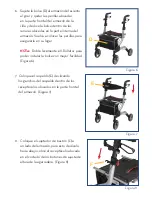
Page 5: ...ecure in place Figure 6 NOTE Fold the I Walker slightly to make it easier to install the bag Figure 6 D 7 Attach the backrest E by sliding the backrest hooks down into the receptacles located on the f...

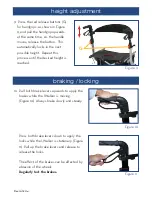
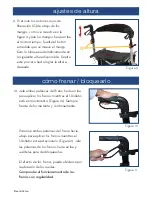
Page 6: ...ocess until the desired height is reached braking locking 10 Pull both brake levers upwards to apply the brakes while the I Walker is moving Figure 10 Always brake slowly and steady Press both brake l...

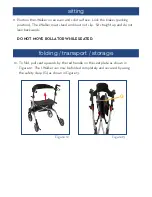
Page 7: ...t not slip Sit straight up and do not lean backwards DO NOT MOVE ROLLATOR WHILE SEATED folding transport storage 12 To fold pull seat upwards by the red handle on the seat plate as shown in Figure 12...

Page 8: ...in the down position Be sure that both knobs are fully tightened and are at equal heights Test Rollator for stability before applying full weight to hand grips Test the brake lever before operating th...

Page 9: ...dence in the materials and workmanship of our products and our assurance to the consumer of years of dependable service This warranty does not cover device failure due to owner misuse or negligence or...

Page 10: ...trasero sobre el mango 4 Palanca del freno 5 Bot n de enclavamiento para los mangos 6 Respaldo 7 Asiento 8 Bolsa 9 Rueda frontal 10 Rueda posterior 11 Sujetador de bast n Art culo RTL10555SL CAPACIDAD...

Page 11: ...ador de bast n 2 Agarraderas 4 Respaldo 6 Instrucciones de operaci n introducci n incluye 1 Saque todo el contenido de la caja Figura 1 instrucciones de armado 2 Introduzca la rueda frontal A dentro d...

Page 12: ...n encajar en su lugar al asegurarse repita lo mismo para la segunda rueda trasera Figura 3 4 Para desdoblar el I Rollator presione hacia abajo sobre ambos lados del armaz n del asiento Figura 4 5 Intr...

Page 13: ...lugar NOTA Doble levemente el I Rollator para poder instalar la bolsa con mayor facilidad Figura 6 7 Coloque el respaldo E deslizando los ganchos del respaldo dentro de los recept culos ubicados en la...

Page 14: ...te proceso hasta lograr la altura deseada 10 Jale ambas palancas del freno hacia arriba para aplicar los frenos mientras el I Rollator est en movimiento Figura 10 Siempre frente de forma lenta y conti...

Page 15: ...ar el I Rollator completamente y asegurarlo usando el cierre de seguridad G como se muestra en las Figura 13 11 Coloque el I Rollator sobre una superficie uniforme y s lida Bloquee los frenos posici n...

Page 16: ...ambas perillas est n completamente apretadas y que est n a la misma altura Realice pruebas para comprobar la estabilidad de su I Rollator antes de aplicar todo el peso sobre los mangos Revise los cand...

Page 17: ...nuestros productos y en nuestra aseveraci n al consumidor de a os fiables de servicio Esta garant a no cubre las fallas de la unidad debido al mal uso o negligencia por parte del due o o por el uso y...

Page 18: ...le 3 R flecteur arri re sur la poign e 4 Levier de frein 5 Bouton de verrouillage des poign es 6 Dossier 7 Si ge 8 Sac 9 Roue avant 10 Roue arri re 11 Porte canne Article RTL10555SL CAPACIT DE POIDS D...

Page 19: ...canne 2 Poign es 4 Dossier 6 Instructions pour l utilisation introduction inclut 1 Retirez le contenu de la bo te Figure 1 instructions pour l assemblage 2 Ins rez une roue avant A dans le r ceptacle...

Page 20: ...r que la roue soit solidement fix e R p tez cette op ration pour l autre roue arri re Figure 3 4 D pliez le I Ambulateur en appuyant vers le bas sur les deux c t s du cadre du si ge Figure 4 5 Ins rez...

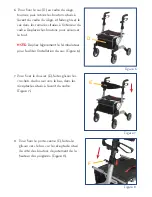
Page 21: ...er le tout NOTE Repliez l g rement le I Ambulateur pour faciliter l installation du sac Figure 6 7 Pour fixer le dossier E faites glisser les crochets du dossier vers le bas dans les r ceptacles situ...

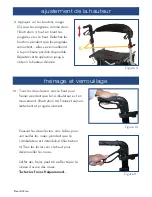
Page 22: ...ur est immobilis illustration 11 Tirez les leviers vers le haut pour d verrouiller les roues L effet des freins peut tre affect par le niveau d usure des roues Testez les freins fr quemment Figure 10...

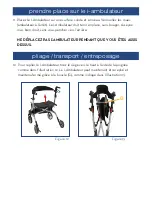
Page 23: ...z vous bien droit sans vous pencher vers l arri re NE D PLACEZ PAS L AMBULATEUR PENDANT QUE VOUS TES ASSIS DESSUS pliage transport entreposage Figure 12 Figure 13 G 12 Pour replier le I Ambulateur tir...

Page 24: ...en serr s qu ils sont la m me hauteur Testez la stabilit de l ambulateur avant de vous appuyer fermement sur les poign es Testez le syst me de verrouillage avant d utiliser l ambulateur Lorsque les ro...

Page 25: ...a fabrication et les mat riaux de nos produits et notre conviction que vous serez satisfait Cette garantie ne couvre pas les d fectuosit s dues un usage abusif ou la n gligence de l utilisateur ni l u...

Page 26: ...Rev 1 07 21 14...

Reviews: