background image

5

4

FOUNTAIN:  CLEAN ONCE A WEEK

FOUNTAIN DISASSEMBLY & CLEANING

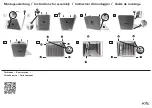
Unplug the fountain and disconnect the inline plug. (See Fig. 7)

Next, remove the upper dish and set aside. (See Fig. 8)

Remove the entire housing by lifting straight up and set aside. Empty 

all of the water out of the fountain.

1)

2) 

3)

With the housing removed and the fountain completely empty, turn 

the bowl over to loosen and remove the nut on the bottom of the 

bowl. (See Fig. 9)

Next, remove the intake tube from the pump by lifting straight up. 

Grab the Cord Pass-Thru Tube and lift up to expose the hole in the 

bottom of the bowl. Pull the electrical cord through the opening until 

completely removed. 

Once the electrical cord has been removed from the bowl, continue 

pulling the cord through the Cord Pass-Thru Tube. (See Fig. 10) 

4)

5)

6)

6)

The Fountain must be cleaned on a regular basis to 

continue working normally!

With the housing in place, affix the housing cap by aligning the 

arrow on the cap with the picture of a lock on the housing (See 

Fig. 5).  With these two items aligned, press down on the cap while 

simultaneously turning it to the right, this will secure the cap. 

Fig. 4b

Fig. 4a

7)

8)

9)

10)

11)

12)

Place the O-ring over the housing. (See Fig. 6) Next, slide the upper 

dish onto the housing. Rotate the upper dish until you are happy with 

how the spouts line up with the bottom bowl. 

Adjust the flow of water by turning the housing cap in between the 

two arrows marked on the side of the housing. The arrow shown with 

a “+” sign beneath it indicates maximum flow.


Place the fountain in a desired location. If placing on carpet, tile or 

wood flooring, always use a protective mat or other durable, water 

resistant surface to help protect your floor from splashing or dripping.

Fill the fountain with water by pouring water directly into the bottom 

bowl and upper dish. Fill the fountain with water to the MAX Fill Line.


Before you plug the fountain in, make sure the cord and your hands 

are dry. Plug the fountain into an electrical outlet.

Add water to the fountain as needed. Never let the water level fall 

below the MIN Fill Line or you may risk burning out the pump. 

Fig. 6

Fig. 5

Fig. 7

Fig. 8

Fig. 9

Fig. 10

Summary of Contents for Ceramic Lotus Pet Fountain

Page 1: ...tions or has been dropped or damaged in any manner Call customer service immediately for further instructions For a portable appliance To reduce the risk of electrical shock do not place or store appliance where it can fall or be pulled into a tub or sink Always unplug any appliance when not in use before putting on or taking off parts and before cleaning Never pull on the cord to remove the adapt...

Page 2: ...in place by the clip on the tube connector See Fig 3b 4 Housing U S Patents No 5 799 609 and 5 842 437 5 Fig 1 Housing Cap Replace the housing by aligning the large gap at the bottom of the housing with the raised bump on the bottom of the main bowl The gap in the housing is shown in Fig 4a next page and the raised bump is circled in Fig 4b next page The housing should rest flat and stable on the ...

Page 3: ... lock on the housing See Fig 5 With these two items aligned press down on the cap while simultaneously turning it to the right this will secure the cap Fig 4b Fig 4a 7 8 9 10 11 12 Place the O ring over the housing See Fig 6 Next slide the upper dish onto the housing Rotate the upper dish until you are happy with how the spouts line up with the bottom bowl Adjust the flow of water by turning the h...

Page 4: ...ishwasher only the plastic and ceramic pieces If possible it is recommended that you turn down the heat of the water inside the dishwasher See the Pump Maintenance section of this manual for detailed instructions on how to clean your pump 7 8 Pump Impeller Stator Intake Plate Stator Pull Tab Fig 11a Fig 11b REPLACING THE FILTER FILTERS CHANGE EVERY 2 to 4 WEEKS 1 Filters should be changed every tw...

Page 5: ...ace the pump inside the filter so that the cord rests on top of the filter not beneath it Fig 17 Fig 16 6 With the pump and filter in place insert the Intake Tube into the opening at the top of the pump Move the Tube Connector up the shaft of the Cord Pass Thru Tube slightly to make room for the Intake Tube See Fig 18 7 With both tubes in place slide the Tube Connector back down the shaft so that ...

Page 6: ...nt notices on the appliance Do not attempt repairs on the pump yourself If the plug of this device gets wet turn off the electricity to that outlet Do not attempt to unplug To avoid the possibility of the plug or outlet getting wet the outlet should always be above the level of the fountain Examine this appliance after installation Do not plug in if there is water on the cord or plug Do not operat...

Reviews: