Drill Master 750SP Operating Instructions Manual Download Page 11

TROUBLESHOOTING & TIPS

1. I aligned the drill bit and sharpened it, but no material gets
removed. 
You may have allowed the paddle 

to knock the

drill back into the chuck.  Carefully realign the drill in the  align-
ment tube 

again.  Make sure the drill is pushed all the way

against the drill stop (see Figure 8 on page 4). 

2. I’m getting negative relief. Negative relief is present when the
heel of the flute is higher than the cutting lip on a drill. When this
happens the drill will not cut.  To correct negative relief, set the
alignment tube to the non-split setting.  Turning lever number 1
counter clockwise will increase relief.  Realign the drill and
resharpen in the sharpening tube 

.  Maintain consistent inward

pressure to the grinding wheel during the chuck rotation. 

3. Why is the drill point off center? If the tip of the drill bit
appears to be sharpened off center, check the following items: 
a. Make sure that there are no particles between the chuck jaws
and the drill bit, which could hold it off center. b. Note if  the clos-
ing knob is closed firmly enough to hold the drill bit on center. 
c. During the sharpening process be sure not to push unevenly dur-
ing the rotations.  If the point split appears off center see #10.

4. Why don’t my drills align like the “correct” diagram? There
may be a burr on the drill shank (remove burrs with a flat file).
Also, the drill may be too loose or too tight in chuck.

TROUBLESHOOTING

5. What can I do about the flat spot between the lip and the
heel? 
The flat spots or chattering on a sharpened drill, are the
result of an incomplete or fast rotation of the chuck in the sharp-
ening tube 

.  To correct, apply firm, not excessive inward pres-

sure and rotate the chuck smoothly while sharpening.  Be sure to
complete the grind.  

6. The chisel edge on my drill bit is flat. During the alignment
process the pawls were gripping “ON” the flutes of the drill bit.
Re-align the drill bit making sure that the pawls are located in the
narrowest section of the flutes.

7. After sharpening, the grind finish on my drill is rough.
Grind finish is initially rough when sharpened by a new diamond
wheel.  Drill performance will not be noticeably affected howev-
er.  The finish will improve as the diamond coating breaks down.  

8.  My small drills are grinding off center. After aligning the
small drill, look into the back of the chuck and notice if the jaws
are straight to each other.  If the jaws are twisted in a spiral direc-
tion, grasp the closing knob and very carefully turn it counter
clockwise to straighten the jaws.  This procedure will center the
drill in the chuck. 

9. My  drill point was sharpened improperly. The most com-
mon cause of improper sharpening is not aligning the drill in the
chuck properly.  Key causes are: 1. Drill point not pushed all the
way to the drill stop. 2. Chuck not pushed all the way into the
alignment tube.  3. Drill not aligned in the pawls correctly.  
In order to correct these problems be sure the chuck is all the way
in the alignment tube 

with the flats entirely hidden.  The drill

point is against the drill stop and the pawls are located in the nar-
rowest section of the drill flutes.

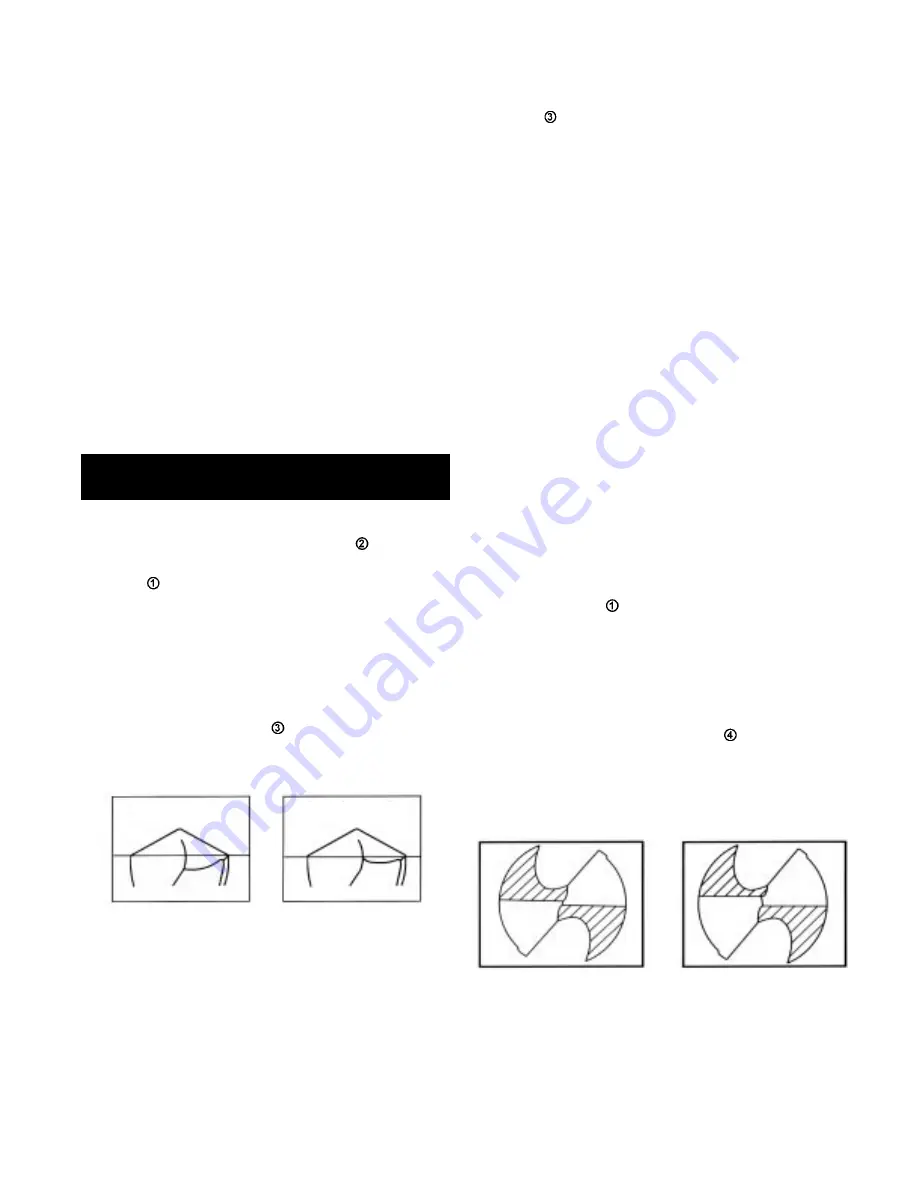
10. Why is my point split uneven? Figure 31 shows a drill point
that is under split and a drill point that is correctly split.  To cor-
rect an uneven point split take more material off of the under split
flute.  To do this, reinsert the chuck in the 

splitting tube with

the under split flute on top.  Repeat Step 2B (page 6) until split is
correct.  A correct split point should look symmetrical.  The two
parallel lines formed by the split should have a separation of .005
to .012 of an inch on the chisel angle.

Correct

Incorrect

If this guide and the video do not answer your questions call

Professional Tool Manufacturing LLC customer service at 

1-800-597-6170 or 1-541-552-1301.

Watch Professional Tool Manufacturing LLC

for new innovative products.

http://www.drilldr.com

Fig. 30

Reverse the grinding wheel before you replace it.
The grinding wheel supplied with the Drill Doctor® is
designed to give you long and trouble-free service, on
average over 200 sharpenings.  Eventually, you will
need to replace the wheel. However, before you replace
the wheel you can flip it over. Drill point burning and
an increase in drill bit sharpening time are indicators
that the wheel needs replacement. See page 7

You can take less material off of a drill bit. The
sharpener will remove approximately .015” to .025”
depending upon the point angle that is sharpened. To
align the drill bit to remove less material, merely insert
a shim or feeler gauge between the drill bit point and
the metal stop where the drill bit normally touches dur-
ing alignment.

10

Negative Relief

Correct Relief

Fig. 31

Summary of Contents for 750SP

Page 1: ... INFORMATION US Patents D385567 4 471 581 5 735 732 5 400 546 other Patents Pending MODEL 750SP CONTENTS Warranty 1 Congratulations 2 Quick Steps 3 Instructions 4 Maintenance 7 Quick Facts 8 Replacement Parts 9 Troubleshooting 10 ...

Page 2: ...LV s PROTECTIVE GLOVES As desired by user EYE PROTECTION Recommended see OSHA 29 CFR 11910 215 OTHER PROTECTIVE EQUIPMENT Use standard precautions for grinding operations SECTION IX STORAGE AND HANDLING PROCEDURES NORMAL STORAGE AND HANDLING Store in clean dry area away from chemicals NORMAL USE Use adequate ventilation see Section VIII PAGE 1 FORM OSHA 20 IMPORTANT SAFETY INSTRUCTIONS REMEMBER FO...

Page 3: ...ple of drill bits to get the point POINT ANGLE GAUGES WHEEL COVER PP01434PF SPLIT POINT TUBE STANDARD POINT POWER CORD ALIGNMENT TUBE PP01455PF ALIGNMENT TUBE HANDLE ON OFF SWITCH CHUCK KNOBS 3 4 CHUCK SA01750PA SHARPENING TUBE PP01426PA ANGLE CHANGE LOOP HANDLE PADDLE MASONRY SPLIT POINT DRILL DOCTOR MODEL 750SP Shown 1 2 CHUCK SA01500PA 3 4 CHUCK SA01750PA 1 2 CHUCK SA01500PA About the Drill Doc...

Page 4: ... chuck knob clockwise to tighten the jaws onto the drill bit Push the paddle back and remove the chucked drill see Figures 8 and 24 for correct alignment and terminology C Sharpening the drill bit point full instructions page 5 1 Turn the switch below the sharpening tube on Position the sharpen er so that you are looking at it from the perspective shown in C 1 Insert the chuck in the tube 2 Rotate...

Page 5: ...ment procedure Note This procedure can be used to increase or decrease relief on a drill bit See pages 5 and 10 for full discussion and appli cations STEP 2 Aligning Drill Bit For Sharpening A Turn the chuck knob counter clockwise CCW to open the chuck jaws until you can insert the drill bit into the chuck see Figure 5 With the drill bit in the chuck turn the chuck knob clockwise CW This will clos...

Page 6: ...nsistent contact with the cams and cam followers NOTE The sharpening tube is moving in and out due to the secondary or feed cam on the chuck riding against the top cam follower The initial grinding occurs when the valley of the feed cam rides against the top cam follower see Figure 12 If at the start of the grind the feed cam on the chuck is NOT touching the top cam follower then it is the result ...

Page 7: ... to hold the drill bit with one hand and carefully slide the chuck onto the drill bit with the other See Figure 17 Align the flats on the chuck with the flats in the alignment tube and push the chuck all the way in until the flats on the chuck are entirely hidden Tighten the chuck jaws onto the drill bit with the chuck knob Push the paddle back and remove the chucked drill bit D Look in to the bac...

Page 8: ...e the chuck checking that all of the jaws are in their respective grooves see Figures 21 and 22 Determining if a Wheel Change is Required A wheel may need to be changed if 1 Sharpened drill bits will burn or turn blue no matter how fast or slow you rotate the chuck 2 Upon inspecting the wheel by touching it it feels like there is not any abrasive on the lower portion 3 When sharpening the drill bi...

Page 9: ...lit point You can split either the 118 or the 135 degree points with Drill Doctor CARBIDE DRILL BITS This point angle is typically 130º to 135º Carbide is harder and more brittle than high speed steel and cobalt This type of drill is used for drilling tempered steels alloys glass Etc Carbide drill bits can be sharpened with your Drill Doctor PARABOLIC AND COBALT DRILL BITS Have a thicker web than ...

Page 10: ...olding the jaws and springs and the chuck knob Rotate the knob to make sure all dust grit is removed Reinstall chuck body to chuck knob ensuring the jaws are in the jaw grooves Slow and Fast Spiral Helix Drill Bits Raised Margin Drill Bits Negative Relief Using the stan dard drill setting align the bit in the chuck Visually check the alignment of the bit before sharpening Note the position of the ...

Page 11: ...are grinding off center After aligning the small drill look into the back of the chuck and notice if the jaws are straight to each other If the jaws are twisted in a spiral direc tion grasp the closing knob and very carefully turn it counter clockwise to straighten the jaws This procedure will center the drill in the chuck 9 My drill point was sharpened improperly The most com mon cause of imprope...

Page 12: ...eo in order to give you the information you need to effectively master its operation and get the satisfactory results you expect from Professional Tool Manufacturing LLC P O Box 730 Ashland OR USA 97520 Phone 541 552 1301 Fax 541 552 1377 http www drilldr com MODEL 500SP 3 32 1 2 CHUCK 1 2 DIAMOND WHEEL 110V 60Hz 1 75 AMP MOTOR MODEL 750SP 3 32 1 2 CHUCK 1 2 3 4 CHUCK 1 2 DIAMOND WHEEL CHUCK STORA...

Reviews: