49-120H F535, F535-230V, F535-230V UK, F535-230V AU
3
Legend Brands, Inc.
This unit is intended for household and commercial
use.
HANDLE THE UNIT CAREFULLY
Always operate the unit on a stable, level surface. Do
not drop, throw, or place where it could fall. Rough
treatment can damage the unit, and may create a
hazardous condition or void the warranty.
FUEL TYPE
The Dragon is designed to operate on diesel fuel. In
cold weather, s
ee “Cold weather recommendations”
below.
WARNING: Failure to use diesel fuel as specified
could cause injury and permanent damage to the
unit. It may also void the Dri-Eaz warranty.
For best results, purchase fresh fuel from a reliable
fuel distributor. Keep the Dragon fuel tank full to help
prevent the formation of condensation inside the tank.
When not using the Dragon for extended periods of
time, we recommend the addition of a diesel fuel fuel
stabilizer.
Cold weather recommendations
To optimize fuel quality and improve performance in
cold condtions use a diesel fuel stabilizer. Follow
product instructions.
Increasing temperature rise
In normal operating conditions (above 35°F/2°C), the
weather shield can be removed when operating the
Dragon. However, when operating the Dragon in
extremely low outdoor temperatures (below
35°F /
2°C) the temperature of the heated air can be
increased by leaving the weather shield in place during
operation. Note that removing the weather shield
increases airflow by about 100 CFM / 680 m
3
/hr but
will reduce the Dragon’s heat output.
BEFORE FIRST USE
ATTENTION: Installation of the unit shall be in
accordance with the regulations of the authorities
having jurisdiction.
Tools required
10 mm wrench or socket and handle
Flat-blade screwdriver
7/8 in. wrench for drain plug
The unit is shipped with an Accessory Kit that includes
the following 1) Heat outlet duct ring, 2) 25 ft. / 7.6 m
of heat resistant semi-rigid ducting, 3) a handle and 2
locking clevis pins, 4) weather shield, and 5) exhaust
stack and rain cap. A heat sensor cable is permanently
attached to the unit and is ready for use.
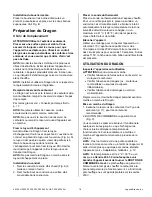
Install Handle
Insert handle into slots on the sides of the fuel tank.
Insert clevis pins on both sides and secure with clip.
See Fig. B.
Install Heat Outlet Duct Ring
Install on the heat outlet using the 8 screws provided.
Install Weather Shield
Place shield over lower posts first, then lower into
place over the the two upper pegs and tighten star
knob. See Fig. B.
Setting up the Dragon
Choosing a location
WARNING! Use the Dragon outdoors only. Place
the unit on a level, stable surface. Be sure to
chock the wheels securely to prevent the unit from
rolling. Choose a location away from high-traffic
areas, children and pets, and ensure there are no
obstructions to the air intake.
NOTICE:
Keep air intake vents clean and clear of any
obstruction. Avoid setting up unit in a location where
the intake could be blocked or restricted. Blocking the
air intake will cause the unit to
produce sooty exhaust,
potentially damaging the unit and the structure being
heated.
NOTICE:
Install and operate the Dragon in
accordance with all local and regional regulations.
Fill the fuel tank
The Dragon is shipped with the fuel tank empty.
Before operating, fill the tank with diesel. Do not
overfill.
In freezing conditions, see “Cold weather
recommendations,” p. 3.
Fig. B: Weather Shield and Handle Installation
Handle
: Slide handle
into slots and secure
with clevis pins
provided.
Weather Shield:
Place lower
brackets over
posts and lower
shield into place.
Secure with star
knob.


