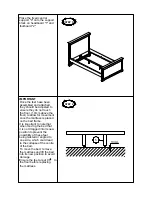
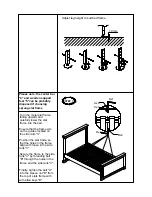
DREAMS SABINA BED Assembly Instruction Manual Download Page 5

10mm

5

IMPORTANT

Once the feet have been

assembled and attached,
they should be adjusted to
ensure they do not touch
the floor, (10mm above the

floor) to allow for movement
once the mattress is placed
on the bed frame.

It is important to note that

when moving the bed that

it is not dragged into its new
position to prevent the
possibility of these feet
being twisted or angled to

one side, which could lead
to the collapse of the centre
of the bed.

To move the bed, remove
the mattress and lift the bed

into its new position to avoid

damage.

Ensure the feet are at 90

 to

the floor before replacing
the mattress.

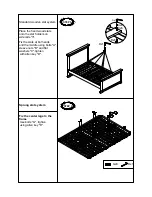
Place the fixed central

support "4" onto the support

block on headboard "1" and

footboard "2".

STEP 3

STEP 4

Summary of Contents for SABINA BED

Page 1: ...that you 3 have all the parts and the pack of fittings To ensure an easier assembly we strongly advise that all fittings are 4 only finger tightened during initial assembly Only upon completion of the...

Page 2: ...ote The following fittings will be found in the box which contains the Sprung Frame NOT with the bed frames Assembly Kit A B M6 x 45mm x 8pcs C Allen key 4mm x 2pcs D PARTS FITTINGS 1 1 piece 2 1 piec...

Page 3: ...1 and footboard 2 Assembly ASSEMBLY ITEM SABINA BED 2 1 3 3 Dx1 STEP 1 Tighten the bolts which are pre fitted on Head Foot End using allen key D Identify the slat system you have purchased Standard wo...

Page 4: ...Sprung slat system Turn to step 6 7 Ex1 Fx2 Gx8 x1 Attach central support 4 to support feet 5 Use bolts A and flat washers C tighten using allen key D STEP 2 4 5 5 Dx1 Ax2 Cx2...

Page 5: ...ng the bed that it is not dragged into its new position to prevent the possibility of these feet being twisted or angled to one side which could lead to the collapse of the centre of the bed To move t...

Page 6: ...EP 6 Ax6 Dx1 Bx6 Dx1 Standard wooden slat system Cx6 Sprung slat system Gx8 Dx1 F F E G D Fix the center legs to the frame Use bolts G tighten using allen key D Fix the slats at both ends and the midd...

Page 7: ...with those in the side rails 3 Secure the frame to the side rails 3 by threading bolt B through the holes in the frame and the side rails 3 Finally tighten the bolt A into the sleeve nut B the top of...

Reviews: