DREAM MULTIMEDIA Dreambox DM 7025 User Manual Download Page 14


- 14 -

U s e r   M a n u a l   D r e a m b o x   D M  7 0 2 5 


                                       english


Important notes about operation 


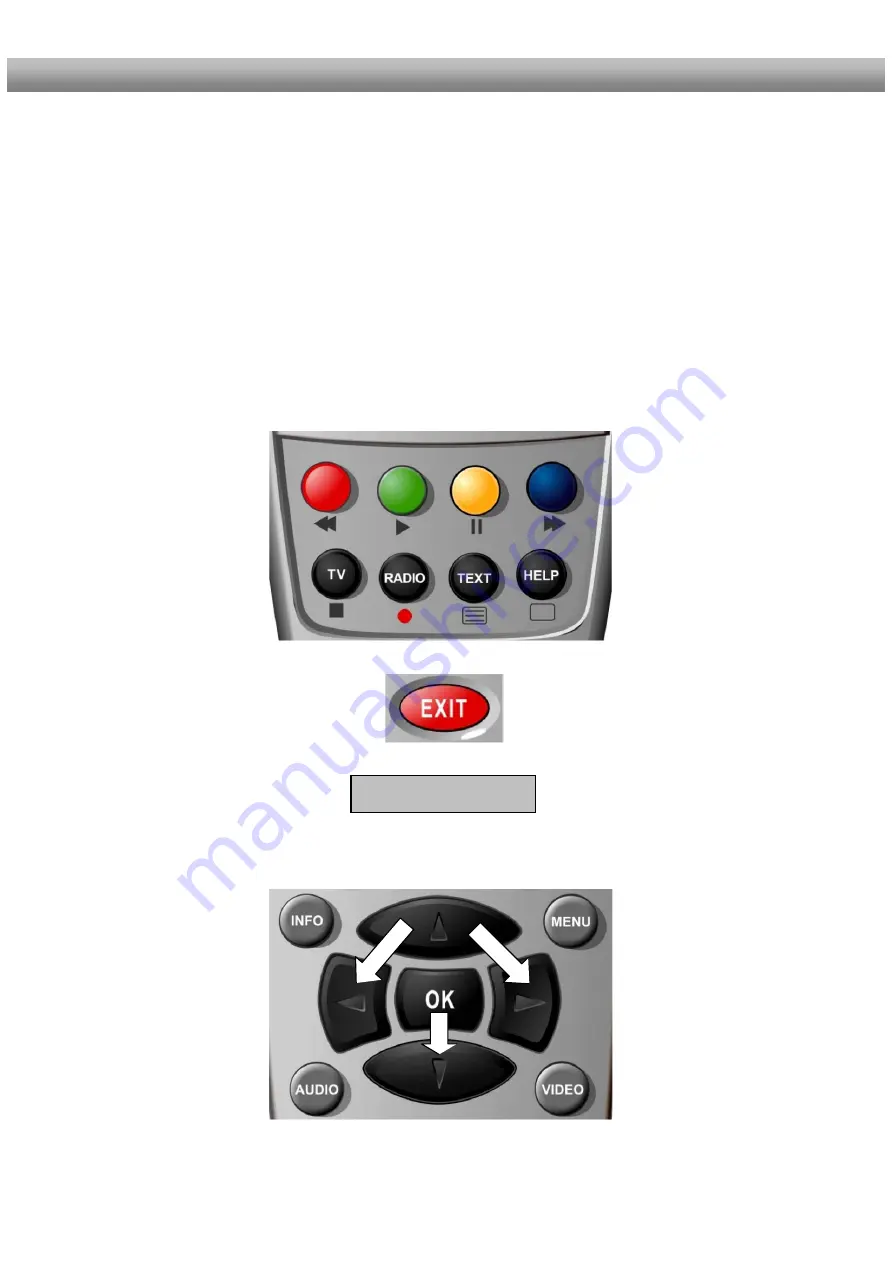
All functions of the Dreambox can be controlled via OSD-Menu (On-Screen-Display). This 
makes the handling of the Dreambox very easy for you. All options are indicated by four 
colored dots or beams (

red, green, yellow, blue

) in the OSD-Menu and can be started with 

the Option-Buttons on the Remote Control. 
 
Depending on the chosen Menu, these options do vary. 
 
The 

Options-Buttons

 of your remote control have multiple functions. You will notice control 

symbols below the four colored 

Options-Buttons

, the 

TV-

 and the 

RADIO-Button

. In PVR-

Mode these buttons are used to control the digital recording according to their symbols. 
Pressing the 

VIDEO-Button

 on your remote control will activate the PVR-Mode. The Infobar 

will also indicate this. It changes from showing the channel information to showing the control 
symbols for the PVR-Mode. (also see 

7.3.1. Instant recording


All Menus and Service 


lists are closed with 

 the 

EXIT-Button.


In general the menus are  


To get into a submenu 

controlled 

using 

the 


      you 

have 

to 

press 

the 

Navigation-Buttons


on 


OK-Button


your remote control.


Navigation-Buttons

Summary of Contents for Dreambox DM 7025

Page 1: ...Module Anschluss f r interne Festplatte Compact Flash Schacht Grafisches LC Display Twin Tuner steckbar Smartcard Leser Linux OS User Manual Digital satellite receiver for free and encrypted Digital...

Page 2: ...e control 13 2 Installation 2 1 Turning the device on 19 3 Start wizard 3 1 Language selection 20 3 2 Tuner setup 21 3 3 Service scan 21 4 Basic operation 4 1 Turning your Dreambox on and off 22 4 2 S...

Page 3: ...disk operation 7 1 Mounting guidelines 31 7 2 Management 37 7 3 Recording 38 7 3 1 Instant recording 38 7 3 2 Stop recording 38 7 3 3 Recording by timer 39 7 3 4 Timeshift 41 7 4 Watch a recording 42...

Page 4: ...9 2 Automatic scan 62 9 3 Manual scan 64 10 System information 10 1 Service 65 10 2 About Hard and Software 66 11 Troubleshooting 67 12 TV Mode setup 12 1 Programming the remote control 68 12 2 Device...

Page 5: ...any other liquid filled containers on top of the device Do not expose the device to dripping or splashing liquids Do not place open flame sources such as lit candles on top of the device The device m...

Page 6: ...rn it off In case you notice any damage to the power cord or power plug immediately disconnect the device from the power outlet In case the device was exposed to humidity immediately disconnect the de...

Page 7: ...gnated collection point for the recycling of waste electrical and electronic equipment The separate collection and recycling of your waste equipment at the time of disposal will help to conserve natur...

Page 8: ...ompleteness of the box s contents Included in box Remote control Dreambox DM 7025 1 User manual most recent version online http www dream multimedia tv de 2 Batteries 1 5V Mignon AA LR6 1 Power cord 1...

Page 9: ...Compact Flash Slot Smartcard Reader Channel up down Power button LC Display Remote control sensor Mains switch Mains connection Video out VCR Scart UHF Modulator in out USB port Digital audio out Mini...

Page 10: ...rd reader Insert your Dreamcrypt Smartcard with the golden chip facing down and forward into one of the two Smartcard reader slots Dreamcrypt is a registered trademark of Dream Multimedia Remote contr...

Page 11: ...ur Dreambox using a Scart cable Remember the VCR Scart is not designed to record a video signal from the VCR or DVD player UHF Modulator You can optionally connect your Dreambox to your TV via a coaxi...

Page 12: ...rial port RS232C Sub D 9 pol The Serial Port is used to update the operating system Please connect a serial null modem cable here LNB1 in DVB S Tuner Connect the coaxial cable from your LNB here LNB2...

Page 13: ...utton Power Button TV Mode Button Numeric Keypad Arrow Left Button Arrow Right Button Mute Button Volume Buttons Bouquet Buttons INFO Button EXIT Button MENU Button Navigation Buttons OK Button VIDEO...

Page 14: ...have multiple functions You will notice control symbols below the four colored Options Buttons the TV and the RADIO Button In PVR Mode these buttons are used to control the digital recording accordin...

Page 15: ...trol your preprogrammed TV It will shortly light up once your press the button See chapter 12 TV Mode setup Enter a service number to directly access the option by using the Numeric Keypad The service...

Page 16: ...ttons will jump back and forth between the bouquets If no OSD menu is visible on the screen and you are in TV or RADIO Mode pressing the INFO Button will reveal the EPG information of the chose channe...

Page 17: ...the AUDIO Button you can choose the different audio tracks offered by the station Pressing the VIDEO Button activates the PVR Mode The Infobar will show the control symbols You can instantly start re...

Page 18: ...underneath it Pressing the HELP Button activates the Help menu Pressing the RADIO Button activates the RADIO Mode If you preprogrammed your remote control to operate a TV See chapter 12 TV Mode setup...

Page 19: ...rt cable to your television screen and if available connect your DVD Player or VCR to the VCR Scart of the Dreambox Plug in the power cable into the Dreambox and then into a 110V 60Hz or 230V 50Hz pow...

Page 20: ...e basic setup of your Dreambox Press the OK Button on your remote control to get to the next step You will be asked if you want to set the basic settings for your Dreambox now or if you want to quit t...

Page 21: ...3 2 Tuner setup Detailed information about the tuner setup can be found in chapter See chapter 9 1 Satelliteconfig 3 3 Service scan Detailed information about the service scan can be found in chapter...

Page 22: ...to the Deep Standby Mode Alternatively you can push down the Power Button on your Dreambox for 5 seconds If no OSD Menu is visible on the screen this will also put your Dreambox into Deep Standby Mode...

Page 23: ...ntrolling the volume The Volume Buttons control the volume of the audio Pressing will make turn it up and pressing will turn it down Pressing the MUTE Button mutes the volume A crossed speaker symbol...

Page 24: ...its sub services Pressing the green Options Button in TV or Radio mode will reveal the sub services menu Use the Navigation Buttons up and down to move to one of the sub services Press the OK Button t...

Page 25: ...rmation about the selected service Elapsed time Current time Dolby Digital Remaining time Next show Current show Is highlighted yellow as soon as a show is broadcasted encrypted Is highlighted yellow...

Page 26: ...tion about the current show and by pressing the Right Button afterwards about the next show Pressing the yellow Options Button activates the Channel EPG See chapter 5 1 and pressing the blue Options B...

Page 27: ...g timer This view shows the currently airing shows on the services listed in the left column A progress bar showing the progress of the currently airing show is placed next to the service s name Using...

Page 28: ...he Up Down Buttons on your remote control activates the service list Press the red Options Button to change to the All view Use the Navigation Buttons up down to select the desired service and press t...

Page 29: ...ressing the Up Down Buttons on your remote control activates the service list Use the Navigation Buttons up down to select the desired service and press the MENU Button to open the Channellist menu Na...

Page 30: ...nd press the OK Button Use the Navigation Buttons up down to select the service that you want to move and press the OK Button The service will be highlighted red Use the Navigation Buttons up and down...

Page 31: ...in any other rooms with carpeting or any other flooring that can carry an electrostatic charge Remove all connection from the device Only open the device with the tools depicted in this manual Try to...

Page 32: ...hard disk cage The IDE cable and the hard disk power cord a already installed inside the Dreambox DM7025 1 Phillips screwdriver 1 Hard disk of your choice 4 Hard disk mounting screws Action Remove the...

Page 33: ...33 U s e r M a n u a l D r e a m b o x D M 7 0 2 5 english Lift the cover on the sides on slide it backwards Remove the 2 screws from the hard disk cage Remove the hard disk cage by lifting it upwards...

Page 34: ...s e r M a n u a l D r e a m b o x D M 7 0 2 5 english Bend the IDE cable as shown in this picture Now you need the Phillips screwdriver the hard disk cage the 4 hard disk mounting screws and your hard...

Page 35: ...D M 7 0 2 5 english Attach the hard disk cage to the hard disk Pay attention to the correct mount of the hard disk in the hard disk cage Set the jumper of the hard disk to cable select This informati...

Page 36: ...disk Screw the two screws back onto the hard disk cage Slide the cover from the rear back onto the device Watch for the small plastic clips shown in the picture above The must not overlap when you sli...

Page 37: ...tup and press the OK Button to select Navigate to the option System and press the OK Button Navigate to the option Hard disk and press the OK Button Navigate to the option Samsung SV8004H Internal Mas...

Page 38: ...cording is indicated by a flashing symbol in the Infobar See chapter 4 8 Infobar During recording you can watch another recording or another channel Pressing the Up Down Buttons on your remote control...

Page 39: ...Button will delete a timer The green Options Button adds a timer the yellow Options Button toggles active on and off only possible in waiting status and the blue Options Button removes finished timer...

Page 40: ...ed defined Set your desired options by pressing the Navigation Buttons up down and left right and press the green Options Button to save the timer Programming via EPG Change into on of the EPG views a...

Page 41: ...Button to pause the screen video and audio will pause The recording will continue in the background Press the yellow Options Button again to resume watching This way you won t have to miss anything ev...

Page 42: ...rol symbols for the PVR Mode on you remote control below the Options Buttons In PVR Mode the Options Buttons are mapped as described below Keep in mind that you have to be in the PVR Mode to use these...

Page 43: ...the selection of recordings Use the Navigation Buttons up and down to select a recording Press the Menu Button Use the Navigation Buttons up and down to select Delete and press the OK Button You will...

Page 44: ...igate to the option Setup and press the OK Button to select Navigate to the option System and press the OK Button The System menu will open up Navigate to the option Language and press the OK Button T...

Page 45: ...menu is visible on your screen press the Menu Button to open the main OSD menu Navigate to the option Setup and press the OK Button to select Navigate to the option System and press the OK Button The...

Page 46: ...n minutes for a recording Margin after record Set the desired lag in minutes for a recording Visualize positioner movement If you own a satellite dish with a positioner you can see a flashing symbol o...

Page 47: ...te to the option Setup and press the OK Button to select Navigate to the option System and press the OK Button The System menu will open up Navigate to the option Time zone and press the OK Button The...

Page 48: ...menu is visible on your screen press the Menu Button to open the main OSD menu Navigate to the option Setup and press the OK Button to select Navigate to the option System and press the OK Button The...

Page 49: ...upports PAL or NTSC WSS on 4 3 Check the checkbox to disable zooming on some 16 9 TV s during 4 3 transmissions AC3 default If a program is transmitted with an AC3 audio track e g Dolby Digital the Dr...

Page 50: ...ss the OK Button The System menu will open up Navigate to the option UHF Modulator and press the OK Button Connect a TV to the UHF out using a coaxial cable Start a channel scan on your TV The UHF Mod...

Page 51: ...ss the OK Button The System menu will open up Navigate to the option LCD and press the OK Button Using the Navigation Buttons left and right you can set the brightness and contrast of the LCD Standby...

Page 52: ...menu is visible on your screen press the Menu Button to open the main OSD menu Navigate to the option Setup and press the OK Button to select Navigate to the option System and press the OK Button The...

Page 53: ...er a router Nameserver Enter the DNS Server s IP address here DNS is used to translate a Domain name to an IP address Normally if the Type is set to LAN there is no need for a DNS entry If the Dreambo...

Page 54: ...d if you are experiencing trouble with one of your encrypted services Init This option initializes an inserted Smartcard It is recommended to inset the CI Module with the Smartcard already in it No mo...

Page 55: ...utton to open the main OSD menu Navigate to the option Setup and press the OK Button to select Navigate to the option Service searching and press the OK Button The Service searching menu will open up...

Page 56: ...d from you Dreambox to the LNB Please read the section 9 1 Satellite configuration to learn how to get into this menu The Satconfig menu will open up Use the up down Buttons to navigate to the DiSEqC...

Page 57: ...ease read the section 9 1 Satellite configuration to learn how to get into this menu The Satconfig menu will open up Use the up down Buttons to navigate to the DiSEqC Mode option and use the left righ...

Page 58: ...in your household Please read the section 9 1 Satellite configuration to learn how to get into this menu The Satconfig menu will open up Use the up down Buttons to navigate to the DiSEqC Mode option a...

Page 59: ...ers Dreamboxes in your household Please read the section 9 1 Satellite configuration to learn how to get into this menu The Satconfig menu will open up Use the up down Buttons to navigate to the DiSEq...

Page 60: ...Use the up down Buttons to navigate to the DiSEqC Mode option and use the left right Buttons to select Positioner This menu is meant for a Stab positioner You only have to enter the geographical detai...

Page 61: ...as Tuner 1 Loopthrough to socket A Use this option if you connected the LNB1 out to the LNB2 in Nothing connected Use this option if no cable is attached to Tuner 2 Secondary cable from motorized LNB...

Page 62: ...OK Button to select Navigate to the option Service searching and press the OK Button The Service searching menu will open up Navigate to the option Automatic scan and press the OK Button The Automati...

Page 63: ...u a l D r e a m b o x D M 7 0 2 5 english You can see the progress of the scan here The scan is done once you see this menu It shows how many channels were found during the scan Press the OK Button t...

Page 64: ...ion Setup and press the OK Button to select Navigate to the option Service searching and press the OK Button The Service searching menu will open up Navigate to the option Manual scan and press the OK...

Page 65: ...screen press the Menu Button to open the main OSD menu Navigate to the option Information and press the OK Button to select The Information menu will open up Navigate to the option Service and press...

Page 66: ...press the Menu Button to open the main OSD menu Navigate to the option Information and press the OK Button to select The Information menu will open up Navigate to the option About and press the OK But...

Page 67: ...lty Check dish Channel is transmitted in a new slot Start service scan see chapter 8 No reception on a channel that was working before The transmission of the channel was terminated No reception of th...

Page 68: ...e SHIFT Setup Button for 3 seconds the TV Mode Button will flash twice Use the Numeric Keypad to enter the four digit device code into the remote control The TV Mode Button will flash once for every d...

Page 69: ...448 Best 0367 0400 Bestar 0067 0400 0404 Binatone 0247 Deitron 0067 Denko 0294 Desmet 0350 0067 Diamant 0067 Digiline 0067 Dixi 0039 0067 0277 0247 Black Star 0277 Blacktron 0312 Blackway 0312 Blaupun...

Page 70: ...424 0517 0248 0132 193 0294 0277 Irradio 039 0067 0248 0277 0106 Isukai 248 0067 0312 ITC 247 ITS 067 0401 0248 0312 0294 0246 ITT 193 0510 0379 0391 0503 0578 597 0376 0238 ITV 294 0067 0277 Goodmans...

Page 71: ...on 0067 0441 Pathe Cinema 0193 0268 0246 0430 0350 0379 Pathe Marconi 0235 0243 0531 0139 0226 0228 0363 0429 0267 Micromaxx 0067 0698 Minerva 0517 0225 0100 0106 0221 0267 Minoka 0442 0067 0389 Mitsu...

Page 72: ...47 0246 0389 0193 Tatung 0102 0546 0247 0067 0041 Teac 0067 0542 0485 0294 0039 0442 0379 TEC 0247 0039 0277 0501 0365 0367 0289 Sandra 0246 0247 Sanela 0268 Sansui 0067 0401 Sanyo 0238 0187 0066 0041...

Page 73: ...039 Thomson 0317 0429 0139 0531 0363 0501 0365 0226 0228 0235 0267 0373 0067 0520 0590 0655 Thorn 0268 0104 0114 0067 0134 0365 0542 0389 0404 0065 Tokai 0102 0067 0367 0193 0247 0404 0039 Tokyo 0246...

Page 74: ...ut Analog Modem upgrade available Additional info DVB S Tuner pluggable Frequency Range 950 2150 MHz Signal Level 65 dBm 25 dBm Signal to Noise Level 12 dB max DBS Tuner Input Connector F Type female...

Page 75: ...analog Output Level L R 0 5 Vss on 600 Ohm THD 60 dB 1 kHz Crosstalk 65 dB Output digital Output Level 0 5 Vss on 75 Ohm Sampled Data Filtering 32 kHz 44 1 kHz 48 kHz S PDIF Output optical AC3 Video p...

Page 76: ...out load 11 5V at 400mA LNB Voltage horizontal 20V without load 17 3V at 400mA LNB shut off at Standby Mode Count of active satellite position DiSEqC 1 0 2 0 SAT POSITION SAT OPTION DiSEqC Rotor Contr...

Page 77: ...each the dealer s hotline from Mo Fr 09 00 am 12 00 pm and 01 00 pm 03 00 pm Technical Hotline Tel 49 0 180 368 43 99 777 0 09 min Fax 49 0 180 368 43 99 778 0 09 min You can reach the technical hotli...

Page 78: ...s that are distributed under different licenses especially a Open Source License the GNU General Public License You can find details about this License on the next three pages Additional notes about t...

Page 79: ...for this free software If the software is modified by someone else and passed on we want its recipients to know that what they have is not the original so that any problems introduced by others will n...

Page 80: ...a Accompany it with the complete corresponding machine readable source code which must be distributed under the terms of Sections 1 and 2 above on a medium customarily used for software interchange or...

Page 81: ...ation excluding those countries so that distribution is permitted only in or among countries not thus excluded In such case this License incorporates the limitation as if written in the body of this L...

Page 82: ...on Games Plugins Setup Service seraching System Common Interface Service About Standby Reboot Satelliteconfig Automatic scan Manual scan Language Usage settings Timezone Audio Video UHF Modulator Hard...

Reviews: