background image

8


2.6.


Player


Information


User


can


check


the


player’s


basic


information


including


the


Health


status,


Firmware


version,


and


Player


ID.


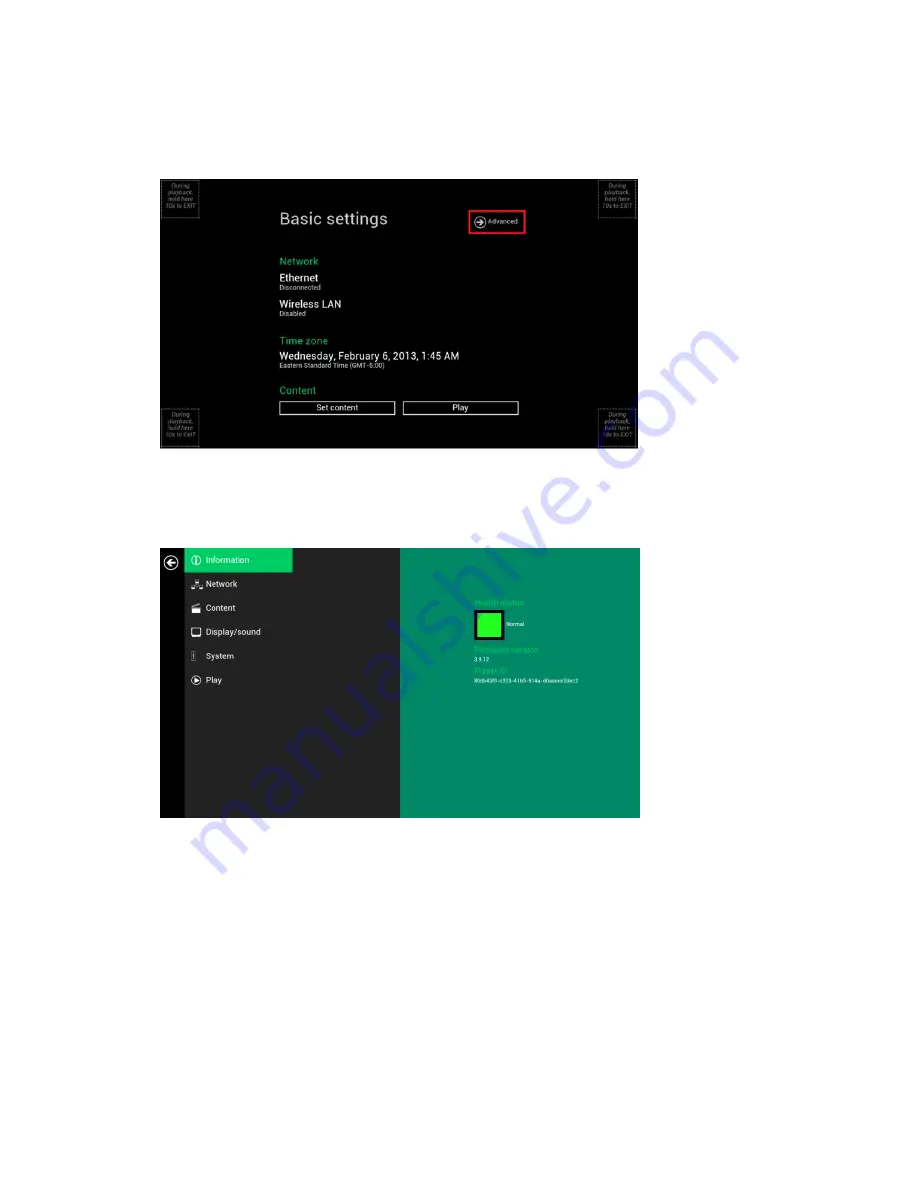
1


Click


the


Advanced


button.


(Fig.


2.6.1)


2


Click


on


Information

.


The


definitions


of


the


Health


Status:


Green


Normal.


The


device


is


connected


to


the


URL


server.


Blue


Local.


The


device


is


playing


content


from


the


USB


drive


or


SD


card.


Gray


Disconnected.


The


device


is


disconnected.


(Fig.


2.6.2)


2.7.


Content


configuration


AppStart


User


can


assign


the


URL


and


APP


for


execution


after


the


system


start


up.


1


Click


the


Advanced


button.


(Fig.


2.6.1)


2


Click


on


Content

,


and


then


click


on


AppStart.


3


Enter


the


valid


URL


of


HTML/SMIL


in


AppStart(Fig.


2.7.1).


4


User


can


disable


Autorun


from


here.


Autorun


will


automatically


enable


when


content


is


played.


This


is


useful


when


system


integrators


prepare


the


device


in


the


office


before


installation.


In


most


case,


the


network


needs


to


be


re

configured


on


site,


so


this


prevents


the


device


from


starting


playback


automatically


on


the


first


startup.


Summary of Contents for DNP50

Page 1: ...RAKE ANDROID NETWORK PLAYER DNP50 Drake Android Network Player Instruction Manual DC Power Supply HDMI Cable A V Cable RCA to 3 5mm jack is a registered trademark of R L Drake Holdings LLC Copyright 2014 R L Drake Holdings LLC P N 651234400 A Printed in U S A Rev V002 20140106 1002595 DNP50 Contents Included ...

Page 2: ...art 8 2 8 Content configuration FailSafe 9 2 9 Content configuration EasyPlay 9 2 10 Display settings 12 2 11 Sound settings 14 2 12 System configuration Time Server 15 2 13 System configuration Scheduled reboot 16 2 14 System configuration Firmware upgrades 16 2 15 System configuration Factory reset 17 2 16 System configuration Power save 18 2 17 System configuration Expand Storage by using SD ca...

Page 3: ...tion compatibility Industry leading W3C SMIL support for developers DNP50 AVW only Built in Wi Fi wireless b g n network DNP50 AVW only Composite AV input and Component input 1 2 Package contents NOT INCLUDED A USB mouse is required for system setup 1 3 Mounting options The player can be attached to mounting posts on the backs of screens or inside cabinetry with the built in VESA MIS D100 100mmx10...

Page 4: ...utput Ethernet port for network content update SD card slot with SD card cover USB ports for USB content update and configuration S W Reset button to perform factory reset Wireless antenna post DNP50 AVW only RS 232 port not used as telephone connector DNP50 AVW only Composite AV input DNP50 AVW only Component input DNP50 AVW only VGA port for analog video output DNP50 AVW only DNP50 AVW only DNP5...

Page 5: ...art configuring the player If you have already set content into the player contents will play back automatically after 15 seconds after boot up To enter the menu system at any time during playback plug in a USB mouse and hold the left mouse key in the corner area as shown below for 10 seconds Player will ask for password if password has been configured Troubleshooting Tips 1 The operation indicato...

Page 6: ...y set Auto playback can be canceled by clicking on the button before the countdown ends User is able to enter Advanced Settings by clicking the Advanced button 2 3 Connect the DNP50 DNP50 AVW to your network Wireless connection Wi Fi DNP50 AVW only 1 Click the Wireless LAN setting to launch the wireless configuration UI Fig 2 3 1 2 Click the ON OFF button as indicated below to turn ON Wireless int...

Page 7: ...If the network requires authentication you will be asked to provide a password Fig 2 3 4 Wired connection To use the wired Ethernet connection connect an Ethernet cable and disable Wireless LAN first 1 Click the Wireless LAN setting to enter the wireless configuration UI Fig 2 3 1 2 Click the ON OFF button as indicated below to turn OFF Wi Fi Fig 2 3 2 ...

Page 8: ...IP address 3 Turn on Ethernet If using DHCP no further action is required Fig 2 3 5 Static IP manually assign network IP address 4 Click Ethernet to configure static IP address Fig 2 3 6 2 4 Time zone settings 1 Click Time zone Fig 2 4 1 ...

Page 9: ...orrect time zone from the available options Fig 2 4 2 2 5 Content settings 1 Click the Set content button Fig 2 5 1 2 Input the content source URL and click Connect The player will start playback immediately Fig 2 5 2 ...

Page 10: ...ected Fig 2 6 2 2 7 Content configuration AppStart User can assign the URL and APP for execution after the system start up 1 Click the Advanced button Fig 2 6 1 2 Click on Content and then click on AppStart 3 Enter the valid URL of HTML SMIL in AppStart Fig 2 7 1 4 User can disable Autorun from here Autorun will automatically enable when content is played This is useful when system integrators pre...

Page 11: ...ilSafe 3 Enter the URL of HTML SMIL in FailSafe 4 The Advanced option is used for 3rd party App configuration only Fig 2 8 1 2 9 Content configuration EasyPlay The feature EasyPlay allows the player to play media content from the USB flash drive or SD card directly When EasyPlay is enabled the player will play content from the USB drive or SD card only If user wants to play content from the URL se...

Page 12: ...ect the directories for photos and music from the USB drive 5 Click Set button after selecting the directories Fig 2 9 2 Configure Movie Mode 6 Click on Movie Click on the button as marked in red below and select the directory for movies from the USB drive 7 Click Set button after the folder is selected 8 The files in the selected folders will be played after clicking the Play button in the Basic ...

Page 13: ...ck on the buttons marked in red below to enable disable the EasyPlay schedule for each time slots Type the scheduled time in the dialogue boxes marked in blue below by using the pop up keyboard or the USB keyboard Fig 2 9 4 4 The On times assigned in the time slots A E are inclusive For example a schedule assigned as the example below ...

Page 14: ...lay settings Output Mode For best quality set the output resolution to match your display s native resolution to avoid image scaling and blur If you are connecting an LCD computer monitor projector or plasma display refer to the device specifications for optimal settings If you are connecting to composite input only monitor such as CRT TV the output resolution must be set to ...

Page 15: ...ck the Display sound button and then click on Display The Display Settings page will be launched Fig 2 10 1 3 Click on Output mode Select Output mode from the popup menu Fig 2 10 2 Fig 2 10 3 Screen orientation Screen orientation is to set the display to rotate 90 180 270 degrees ...

Page 16: ... the Screen orientation marked in red below Fig 2 10 4 4 Click on the preferred angle from the menu The option Auto rotate allows the display to rotate along with the signboard automatically Fig 2 10 5 2 11 Sound settings To control the output sound volumes and touch sounds 1 Click the Advanced button Fig 2 6 1 2 Click the Display sound button and then click on Sound The Sound Settings page will b...

Page 17: ...in red to enable disable the Touch sounds Fig 2 11 2 Fig 2 11 2 Fig 2 11 3 2 12 System configuration Time Server The feature allows user to choose the player s synchronization source When it s enabled the player synchronizes with the time of AppStart URL Otherwise the player synchronizes with Android default time server 1 Click the Advanced button advanced configuration menu will be launched Fig 2...

Page 18: ...ck on Scheduled Reboot 3 Click the Enable daily reboot button as marked in red below to enable disable the daily reboot function Click on the dialogue box to set the time The value can be inputted with the pop up keyboard or the USB keyboard 4 Click on Set to save the setting Fig 2 13 1 2 14 System configuration Firmware upgrades Firmware updates can be performed by using a USB flash drive Please ...

Page 19: ...Click on OK to begin the firmware update Fig 2 14 1 7 Plug in the USB drive while the screen shows Scanning USB drives for firmware package Fig 2 14 2 2 15 System configuration Factory reset If you forget the system password you must reset the system to access to the player Using the reset button 1 PRESS and HOLD the reset button with a pin 2 RE CONNECT the power cord 3 WAIT about 10 seconds or un...

Page 20: ...rm the system reset Fig 2 15 1 2 16 System configuration Power save The Power save feature allows the player to power off automatically while idle in the Basic settings page while idle for 10 minutes 1 Click the Advanced button Fig 2 6 1 2 Click on System and click on Power save Fig 2 16 1 2 17 System configuration Expand Storage by using SD card An external SD card may be used to replace the curr...

Page 21: ... about using HTML5 for digital signage visit http widget iadea com 5 Working with SMIL The DNP50 DNP50 AVW uses open communications protocols for content presentation and playback control SMIL compliance means predictable results across multiple devices and SMIL s non proprietary nature means that your investments are never obsolete 5 1 Introduction Using SMIL pronounced smile the language created...

Page 22: ...MPEG 2 720p 12Mbps CBR S11 MPEG 4 AVC 480p 6Mbps CBR S12 MPEG 4 AVC 720p 10Mbps CBR E4 VC 1 WMV9 MP ML 720p E7 MPEG 4 ASP 480p 10Mbps CBR E8 MPEG 4 AVC 1080p 10Mbps CBR Image format support POPAI Screen Media Standards S1 JPEG 480p baseline S2 JPEG 720p baseline S3 JPEG 1080p baseline E1 PNG 24bpp alpha 480p E2 PNG 24bpp alpha 720p E3 PNG 24bpp alpha 1080p Audio codec support POPAI Screen Media St...

Page 23: ...blank screen occur before and after each video are played To minimize the gap avoid back to back video programming by scheduling an image between each video If both Ethernet WiFi are connected which one will take precedence If both connections are available WiFi will be used What is the maximum file size for a single video file The maximum video file size for the DNP50 DNP50 AVW is 2GB We recommen...

Page 24: ...or maximum compatibility JPEG images can be either of 2 types baseline or progressive compression Baseline JPEG offers greatest compatibility while progressive JPEGs are suitable for web site images Progressive images are downloaded and displayed progressively being rendered more clearly as more data is received over the internet Progressive images are primarily supported on PCs For media applianc...

Page 25: ... on the date of shipment of that product or fails to meet such other specifications as may have been expressly agreed upon in writing between the parties for a period of ninety 90 days from the date of original purchase Notwithstanding the foregoing in some cases the warranty on certain proprietary sub assembly modules manufactured by third party vendors and contained in Seller products third part...

Page 26: ...eturning the product without its original packaging in good ed with the RMA Number Place the RMA Number near the new condition may cause the incursion of additional fees return address in large bold print approx 2 in height Pack this box within another shipping container or box Mark the shipping box or container with your RMA Number Place the RMA Number near the return address in large bold print ...

Page 27: ...DRAKE HOLDINGS LLC 9900 SPRINGBORO PIKE MIAMISBURG OH 45342 USA SALES 937 746 4556 800 777 8876 FAX 937 806 1510 sales rldrake com SERVICE 937 746 6990 FAX 937 806 1576 servicehelp rldrake com http rldrake com ...

Reviews: