10
WARNING:
Do not fill closer than one inch to the top of fuel tank to prevent spills and to allow
for fuel expansion. If gasoline is accidentally spilled, move unit away from area of spill. Avoid
creating any source of ignition until gasoline vapors have disappeared.
CAUTION:
Experience indicates that alcohol blended fuels (called gasohol or using ethanol or methanol) can
attract moisture which leads to separation and formation of acids during storage. Acidic gas can damage the fuel
system of an engine while in storage. To avoid engine problems, use fresh fuel every 30 days. Never use engine
or carburetor cleaner products in the fuel tank or permanent damage may result.
NOTE:
USE CLEAN OIL AND FUEL. STORE IN APPROVED,
CLEAN, COVERED CONTAINERS. USE CLEAN FILL FUNNELS.
ENGINE STARTING INSTRUCTIONS
A.
There is a fuel shut-off valve below the gas tank on your machine. Before starting the chipper, be sure the
fuel shut-off valve is open (the tab should be vertical). When transporting and storing the chipper, close
the fuel shut-off valve to prevent leakage (tab should be horizontal).
B.
Locate choke lever (ring under air clearner approximately 8” left of starter button).
C.
Move choke lever to “FULL CHOKE POSITION” by pulling ring straight out.
NOTE: IF RESTARTING A WARM ENGINE AFTER A SHORT SHUTDOWN, MOVE CHOKE
LEVER TO “NO CHOKE POSITION”.
D.
Move toggle switch lever away from “STOP” position.
E.
Push starter button to crank engine.
F.
Crank engine until it fires. When it starts, release starter button and move choke ring to “1/2 CHOKE”
until engine runs smoothly and then to “NO CHOKE POSITION”.
If engine falters, move choke lever to “1/2 CHOKE” until engine runs smoothly and then to “NO CHOKE
POSITION” by pushing choke ring in.
NOTE: If engine fires, but does not continue to run, move choke lever to “NO CHOKE POSITION” and
crank engine until it starts.
NOTE: If engine again fires, but does not continue to run, move choke lever to “FULL CHOKE” and
repeat instructions C, D, and E until engine starts.
ENGINE STOPPING INSTRUCTIONS
•
Move toggle switch to “STOP” position.
Engine running speed is preset by engine manufacturer - it only runs at full speed.
DO NOT tamper with engine settings this could damage engine and will void engine warranty.
Whenever you operate your chipper, wearing gloves
and safety glasses is required. If necessary to push
material into chipping chamber, use a wood stick,
never your hands or steel implements. At the end of
this section, we offer additional cautions. Read and
observe them.
As the engine ignition begins, the engine operates
under no load until approximately 1200-1400 rpm at
which speed the centrifugal clutch engages and
begins driving the rotor. Proper rotor speed is in the
2400 rpm range with a plus or minus tolerance of 200
rpm.
When viewed from the pulley side of the chipper
body, the flywheel runs counterclockwise. This
action tends to pull materials into the chipping
chamber.
Branches are fed into the side hopper for chipping. If
they are thicker than 2” in diameter, feed only one
branch at a time. For smaller diameter sticks and
twigs, several may go together. Since the throat
opening is approx. 4-1/2” square, some side shoots
or side branches may have to be trimmed from the
main stalk before the chipping process. Short stubs
of branches may be pushed through the chipper
section with the next branch.
Never
assume you
know where the blade is, and try to push short
branches in by hand. You don’t know where it is. Be
safe, keep your hands away from the chipping blade.
Summary of Contents for 18.0 HP
Page 2: ...2...
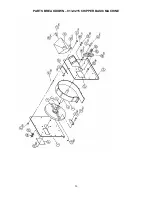
Page 18: ...18 PARTS BREAKDOWN C182 CHP CHIPPER...
Page 20: ...20 PARTS BREAKDOWN 913 0215 CHIPPER BASIC MACHINE...


