background image


DPtech FW1000 Series Firewall Products User Configuration Guide 


2-24 

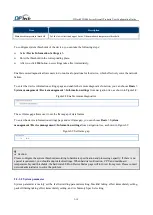
  Caution


Default password cannot be used when you add an administrator, please confiure the password corresponding to the 
rule.  

You cannot lock administrator when you add the administrator. Default status is normal. If you require to lock the  
administrator, you should lock the administrator after you create it.  

When you delete an administrator, the system w

ill prompt you. Please carefully use it. 


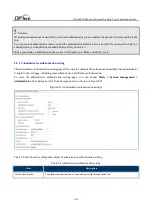
2.5.1.3 Administrator authentication setting 

The administrator authentication setting page allows user to configure the authentication method of an administrator 

to login to the webpage, including local authentication and Radius authentication. 

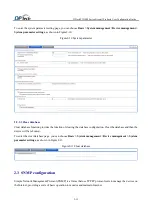
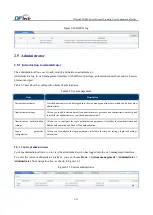
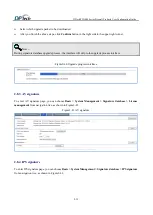
To  enter  the  administrator  authentication  setting  page,  you  can  choose

  Basic  >  System  management  > 

Administrator 

from navigation tree from navigation tree, as shown in Figure2-23.  

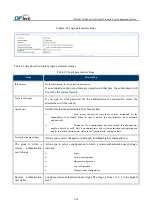
Figure2-23


Administrator authentication settings 


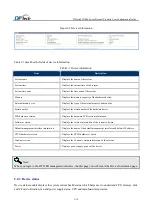
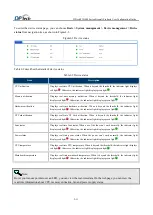
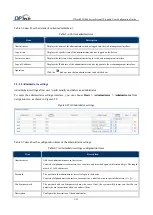
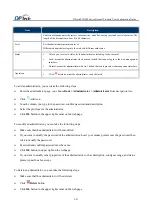
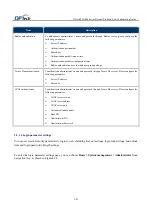
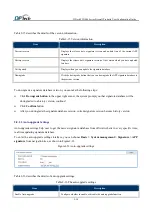
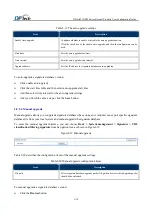
Table2-8 describes the configuration items of administrator authentication setting. 

Table2-8


Administrator authentication setting 

Item 

Description 

Local authentication 

To authenticate administrator’s name and password through the device.  

Summary of Contents for FW1000 SERIES

Page 1: ...i DPtech FW1000 Series Firewall Products User Configuration Guide v1 0...

Page 2: ...upport If you need any help please contact Hangzhou DPtech Technologies Co Ltd and its sale agent according to where you purchase their products Hangzhou DPtech Technologies Co Ltd Address 6th floor z...

Page 3: ...duct upgrading or other reasons information in this manual is subject to change Hangzhou DPtech Technologies Co Ltd has the right to modify the content in this manual as it is a user guides Hangzhou D...

Page 4: ...CTION TO ADMINISTRATOR 2 21 2 5 2 AUTHORITY MANAGEMENT 2 27 2 5 3 WEB ACCESS PROTOCOL 2 28 2 5 4 LIMITED INTERFACE SERVICE 2 28 2 5 5 REMOTE USER 2 29 2 6 CONFIGURATION FILE 2 30 2 7 HOT PATCHING 2 32...

Page 5: ...66 3 4 5 MAC ADDRESS MANAGE 3 67 3 4 6 ACCOUNT 3 68 3 4 7 DOMAIN NAME 3 69 3 4 8 SERVICE 3 69 3 5 FORWARDING 3 70 3 5 1 FORWARDING 3 70 3 5 2 FORWARDING MODE 3 71 3 5 3 NEIGHBOR DISCOVER 3 71 3 6 TRAN...

Page 6: ...CY BASED ROUTING 3 121 3 14 1 INTRODUCTION TO POLICY BASED ROUTING 3 121 3 14 2 IPV6 POLICY BASED ROUTING 3 121 3 14 3 IPV4 POLICY BASED ROUTING 3 122 3 15 MPLS 3 124 3 15 1 MPLS CONFIGURATION 3 124 3...

Page 7: ...T 4 149 4 4 4 ONE TO ONE NAT 4 150 4 4 5 N TO N NAT 4 151 4 5 NAT64 4 152 4 5 1 NAT64 PREFIX 4 153 4 5 2 NAT64 ADDRESSS 4 153 4 5 3 ADDRESS POOL 4 153 4 6 NAT66 4 154 4 6 1 SOURCE NAT 4 154 4 6 2 DEST...

Page 8: ...FIC SHAPING 4 179 4 17 ANTI ARP SPOOFING 4 179 4 17 1 ANTI ARP SPOOFING 4 179 4 17 2 ARP CONFIGURATION 4 180 CHAPTER 5 LOG MANAGEMENT 5 181 5 1 INTRODUCTION TO THE LOG MANAGEMENT 5 181 5 2 SYSTEM LOG...

Page 9: ...MIZE URL CLASSIFICATION 7 208 7 3 3 ADVANCED URL FILTERING 7 209 7 3 4 URL FILTER PAGE PUSH 7 210 7 3 5 TYPICAL CONFIGURATION FOR THE RATE LIMITATION 7 211 7 4 SQL INJECTION PROTECTION 7 214 CHAPTER 8...

Page 10: ...HAPTER 10 PORTAL AUTHENTICATION 10 239 10 1 INTRODUCTION TO THE PORTAL AUTHENTICATION 10 239 10 1 1 AUTHENTICATION CONFIG 10 239 10 1 2 WEB AUTHENTICATION NOTICE 10 243 10 1 3 WEB LISTEN 10 244 10 1 4...

Page 11: ...stem parameter 2 15 Figure2 11 Clear database 2 15 Figure2 12 SNMP 2 16 Figure2 13 Device information 2 17 Figure2 14 SNMP version configuration 2 18 Figure2 15 IP address list 2 18 Figure2 16 Alarm 2...

Page 12: ...55 Certificate management 2 50 Figure2 56 Key management 2 50 Figure2 57 Certificate application 2 51 Figure2 58 Certificate management 2 51 Figure2 59 CRL management 2 52 Figure2 60 Install option 2...

Page 13: ...igure3 42 Equal cost route 3 78 Figure3 43 Configure BGP 3 78 Figure3 44 Configure BGP VPN 3 80 Figure3 45 BGP neighbor information 3 81 Figure3 46 Configure RIP 3 82 Figure3 47 Display RIP state 3 83...

Page 14: ...114 Figure3 89 Multicast routing table 3 114 Figure3 90 PIM multicast routing table 3 115 Figure3 91 IGMP multicast routing table 3 115 Figure3 92 IGMP proxy routing table 3 115 Figure3 93 Basic conf...

Page 15: ...3 137 Figure3 135 Basic wireless 3 137 Figure3 136 Ping 3 138 Figure3 137 Traceroute 3 139 Figure3 138 Capture 3 139 Figure3 139 Spanning tree 3 139 Figure3 140 STP 3 140 Figure3 141 RSTP 3 141 Figur...

Page 16: ...toring 4 172 Figure4 40 VIP bandwidth guarantee Figure4 41 Traffic classification 4 174 Figure4 42 Congestion avoidance Figure4 43 Congestion management 4 178 Figure4 44 Traffic shaping 4 179 Figure4...

Page 17: ...e8 8 L2TP user authentication 8 221 Figure8 9 L2TP IP pool 8 222 Figure8 10 L2TP online status 8 222 Figure8 11 PPTP 8 222 Figure8 12 GRE configuration 8 224 Figure8 13 SMAD 8 225 Figure8 14 SMAD blac...

Page 18: ...244 Figure10 8 Proscenium management 10 244 Figure10 9 Online management for the hotel user 10 245 Figure10 10 Terminal management 10 246 Figure10 11 USB data leakage monitor 10 247 Figure10 12 Termin...

Page 19: ...e configuration items 2 38 Table2 21 Software version configuration items 2 41 Table2 22 NTP server mode configuration items 2 42 Table2 23 NTP client mode 2 43 Table2 24 Virtual server setting config...

Page 20: ...le3 35 Basic config 3 102 Table3 36 IGMP snooping 3 102 Table3 37 IGMP configuration 3 103 Table3 38 IGMP Proxy 3 105 Table3 39 IGMP status 3 106 Table3 40 Candidate BSR configuration 3 107 Table3 41...

Page 21: ...8 Table5 7 Back up or delete operation file 5 189 Table5 8 Operation log configuration 5 189 Table5 9 Service log configuration 5 190 Table7 1 Rate limit configuration items 7 196 Table7 2 User group...

Page 22: ...Hotel user online management 10 245 Table10 8 Microsoft patch management 10 246 Table10 9 USB data leakage monitor 10 247 Table10 10 Terminal configuration items 10 248 Table10 11 Online user 10 248...

Page 23: ...protection integrate OSPFv3 RIP routing into source NAT and destination NAT translation which separate and restrict network communication from Intranet and Internet and other outside network to separ...

Page 24: ...eth0_0 and the IP address is 192 168 0 1 Both of the default username and the default password are admin You can use the default username for the first login but it is strongly recommended that you sh...

Page 25: ...all of the Web management function menus You can choose the desired function menu which is shown in the configuration area Shortcut area Shows the directory of the current page as well as the status o...

Page 26: ...gure the related system management function including Device management SNMP configuration RMON configuration Administrator Configuration file Signature database Software version NTP configuration Vir...

Page 27: ...current system and the device including system name system time and system time zone memory external memory serial number PCB hardware version software version default management interface information...

Page 28: ...are version Displays the hardware PCB version information Software version Displays the version information of the system software Default management interface information Displays the name of the def...

Page 29: ...Card utilization Displays real time CF Card utilization When it beyond the threshold the indicator light displays red light Otherwise the indicator light displays green light Fans status Displays real...

Page 30: ...Device information settings from navigation tree as shown in Figure2 4 Figure2 4 Device information settings The system name feature allows users to customize system name which is easily to be managed...

Page 31: ...hreshold allow user to configure the hardware utilization and temperature threshold To enter the device information settings and configure system threshold you can choose Basic System management Devic...

Page 32: ...ree as shown in Figure2 8 Figure2 8 Enable remote diagnostics The set frame gap allows user to set the frame gap of data frames To enter the device information settings page and set frame gap you can...

Page 33: ...rovides the function of clearing the database configuration Clear the database and then the device will be rebooted To enter the clear database page you can choose Basic System management Device manag...

Page 34: ...naged device To enter SNMP version configuration page you can choose Basic System management SNMP configuration from navigation tree as shown in Figure2 12 Figure2 12 SNMP To configure the SNMP versio...

Page 35: ...icate password Encryption algorithm Mixing the contents of a package to prevent it from being read by an unauthorized source You should select a kind of encryption algorithm including none DES Encrypt...

Page 36: ...navigation tree as shown in Figure2 14 Figure2 14 SNMP version configuration To configure NAT traverse you can take the following steps Select Basic System management SNMP configuration from navigatio...

Page 37: ...s such as statistics on a port If the sampled value of the monitored variable is bigger than or equal to the upper threshold an upper event is triggered if the sampled value of the monitored variable...

Page 38: ...periodically collect statistics on packet at the specified interface Each statistical value is a cumulative sum of packets sent received on the interface during a sampling period To enter the RMON al...

Page 39: ...s you to add delete and modify an administrator s password and administrator authority and to modify the administrator except the administrator itself Administrator authentication settings Allows you...

Page 40: ...add modify and delete an administrator To enter the administrator settings interface you can choose Basic Administrator Administrator from navigation tree as shown in Figure2 22 Figure2 22 Administrat...

Page 41: ...g steps Enter the administrator page you choose Basic Administrator Administrator from navigation tree Click Add icon In each column you type in the password confirm password and description Select th...

Page 42: ...authentication setting The administrator authentication setting page allows user to configure the authentication method of an administrator to login to the webpage including local authentication and...

Page 43: ...ough Tacacs Plus server Please configure the following parameters Server IP address Share key LDAP authentication To authenticate administrator s name and password through Tacacs Plus server Please co...

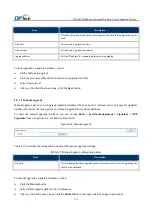
Page 44: ...have designated for the administrator to be locked When the time is arrived this administrator can be unlocked automatically Permanent If an administrator has been locked this administrator unable to...

Page 45: ...nistrator has the permission to login to the Web which can configure all modules System configuration The administrator has the permission to login to the Web which can configure system management mod...

Page 46: ...1 WEB access protocol Item Description HTTP settings Click Enable HTTP checkbox and configure the port number HTTPS settings Click Enable HTTPS checkbox and configure the port number If digit certific...

Page 47: ...face name Allows you to select an interface to be limited Limit services Allows you to select which kind of access protocol to be limited including Https Http telnet SSH Ping protocol Operation Click...

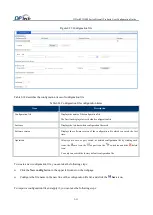
Page 48: ...the administrator forcedly Caution User can enable the Telent and SSH method at the same time but only login method can be used to login to the device 2 6 Configuration file Configuration file provide...

Page 49: ...version Displays the software version of the configuration file which you saved the last time Operation Allows you to save export switch or deleted configuration file by clicking such icons the save...

Page 50: ...side the file name To download a configuration file you can take the following steps Select TFTP or FTP protocol which will be used if you download a configuration file from the server Configure the s...

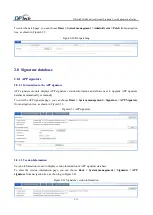
Page 51: ...n information and allows user to upgrade APP signature database automatically or manually To enter the APP signature page you can choose Basic System management Signature APP Signature from navigation...

Page 52: ...steps Click Downgrade button in the upper right corner the system prompt you that signature database will be downgraded to a history version continue Click Confirm button After you downgrade the signa...

Page 53: ...u to upgrade signature database when you need it And user can export specific signature database file from your local system and manual upgrade the signature database To enter the manual upgrade inter...

Page 54: ...allows user to upgrade URL classification filtering signature database automatically or manually To enter the URL classification filtering signature page you can choose Basic System management Signat...

Page 55: ...re database to the previous version To downgrade a signature database version you can take the following steps Click Downgrade button in the upper right corner the system prompt you that signature dat...

Page 56: ...erval for the auto upgrade settings After you finish the above steps click the Save button 2 8 2 4 Manual upgrade Manual upgrade allows you to upgrade signature database when you need it And user can...

Page 57: ...cess the interface will skip to the upgrade process interface Figure2 40 Upgrade progress interface 2 8 3 AV signature To enter AV signature page you can choose Basic System Management Signature datab...

Page 58: ...base License management from navigation tree as shown in Figure2 43 Figure2 43 License management To export license file to your local system Click the Export File button and then system prompt you a...

Page 59: ...use and others Operation Click save or delete icon to do the operations In use software version can t be deleted The software for the next boot Select a software version for the next boot which will b...

Page 60: ...tion tree as shown in Figure2 45 Figure2 45 NTP configuration Table2 22 describes the configuration items of NTP server mode Table2 22 NTP server mode configuration items Item Description NTP server a...

Page 61: ...e following diagram is NTP client configuration as shown in Figure2 46 Figure2 46 NTP client configuration Table2 23 describes the configuration items of the NTP client mode Table2 23 NTP client mode...

Page 62: ...tem from navigation tree as shown in Figure2 47 Figure2 47 Virtual management system 2 11 2 Virtual management system parameter settings To enter the virtual management system parameter settings page...

Page 63: ...table to co exist within the same router at the same time Because the routing instances are independent the same or overlapping IP addresses can be used without conflicting with each other To enter t...

Page 64: ...s your credentials when doing business or other transactions on the Web It is issued by a certification authority CA It contains your name a serial number expiration dates a copy of the certificate ho...

Page 65: ...Country Select a country for the device State Configure the state for the device City Configure the city for the device Company Configure the company name for the device Department Configure the depa...

Page 66: ...gorithm Root certificate fingerprint Set the root certificate fingerprint To configure the CA server configuration you can take the following steps Configure CA ID Configure certificate application UR...

Page 67: ...ke the following steps Select a method of how to get the URL If you the select manual configuration option you should configure the obtain CRL URL item After you finished the above steps you can click...

Page 68: ...igure2 56 Key management Note Factory default for the certificate key is that the device does not have certificate key Click the Hide key information button that you can view or hide RSA publick key i...

Page 69: ...s the details of certification management Table2 29 Certification Management Item Description Certificate file name Displays the name of the certificate file Certificate issuer Displays the certificat...

Page 70: ...ement Table2 30 describes the details of the CRL management Table2 30 CRL management Item Description CRL file name Displays the name of the CRL file CRL issuer Displays the CRL issuer Current CRL upd...

Page 71: ...d management is a method of the firewall using an interface to manage several firewalls in the network As simple as you using a remote control to manage all electrical appliances in your home the cent...

Page 72: ...elated function about device network management Interface management 3G Dial up Network object Forwarding IPv6_Tunnel IPv6 autoconfig IPv4 unicast routing IPv4 multicast routing IPv6 multicast routing...

Page 73: ...2 1 Networking configuration User can configure the FW device s interface working mode according to their requirement for the network mode and select the interface type If you select Layer 2 interfac...

Page 74: ...de interface for users 3 2 2 1 VLAN Interface Configuration To enter the VLAN interface configuration page you can choose Basic Network Interface management VLAN interface configuration from navigatio...

Page 75: ...ew and modify the interface status of the device To enter the interface configuration page you can choose Basic Network Interface management Interface configuration as shown in Figure3 5 Figure3 5 Int...

Page 76: ...nwhile those bound together links can dynamically backup with each other which enhance the link reliability To enter the port aggregation configuration page you can choose Basic Network Interface mana...

Page 77: ...oring from navigation tree as shown in Figure3 10 Figure3 10 Remote source mirroring 3 2 5 3 Remote destination mirroring To enter the remote destination mirroring page you can choose Basic Network In...

Page 78: ...sic Network Interface management Logic interface Loopback interface as shown in Figure3 13 Figure3 13 Loopback interface configuration 3 2 6 3 PPP interface configuration To enter the PPP interface co...

Page 79: ...page you can choose Basic Network Interface management GRE from navigation tree as shown in Figure3 17 Figure3 17 GRE 3 3 3G Dial up 3G dial up allows you to dial up the Internet by using of 3G User c...

Page 80: ...on security zones A security zone is an abstract conception It can include physical interfaces and logical interfaces and also Trunk interface VLAN Interfaces added to the same security zone have cons...

Page 81: ...the operations 3 4 1 3 Typical configuration for security zone 1 Network requirement Figure3 20 Network diagram for configuring security zones 2 A company uses Device as the network border firewall d...

Page 82: ...efault the system has created the Trust DMZ and Untrust zones defined the priority of these zones 1 Deploy the Trustzone Select Basic Network Network object Security zone from navigation tree to enter...

Page 83: ...pecify a name Displays the IP range of the IP address object and exceptional IP address Description Allows you to specify the description of the IP address object Policy reference Whether the IP addre...

Page 84: ...reference Displays which policy can be referenced to the IP address object group Operation Click copy icon or delete icon to do the operations 3 4 3 IPv6 address 3 4 3 1 Introduction to IPv6 Address T...

Page 85: ...re3 25 MAC address group Table3 3 describes the details of the IP address object group Table3 4 IP address object group Item Description Mac address Displays the user group created in the MAC address...

Page 86: ...3 4 6 1 Account user To enter the account user page you can choose Basic Network Network object Account Account user from navigation tree as shown in Figure3 27 Figure3 27 Account user Table3 4 descri...

Page 87: ...he IP address after domain name is configured To enter the domain name page you can choose Basic Network Network object Domain name from navigation tree as shown in Figure3 28 Figure3 28 Domain name 3...

Page 88: ...navigation tree as shown in Figure3 30 Figure3 30 User defined service object 3 4 8 3 Service object group To enter the service object group page you can choose Basic Network Network object Service S...

Page 89: ...you can choose Basic Network Network object Forwarding Forwarding mode from navigation tree as shown in Figure3 33 Figure3 33 Forwarding mode 3 5 3 Neighbor discover To enter the neighbor discover pag...

Page 90: ...page you can choose Basic Network 6 to4 tunnel from navigation tree as shown in Figure3 37 Figure3 36 6to4 tunnel Table3 6 State Item Description Tunnel ID Configure the tunnel ID number Tunnel IP Con...

Page 91: ...ally After static route is configured data packets go to the specific destination will be forwarded to the paths designated by administrator In a simple network network communication can be realized o...

Page 92: ...ferent priority then route back up can be realized To enter the configure static route page you can choose Basic Network IPv4 unicast routing Configure static route from navigation tree as shown in Fi...

Page 93: ...port static route in batch Click Export CSV File button and then select a file path then click Ok button 2 Configure static route manually Configure the destination address 0 0 0 0 subnet mask 0 0 0 0...

Page 94: ...ateway Next hop Allows you to view the network gateway Next hop address Outbound interface Allows you to view the static route outbound interface 3 10 2 Detailed routing table Detailed routing table p...

Page 95: ...tate of the route Protocol Allows you to view the method that the route is generated including Static Connect RIP OSPF BGP Guard protocol Priority Allows you to view the static route priority Cost All...

Page 96: ...y running at a series of routes under the same technology management department There are three early BGP versions BGP 1 RFC1105 BGP 2 RFC1163 and BGP 3 RFC1267 The current version in use is BGP 4 RFC...

Page 97: ...lick the checkbox of enable BGP enter the local AS number Configure the neighbor configuration Click Ok button in the upper right corner on the webpage Table3 11 describes the details of BGP advanced...

Page 98: ...take the following steps Configure each item of route aggregation Click Ok button in the upper right corner on the webpage 3 10 4 3 Configure BGP VPN To enter the configure BGP VPN neighbor informati...

Page 99: ...irtual system configuration Select Basic System VRF from navigation tree to enter the VRF interface and create a new VRF such as VRF_A select a virtual system and an interface for the VRF Select Basic...

Page 100: ...unt as a routing metric RIP prevents routing loops by implementing a limit on the number of hops allowed in a path from the source to a destination The maximum number of hops allowed for RIP is 15 Thi...

Page 101: ...anced configuration Table3 16 RIP advanced configuration Item Description Route priority Allows you to configure the route priority Router update timer Allows you to configure the time intervals for r...

Page 102: ...states so no route loops are generated Area partition Allows an AS to be split into different areas for ease of management and routing information transmitted between areas is summarized to reduce ne...

Page 103: ...uld take the following steps Click advanced configuration And then configure route priority Set route device ID number The auto is the maximum IP address of device interfaces Add NBMA neighbor Select...

Page 104: ...ct authentication mode Advanced configuration Allows you to configure the OSPF advanced configurations To configure OSPF interface configuration you should Configure time interval for the interface to...

Page 105: ...isplays the interface status COST Displays the interface COST value DR Displays the DR of the interface in the area BDR Displays the BDR of interface in the area Neighbor number Displays the neighbor...

Page 106: ...area belongs Displays the interface to which area belongs Interface name Displays the name of the interface DR Displays the DR of the interface in the area BDR Displays the BDR of interface in the ar...

Page 107: ...le3 23 describes the details of IS IS interface configuration Table3 23 IS IS interface configuration Item Description Interface name Displays interface name Enabling status Allows you to configure th...

Page 108: ...S from navigation tree as shown in Figure3 52 Figure3 52 IS IS neighbor Table3 24 describes the details of IS IS neighbor Table3 24 IS IS neighbor Item Description Sys ID Displays system ID number Typ...

Page 109: ...the remaining lifetime Operation Click to view the detailed information 3 10 8 Guard route The Guard route should be used with BGP BGP protocol imports guard route to the BGP route table and advertis...

Page 110: ...ct a configuration file from local disk Click Ok button and then static route configuration file is imported immediately Click Export button to export all static routes To manually configure the IPv6...

Page 111: ...ask Allows you to view the destination subnet IP address and subnet mask Gateway Next hop Allows you to view the gateway Next hop address Outbound interface Allows you to view the outbound interface o...

Page 112: ...ew the method that the route is generated including Static Connect RIP OSPF BGP Guard protocol Priority Allows you to view the static route priority Cost Allows you to view the route cost Type Allows...

Page 113: ...nterface configuration Item Description Interface name Displays all interfaces of the device Enabling status Specify whether to enable RIP protocol for the interface Advanced configuration Specify the...

Page 114: ...Redistribute a route Specify the RIPng redistributed route To configure the RIPng advanced configuration Click advanced configuration Set update timer By default it is 30 Set route aging timer By def...

Page 115: ...re3 60 Figure3 60 OSPFv3 area configuration Table3 30 describes the details of OSPFv3 area configuration Table3 30 OSPFv3 area configuration Item Description Create an area Create an OSPFv3 area Area...

Page 116: ...terval for an interface Dead time interval Displays the dead time interval of an unreceived interface Instance ID Specify the Instance ID Advanced configuration Specify interface OSPFv3 protocol and a...

Page 117: ...te Click Ok button in the upper right corner 3 11 3 2 OSPFv3 neighbor information To access the OSPFv3 interface information you can click Basic Network Unicast IPv6 routing OSPFv3 OSPFv3 neighbor inf...

Page 118: ...the details of OSPFv3 neighbor information Table3 34 OSPFv3 neighbor information Item Description Query item Select an item which you want to query Keyword Displays neighbor information which contain...

Page 119: ...que effectively addresses the issue of point to multipoint data transmission By allowing high efficiency point to multipoint data transmission over an IP network multicast greatly saves network bandwi...

Page 120: ...et mask Click Ok button in the upper right corner 3 12 2 IGMP snooping 3 12 2 1 IGMP snooping Internet Group Management Protocol Snooping IGMP Snooping is a multicast constraining mechanism that runs...

Page 121: ...uter port Displays static configuration Router port 3 12 2 2 IGMP snooping proxy To enter the IGMP page you can choose Basic Network IPv4 multicast routing IGMP snooping proxy as shown in Figure3 67 F...

Page 122: ...igure3 68 IGMP snooping routing 3 12 3 IGMP IGMP proxy 3 12 3 1 IGMP To enter the IGMP page you can choose Basic Network IPv4 multicast routing IGMP IGMP Proxy IGMP from navigation tree as shown in Fi...

Page 123: ...to enable IGMP proxy on the host interface Route interface configuration Select whether to enable IGMP proxy on each interface To configure IGMP proxy configuration you should take the following step...

Page 124: ...3 12 4 1 PIM Protocol Independent Multicast PIM provides IP multicast forwarding by leveraging static routes or unicast routing tables generated by any unicast routing protocol such as Routing Inform...

Page 125: ...ce Candidate BSR hash mask length Configure the candidate BSR hash mask length Candidate BSR priority Configure the candidate BSR priority To configure static RP configuration you can choose Basic Net...

Page 126: ...nterfaces of the device Candidate RP enabling status Allows you to enable or disable candidate RP Candidate RP advertisement interval Set the candidate RP advertisement interval Candidate RP priority...

Page 127: ...ork IPv4 multicast routing PIM Admin scope zone as shown in Figure3 77 Figure3 77 Admin scope zone Table3 44 describes the configuration item of Global zone configuration Table3 44 Global zone configu...

Page 128: ...ld take the following steps Configure scope and set the hash mask length Click Ok button in the upper right corner on the webpage Note After you enable the global zone configuration global zone config...

Page 129: ...on tree as shown in Figure3 80 Figure3 80 RP Mapping 3 12 5 MSDP Multicast Source Discovery Protocol MSDP establishes MSDP peer relationships among RPs of different PIM SM domains source active SA mes...

Page 130: ...page you can choose Basic Network IPv4 multicast routing MSDP Peer status from navigation tree as shown in Figure3 82 Figure3 82 Peer status 3 12 5 3 Cache status To enter cache status page you can ch...

Page 131: ...hoose Basic Network IPv4 multicast routing Multicast source proxy as shown in Figure3 85 Figure3 85 Multicast source proxy 3 12 8 Multicast source NAT To enter the multicast source NAT page you can ch...

Page 132: ...igure3 88 Multicast static routing 3 12 11 Multicast routing table 3 12 11 1 Multicast routing table To enter the multicast routing table page you can choose Basic Network IPv4 multicast routing Multi...

Page 133: ...le page you can choose Basic Network IPv4 multicast routing IGMP multicast routing table as shown in Figure3 91 Figure3 91 IGMP multicast routing table 3 12 11 4 IGMP proxy routing table To enter the...

Page 134: ...disable To configure the basic config you should take the following steps Select an interface will be enabled and then select the Enable status for the interface Configure the multicast address and s...

Page 135: ...tree as shown in Figure3 95 Figure3 95 MLD 3 13 2 3 MLD status To enter the MLD status page you can choose Basic Network IPv6 multicast routing MLD status as shown in Figure3 96 Figure3 96 MLD status...

Page 136: ...cope zone To enter the admin scope zone page you can choose Basic Network IPv6 multicast routing PIM Admin scope zone from navigation tree as shown in Figure3 98 Figure3 98 Admin scope zone Table3 47...

Page 137: ...ion SCOPE Configure SCOPE Hash mask length Set the hash mask length Priority Set the priority Operation Click insert or delete icon to do the operations To configure global zone configuration you shou...

Page 138: ...re3 100 BSR status 3 13 3 5 RP Mapping To enter the RP Mapping page you can choose Basic Network IPv6 multicast routing PIM RP Mapping as shown in Figure3 101 Figure3 101 RP Mapping 3 13 4 PIM multica...

Page 139: ...ech is a technology that recognize different network packets thus forward these packets as the policy created in advance PBR can classify the network packets according different key field and decide w...

Page 140: ...of service ToS Inbound interface Allows you to select which interface enabled the PBR policy Protocol Allows you to select which protocol should be used by the PBR policy Nexthop Allows you to config...

Page 141: ...estination subnet Allows you to configure the destination IP address of the PBR policy ToS Allows you to configure the type of service ToS Inbound interface Allows you to select which interface enable...

Page 142: ...t with the help of labels 3 15 1 MPLS configuration 3 15 1 1 Global configuration To enter the MPLS configuration page you can choose Basic Network MPLS Global configuration from navigation tree as sh...

Page 143: ...n choose Basic Network MPLS LDP LDP configuration from navigation tree as shown in Figure3 110 Figure3 110 LDP configuration 3 15 3 2 Display LDP neighbor To enter the display LDP neighbor page you ca...

Page 144: ...lish Layer 2 connections between nodes 3 15 4 1 L2VPN configuration To enter the L2VPN configuration you can choose Basic Network MPLS L2VPN configuration L2VPN configuration from navigation tree as s...

Page 145: ...ARTINI mode from navigation tree as shown in Figure3 117 Figure3 117 MARTINI mode 3 15 4 5 VPLS mode VPLS provides Layer 2 VPN services However it supports multipoint services rather than the point to...

Page 146: ...dress is not enough because IP data packets runs encapsulated by line protocol so that the sender must know the receiver s physical IP address and needs the IP address and physical address mapping rel...

Page 147: ...set to the IP of the machine issuing the packet and the destination MAC is the broadcast address ff ff ff ff ff ff Ordinarily no reply packet will occur To enter the gratuitous page you can choose Ba...

Page 148: ...se Basic Network ARP ARP configuration from navigation tree as shown in Figure3 124 Figure3 124 ARP configuration 3 16 2 3 ARP log To enter the ARP log page you can choose Basic Network ARP ARP log as...

Page 149: ...eps Enter the DNS server address and click the check box of DNS proxy Click Ok button in the upper right corner on the webpage 3 19 DHCP Configuration 3 19 1 Introduction to DHCP DHCP allows administr...

Page 150: ...on Table3 51 Dynamic DHCP server configuration Item Description Start IP address Specify start IP address from the IP address pool End IP address Specify end IP address from the IP address pool Subnet...

Page 151: ...the following steps Click copy icon And then enter the starting and ending IP address which will be distributed by DHCP server Enter IP address subnet mask of the distributed address and enter the DH...

Page 152: ...ter the DHCP relay agent page you can choose Basic Network DHCP DHCP relay agent as shown in Figure3 130 Figure3 130 DHCP relay agent Table3 53 describes the details of DHCP relay configuration Table3...

Page 153: ...ress table interface you can choose Basic Network DHCP DHCP IP address table from navigation tree as shown in Figure3 131 Figure3 131 DHCP IP address table Table3 54 describes the details of DHCP IP a...

Page 154: ...each other If one system receives no packets consecutively the system considers the BFD session Down Passive mode If multiple BFD sessions exist in a system periodically sending costs of BFD control...

Page 155: ...asic wireless To enter the basic wireless address table interface you can choose Basic Network Wireless from navigation tree as shown in Figure3 135 Figure3 135 Basic wireless To configure basic wirel...

Page 156: ...iagnose tool Ping from navigation tree as shown in Figure3 136 Figure3 136 Ping To use Ping diagnose tool Enter the PING destination IP address Click the Test button on the bottom right The PING test...

Page 157: ...ure page you can choose Basic Network Diagnose tool Capture from navigation tree as shown in Figure3 138 Figure3 138 Capture 3 23 LAN Switch 3 23 1 Spanning tree 3 23 1 1 Select STP To enter the selec...

Page 158: ...s that it is connected with a legacy STP device the port connecting with the legacy STP device will automatically migrate to STP compatible mode MSTP mode All ports of the device send out MSTP BPDUs I...

Page 159: ...layer 2 loop it also can backup links To enter the MSTP interface you can Basic Network LAN Switch Spanning tree MSTP from navigation tree as shown in Figure3 142 Figure3 142 MSTP Table3 57 describes...

Page 160: ...rotection Select whether to enable the global BPDU protection function BPDU protection function can prevent the device from malicious attack by fabricate configuration information so that it can avoid...

Page 161: ...on from outside network the followings are provided by firewall including Packet filtering policy IPv6 packet filtering NAT NAT_PT Basic attack protection Session limit Service limit IPV4 Basic DDOS B...

Page 162: ...originator source IP originator destination IP originator source MAC originator destination MAC service IP fragment flow re mark action for every data packet To enter the packet filtering policy inte...

Page 163: ...C Specify the range of packet source MAC Originator destination MAC Specify the range of packet destination MAC Service Select a service for the packet filtering policy IP fragment Select whether to p...

Page 164: ...ol rule which will apply to the packet filtering policy URL filtering Select URL filtering rule which will apply to the packet filtering policy Advanced filtering Select advanced filtering rule which...

Page 165: ...acket filtering policy log Packet filtering policy log query function is to query specific log in the database but the premise is you should click the select box before packet filtering policy To ente...

Page 166: ...Network Address Translation NAT provides a way of translating the IP address in an IP packet header to another IP address Originally NAT is used to allow users using private IP addresses to access pub...

Page 167: ...enter the destination NAT page you can choose Basic Network Firewall Destination NAT from navigation tree as shown in Figure4 9 Figure4 9 Destination NAT Table4 3 describes the details of destination...

Page 168: ...e destination NAT server After you finished the above steps you can click Ok button in the upper right corner on the webpage Note If you configure the server inner port in the advanced configuration i...

Page 169: ...ake the following steps Click icon of the one to one NAT policy Select public interface Configure the inner address of one to one NAT policy Configure the public address of one to one NAT policy After...

Page 170: ...the following steps Click button of the address pool Configure ID number Configure start IP Configure end IP After you finished the above steps you can click Ok button in the upper right corner on th...

Page 171: ...as shown in Figure4 12 Figure4 12 NAT64 prefix 4 5 2 NAT64 addresss To enter the NAT64 transfer page you can choose Basic Network Firewall NAT64 address from navigation tree as shown in Figure4 13 Fi...

Page 172: ...hown in Figure4 15 Figure4 15 Source NAT 4 6 2 Destination NAT To enter the NAT66 destination NAT page you can choose Basic Network Firewall NAT Destination NAT from navigation tree as shown in Figure...

Page 173: ...navigation tree as shown in Figure4 18 Figure4 18 DS_LITE_NAT 4 7 2 Address pool To enter the address pool page you can choose Basic Network Firewall Address pool from navigation tree as shown in Figu...

Page 174: ...all User defined log from navigation tree as shown in Figure4 21 Figure4 21 User defined log 4 9 Basic attack protection 4 9 1 Basic attack protection Sometimes normal packets transmitted in the netwo...

Page 175: ...nable the relevant protocol attack protection Send log Click the select box and then you can view the log while attack packet transmitted through the device interface Number of attacks Statistics of t...

Page 176: ...on Serial number Displays serial number of the attack Time Displays when the attack log is created Attack type Displays the type of the attack Protocol Displays the protocol of the attack Source IP Di...

Page 177: ...ny session entries on the device these entries occupy large amount of internal memory and influence other service to be performed User can configure session limit to limit the new created session on t...

Page 178: ...fast To enter the IPv4 blacklist configuration page you can choose Basic Firewall Blacklist from navigation tree as shown in Figure4 27 Figure4 27 IPv4 blacklist configuration Table4 8 describes the d...

Page 179: ...er the IPv6 black list configuration page you can choose Basic Firewall Blacklist query from navigation tree as shown in Figure4 28 Figure4 28 Blacklist query 4 13 3 Black list query To enter the blac...

Page 180: ...egins IP address Displays the blacklisted IP address Lifecycle Displays the lifecycle in blacklist log query Add reasons Displays the IP address is added including Manual and Dynamic To query the blac...

Page 181: ...s including not bind and already bind To each Layer 2 network mode auto learning you should take the following steps Click the Layer 2 mode network radio box click Auto learn button Click Check curren...

Page 182: ...able MAC IP binding Enable MAC IP binding function Enabled interface Select an interface to be enabled MAC IP binding MAC IP binding only appointed address pass Click the MAC IP binding only appointed...

Page 183: ...packet is identical If so it forwards the packet otherwise it discards the packet To enter the User IP binding page you can choose Basic Firewall MAC IP binding User IP binding from navigation tree as...

Page 184: ...binding file from your local system click import button If you want to export username and IP address to a CSV file you can click export button then select a file path to store your use IP binding fil...

Page 185: ...al configuration Enter user name and IP address Click Ok button in the upper right corner on the webpage If you want to import username and IP address in batch click Browse button and select the user...

Page 186: ...the IP address of the unmatched MAC address Displays the MAC address that unmatched with MAC IP binding list Detailed information Displays the detailed information about MAC IP binding log To query MA...

Page 187: ...own in Figure4 36 Figure4 36 Session management Table4 17 describes the details of binding log query Table4 17 Binding log query Item Description No Displays the sequence number of the session list Pr...

Page 188: ...nagement Session zone from navigation tree as shown in Figure4 37 Figure4 37 Session zone 4 15 3 Session forwarding After you enable this function response packets will be forwarded by using of origin...

Page 189: ...session monitoring displays as a trend chart To enter the session monitoring page you can choose Basic Firewall Session Management Session Monitoring from navigation tree as shown in Figure4 40 Figure...

Page 190: ...syslog format Normal sending log as normal format Third party sending log as third part log format Log option If you select the stream format option you can configure the inbound interface of packet o...

Page 191: ...ver port Allows you to configure the log server port The port number is 9505 4 16 QoS QoS is a kind of network mechanism which is used for resolving the problem of network delay and network congestion...

Page 192: ...2 User group bandwidth reservation User group bandwidth reservation allocates service stream according to the importance of service stream and delay sensibility thus can make the most use of available...

Page 193: ...u can choose Basic Firewall QOS Single user bandwidth reservation as shown in Figure4 44 Single user bandwidth reservation To configure single user bandwidth reservation Enter a name for this entry of...

Page 194: ...ng relationship respectively Under normal condition the device looks up default priority mapping for data packets If default priority mapping table cannot satisfied with users user can modify mapping...

Page 195: ...increase it drops packets actively and adjusts network traffic to eliminate network overload problem To enter the congestion avoidance page you can choose Basic Firewall QoS Congestion avoidance as s...

Page 196: ...can choose Basic Firewall QoS Congestion management as shown in Figure4 47 Figure4 47 Congestion management Table4 22 describes the details of congestion management Table4 22 Congestion management Ite...

Page 197: ...er the traffic shaping page you can choose Basic Firewall QOS Traffic shaping as shown in Figure4 48 Figure4 48 Traffic shaping 4 18 Anti ARP Spoofing 4 18 1 Anti ARP Spoofing To enter the Anti ARP Sp...

Page 198: ...ays the obtaining method of anti arp spoofing 4 18 2 ARP Configuration The Address Resolution Protocol ARP is used to resolve an IP address into a physical address Ethernet MAC address for example In...

Page 199: ...e ARP configuration interface Chapter 5 Log Management 5 1 Introduction to the Log Management Log management provides log management function for users including System log Operation log Business log...

Page 200: ...em log to the local system click Export button and then you can made a choice from the pop up window that you can view the system log as CSV file or save it to the local system Table5 1 describes the...

Page 201: ...also can be refreshed as if you click the refresh button Shading color is used in warning user and represent the severity of system log Red color stands for fatal error emergency and serverity Orange...

Page 202: ...as its beginning time End time Search system log as its finish time 5 2 3 System Log File Operation System log file operation provides users with system save and delete as today and the desired day To...

Page 203: ...tion you can click Basic Log management System log configuration as shown in Figure5 5 Figure5 5 System log configuration Table5 4 describes the details of system log configuration You can save log fi...

Page 204: ...og as shown in Figure5 6 Figure5 6 Latest log Single click Export button on the bottom and then you can make a choice from the system prompt window that you can view the system log as CSV format or ex...

Page 205: ...ation log Operation result Shows the result of operation log including success and fail success means your operation is successful fail means your operation is fail Log content Shows the content of op...

Page 206: ...tion log query function Table5 6 Operation log query Item Description Administrator Shows the administer who did the operation log IP address Shows the IP address of operation log Time scope Select op...

Page 207: ...t operation log as your configuration To enter operation log configuration interface you can click Basic Log management Operation log Log file operation as shown in Figure5 9 Figure5 9 Operation log c...

Page 208: ...m Table5 9 Service log configuration Item Description Days for saving The system will delete the expired service log by your selection which includes one week two week and three week 30 days or custom...

Page 209: ...h FW1000 Series Firewall Products User Configuration Guide 6 191 Item Description The number of emails sent out every minute Configuring the e mail sent frequency Domain name Set domain name of email...

Page 210: ...s which will not cause network resources waste and better services enterprises Traditional routing strategy can solve the problem in some extent but the inconvenient and inflexible configurations can...

Page 211: ...fig 6 1 2 2 Interface config Click Add configuration button you can view the basic configuration of the ISP as shown in Figure6 2 Figure6 2 Interface config 6 1 3 Link health check To enter the interf...

Page 212: ...DPtech FW1000 Series Firewall Products User Configuration Guide 6 194 6 1 4 ISP To enter the ISP interface you can click Service Load balancing ISP as shown in Figure6 3...

Page 213: ...uction to the Rate Limitation Network traffic can be divided into several service types according to different network protocols such as HTTP service FTP service E mail service that can be implemented...

Page 214: ...ame for the user group limitation Limit parameter Configure the user group limitation parameter Time Select a time scope User group limitation takes effect as your selection Disable Click the option t...

Page 215: ...able7 2 User group parameter Item Description NetUserGroup Configure a name for the user group parameter Up Configure the rate speed for the uplink Unit bps Select a unit for the uplink rate limit Dow...

Page 216: ...then configure upstream and downstream parameter for the service Disable Click the option that user group limitation will be disabled Operation Click copy delete insert icon to do the operations To cr...

Page 217: ...Select a unit for the downlink rate limit Operation Click copy or delete to do the operations Caution Rate limitation is to limit user communiation between inside network and outside while it can t l...

Page 218: ...e firewall device you can configure rate limitation working mode of the network configuration is layer 3 interface and then you can configure marketing department IP segment is 192 168 3 2 192 168 3 1...

Page 219: ...e name and password provided by ISP LAN interface eth0 0 IP address 192 168 3 0 subnet mask 24 eth0 5 IP address 192 168 4 subnet mask 24 and then click the Ok button Choose Basic Network management N...

Page 220: ...ate a rule of the rate limitation per IP address bandwidth2 Configure a name for the rate limitation bandwidth2 Select the Enable status Configure rate limitation parameter select a type of service HT...

Page 221: ...the rule of access control Send log Select whether to enable the send log function Operation Click copy or delete icon to do the operations To create the rule of the access control you can take the f...

Page 222: ...n In the right box the user defined application group box double click the node of application group and configure a name for it Click add button that you can add entry of the user defined application...

Page 223: ...al configuration for the Access Control 7 2 4 1 Network requirement On the firewall device you can configure the access control for the marketing department IP segment is 192 168 3 2 192 168 3 10 excl...

Page 224: ...e name and password provided by ISP LAN interface eth0 0 IP address 192 168 3 0 subnet mask 24 eth0 5 IP address 192 168 4 subnet mask 24 and then click the Ok button Choose Basic Network management N...

Page 225: ...tor there refer to URL hereinafter is a kind of webpage filtering function support HTTP request packet filtering according to IP address host name regular expression The realization of URL filtering f...

Page 226: ...icon to delete an entry of the access control rule 7 3 2 Customize URL Classification To access the customize URL classification interface you can choose Service Access control URL filtering Customize...

Page 227: ...the IP address Host name filtering according to the host name Regular expression filtering according to the content restricted by regular expression Black white list Select an action for the advanced...

Page 228: ...column you should configure the filter parameter IP address filtering according to the IP address Host name filtering according to the host name Regular expression filtering according to the content...

Page 229: ...configure rate limitation working mode of the network configuration is layer 3 interface and then you can configure marketing department IP segment is 192 168 3 2 192 168 3 10 exclude the IP address1...

Page 230: ...guration procedures Choose Basic Network management Network user group IP user group WAN interface eth0 3 access method PPPoE type the name and password provided by ISP LAN interface eth0 0 IP address...

Page 231: ...log option Click the Ok button in the upper right corner on the webpage Create a rule for the advanced URL configuration URL2 Configure a name for the advanced URL configuration URL2 Configure the fi...

Page 232: ...able7 10 SQL injection protection configuration items Item Description Name Configure a name for the SQL injection protection rule Exceptional interface Configure the exceptional interface Exceptional...

Page 233: ...ludes protocols for establishing mutual authentication between agents at the beginning of the session and negotiation of cryptographic keys to be used during the session 8 1 2 IPsec sysConfig To enter...

Page 234: ...s Displays the remote IP address for the IPSec rule Local Device ID Auto The system auto select the local IP address as the local device ID Host Name Required when NAT traverse is configured IP Addres...

Page 235: ...nd then from the four options you should select the obtaining method as your requirement example auto Configure client ID and then from the four options you should select the obtaining method as your...

Page 236: ...gure authentication method and then from the two options you should select an authentication as your requirement example pre shared key 1234 After you finished the above steps click Ok button in the u...

Page 237: ...ou can choose Service VPN IPsec IPsec interface as shown in Figure8 6 Figure8 6 IPsec interface 8 2 L2TP 8 2 1 Introduction to L2TP L2TP is a standard Internet tunnel protocol similar to the PPTP prot...

Page 238: ...P authentication mode Select an option from PPP authentication mode drop down list such as CHAP PAP MSCHAP and MSCHAPV2 Client IP address range Configure the client IP address range and from the addre...

Page 239: ...click Browse button and then select file a path on the pop up window for the configuration file and click Import To export the configuration click Export and then click Save as button select file path...

Page 240: ...ce VPN L2TP online status as shown in Figure8 10 Figure8 10 L2TP online status 8 3 PPTP Point to Point Tunneling Protocol PPTP is a kind of technology support multiple protocol VPN working at layer 2...

Page 241: ...for the customer information Password Configure the corresponding password for the username Confirm password Configure the configuration password Operation Click the copy icon that you can copy an en...

Page 242: ...figuration Configure the advanced configuration including MTU discovery and checksum checkout and tunnel key Operation Allows you to copy or delete the GRE rule Operation Click the copy icon that you...

Page 243: ...Service VPN SMAD as shown in Figure8 13 Figure8 13 SMAD 8 5 2 SMAD blacklist To enter the SMAD blacklist interface you can click Service VPN SMAD blacklist as shown in Figure8 14 Figure8 14 SMAD blac...

Page 244: ...every host like traditional IPsec VPN 8 6 2 SSL VPN 8 6 2 1 Basic configuration To enter the basic configuration interface you can choose Service VPN SSL VPN as shown in Figure8 16 Figure8 16 SSL VPN...

Page 245: ...tion To enter the domain configuration interface you can choose Service VPN SSL VPN Domain configuration as shown in Figure8 18 Figure8 18 Domain configuration 8 6 2 4 License management To enter the...

Page 246: ...figuration To enter the resources interface and configure the IP resource configuration you can choose Service VPN SSL VPN Resource as shown in Figure8 21 Figure8 21 Resource configuration 8 6 3 2 Sha...

Page 247: ...Share space as shown in Figure8 23 Figure8 23 User configuration 8 6 4 2 User status To enter the user status interface you can choose Service VPN SSL VPN User status as shown in Figure8 24 Figure8 24...

Page 248: ...To enter the security rule interface you can choose Service VPN SSL VPN Security rule as shown in Figure8 27 Figure8 27 Security rule 8 6 6 3 Security rule group To enter the security rule group inter...

Page 249: ...Service VPN SSL VPN Log query as shown in Figure8 30 Figure8 30 Log query 8 6 7 2 Log configuration To enter the log configuration interface you can choose Service VPN SSL VPN Log configuration as sho...

Page 250: ...x stat form interface you can choose Service VPN SSL VPN Flux stat form as shown in Figure8 34 Figure8 34 Flux stat form 8 6 8 3 Statistical offline users To enter the statistical offline users interf...

Page 251: ...onfiguration Guide 9 233 Figure8 36 Online time ranking form 8 6 8 5 Resource access form To enter the resource access form interface you can choose Service VPN SSL VPN Resource access form as shown i...

Page 252: ...he following features Traffic analysis Behavior analysis Keyword filtering To view the online behavior management menu you can choose Service Behavior Traffic analysis as shown in Figure9 1 Figure9 1...

Page 253: ...ion To enter the policy configuration interface you can choose Service Behavior Behavior analysis Policy configuration as shown in Figure9 3 Figure9 3 Policy configuration Table9 2 describes the detai...

Page 254: ...inish the above steps you can click the Ok button in the upper right corner 9 3 2 Advanced configuration To enter the policy configuration interface you can choose Service Behavior Behavior analysis A...

Page 255: ...block Operation Click the copy icon that you can copy an entry of the keyword filtering rule Click the delete icon that you delete an entry of the keyword filtering rule To create a keyword filtering...

Page 256: ...n Select an action for the keyword filtering rule including warning or block Operation Click copy icon that you can copy an entry of the keyword filtering rule Click delete icon that you delete an ent...

Page 257: ...Internet Authentication Config Web Auth Notice Behavior Listen Proscenium Management Terminal Management Online User Local User To view the user authentication menu you can choose Service User authen...

Page 258: ...Allows you to set the free authentication IP address User group Allows you to select a user group Auth mode Allows you to select and configure authentication mode Unique authentication Allows you to...

Page 259: ...uth notice and URL address option for web authentication Enable proxy authentication Allows you to use proxy server to authenticate web users and allows you to configure the proxy server IP address HT...

Page 260: ...tion items Item Description Management server IP address Configure an IP address for the management server Client download URL Type client download URL for the TAC configuration MAC match Select wheth...

Page 261: ...e Select an option that the login page will skip to the specific page Default Upload the return page URL address http www baidu com Customize web authentication interface Allows you to customize the w...

Page 262: ...ce Click the delete icon that you can delete an entry of the notice 10 1 3 Web Listen If the web authentication function isn t enabled you can enable the web listen function for user authentication To...

Page 263: ...ing steps In the operation column you can click the copy icon And then configure the proscenium administrator Configure the proscenium administrator s password Configure the access address of the pros...

Page 264: ...tel user Configure real name for the hotel user Configure identification number of the hotel user After you finished the above steps Click Ok button in the upper right corner on the webpage 10 1 5 Ter...

Page 265: ...e configuration items of the USB data leakage monitor Table10 9 USB data leakage monitor Item Description USB data leakage monitor Click the Enable option that you can enable the USB data leakage moni...

Page 266: ...terminal configuration 10 1 6 Online User After the user is authenticated the user s authentication information will be displayed on the online user interface To enter the online user interface you ca...

Page 267: ...the local authentication user Password Configure a password for the local authentication user Repeat password Configure the confirm password for the local authentication user User account group Select...

Page 268: ...from your local system Click Import button To query local authentication users in batch you can Enter the username or description you want to query Click Search button 10 1 8 Blackname list To enter...

Page 269: ...the user name of the User account group Displays the user account group of the Description Displays the description of the local user authentication Select Allow you to select the local user authentic...

Page 270: ...ooperation log interface you can choose Service IDS integration Display IDS cooperation log as shown in Figure11 1 Figure11 1 Display IDS cooperation log Table11 1 describes the configuration items of...

Page 271: ...tocol VRRP technology using back up solution when communication line or device failure so that it ensure data communication smoothly and enhance network robustness and availability Enhancing local net...

Page 272: ...authentication keys are the same the received VRRP packet is considered valid otherwise the received packet is considered an invalid one MD5 authentication You can adopt MD5 authentication in a networ...

Page 273: ...In the advanced configuration column configure master elect priority announce packet sending interval master preempt mode and master preempt delay configuration example master elect priority 20 annou...

Page 274: ...edundant backup links Devices need to quickly detect communication failures and restore communication through backup links as soon as possible On some links such as POS links devices detect link failu...

Page 275: ...ic software constructs high availability system for any reason result in system failure and service disconnection will trigger software process to predicate and isolate the failure and execute disconn...

Page 276: ...ows you to configure the synchronous IP address IP Type in back up device interface IP address Port Type in back up device port number Heartbeat interface Select back up device interface Hot standby m...

Page 277: ...group Table12 4 describes the configuration items of the interface synchronization group Table12 4 Interface synchronization group Item Description Synchronization group name Configure a name for the...

Reviews: