Type TINSTALL <ENTER>. Follow the directions on the
screen.
Start T/MUX
Select the hard drive and the T/Config directory.
Type T/CONFIG <ENTER>.
Highlight T/MUX <ENTER>.
The first screen will request initials. Enter your initials and
press <ENTER>.
Main Menu
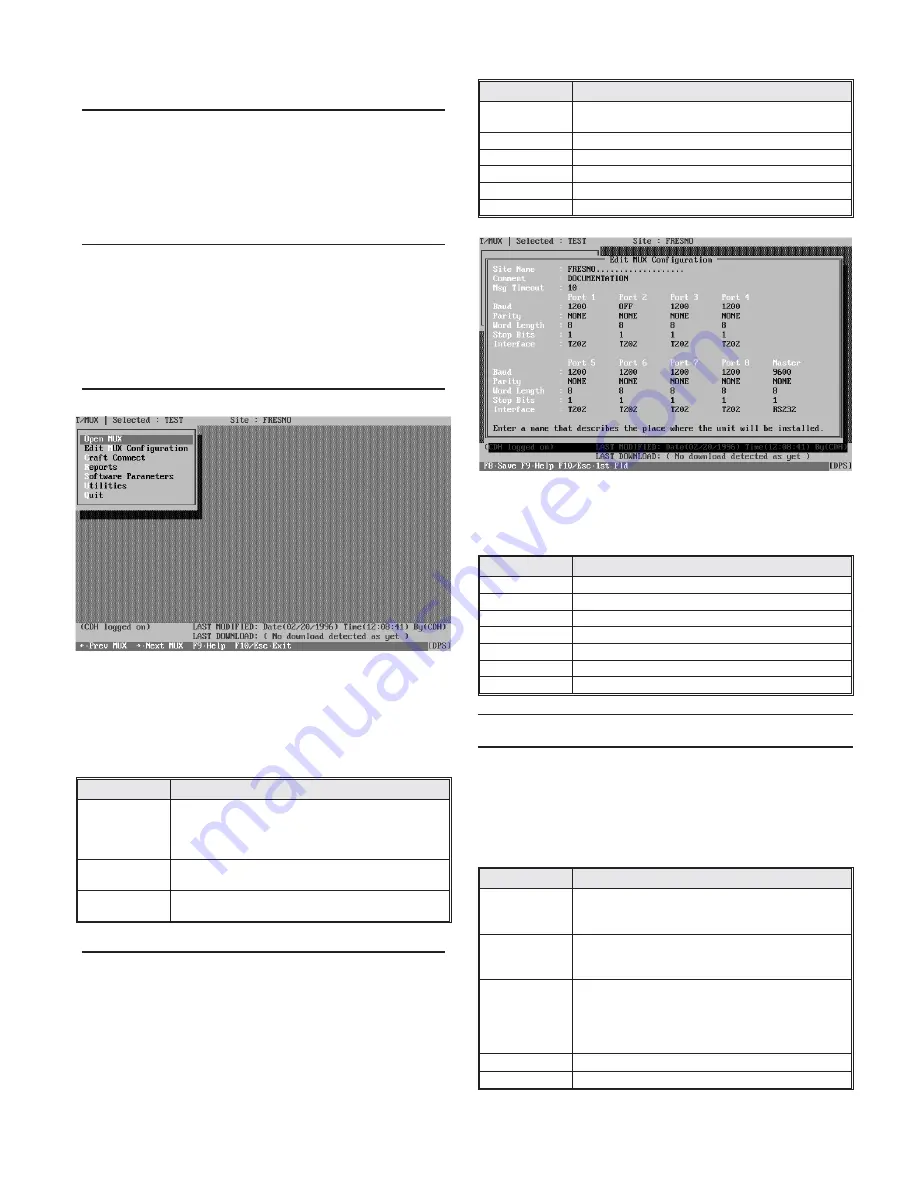
The Main Menu (Fig. 4) lists the functions available in
T/MUX. Each of these Main Menu items is explained in the
following paragraphs.Most fields will have an associated “de-
fault box” that appears. To select from the default box press Tab
and use the Tab key or cursor arrows to highligh the desired
value, then press <ENTER>.
Open MUX
This selection is used to open an existing configuration or to
name a new one. When this function is selected a box will ap-
pear with three fields, as explained in Table A.
Table A - Field Names and Descriptions in the Open
MUX Box
Field Name
Description
NAME
Enter a new name or select an existing one from the de-
fault box. The name will appear in the Title Bar at the
top of the screen at all times. The name should be exclu-
sive to this configuration.
SITE NAME
Enter a name that describes the location of the unit.
(Mandatory field.)
COMMENT
Optional field for additional identifying information,
such as date or initials of preparer.
Edit MUX Configuration
This selection presents the Edit MUX Configuration screen.
See Fig. 6. Set parameters for each of the eight ports and the
MUX (common) Port in this screen. Parameters and their val-
ues are listed in Table B.
Table B - Field Names and Descriptions in the Edit
Configurations Screen
Field Name
Description
Msg Timeout
Time to delay before aborting an incomplete TL1 mes-
sage. Enter in tenths of seconds (10-255). Default is 10.
Baud
Off, 300, 1200, 2400 and 9600
Parity
EVEN, NONE, ODD
Word Length
7 BITS, 8 BITS
Stop Bits
1 BIT, 2 BITS
Interface
TTL, RS232, RS422, RS485, 202
“Hot Keys” available in the Edit MUX Configuration screen
are shown on the line at the bottom of the screen. See Table C.
Table C - Hot Keys in the Edit Configurations Screen
Key
Function
Tab
Select default box.
Up Arrow
Go to previous field.
F1
Go to previous port.
F2
Go to next port.
F8
Save
F9
Help
F1-/Esc
Go to first field or exit.
Craft Connect
Use this menu item when connecting to the craft port on the
front of the MUX for downloading or other functions. NOTE:
When using this function, the MUX port is not active. A
sub-menu offers the functions listed in Table D:
Table D - Field Names and Descriptions in the Craft
Connect Menu
Field Name
Description
DOWNLOAD
Configure the unit using the selected configuration (re-
fer to the title bar). Starts as soon as <ENTER> is
pressed.
UPLOAD
Retrieve configuration from the unit. Overwrites se-
lected configuration. Starts as soon as <ENTER> is
pressed.
MONITOR
Monitor operational status. (Fig. 7) Screen shows local
alarm and control point status. (Shown in this screen
only.) It also displays four operational status points for
use by DPS Technical Support. Press F7 for the Modem
Tuning window.
INQUIRE
Retrieve and display the unit
*
s configuration status.
QUIT
Exit this function and return to the Main Menu.
D-PC-180-10A-XV
3
OG1074A7
November 5, 1997
Fig. 5 - Main Menu Lists the Functions Available in
T/MUX
Fig. 6 - Set TL1 Port Parameters in the Edit
Configurations Screen


