


14
888-994-7636
The Maketable also has 2 additional drains for evaporator coil condensation
located behind the front and rear wall panels of the refrigerated rail
compartment.
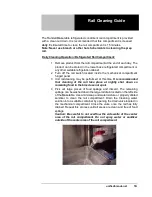
The refrigerated rail is designed to minimize food spillage from entering the
evaporator coil area. It is recommended that the panels located in the front and
back wall be removed quarterly by an authorized service agent to clean any
spillage that may occur in this area; this includes the condensation drain pans
and drain tubes. Estimated time to clean the condensate drains is 30 minutes.
Quarterly Cleaning Operation / Refrigerated Rail Compartment Condensate
Drains:
1. Remove product from the rail compartment at the end of the day. The
product can be stored in the lower base refrigerated compartment or
any other suitable refrigeration cabinet.
2. Turn off the rail switch located inside the mechanical compartment
hinged panel.
3. Turn off the main power switch located inside the mechanical
compartment.
4. Unplug unit from wall.
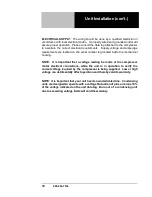
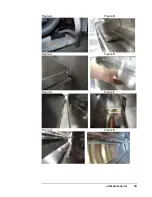
5. Locate two rail drain hoses at rear of compressor area and remove
them from the catch tray. Place end of drain hoses into pan or other
device to hold water. Figure A
6. Remove three air ducts located at each end and center of the rail
by pulling up on the front of the air duct. Figure B
7. Use Phillips screwdriver to remove two screws one on each end of
rear evaporator cover. Figure C
8. Pull rear evaporator cover out at bottom. Once pulled out far
enough the top will release and item can be removed from the
compartment. Figure D
9. Repeat step 8 for front evaporator cover.
10. Wipe away any debris from front condensate pan. Figure E.
Caution: Fins of coil are sharp. Be cautious not to come in
contact with fins of coil.
11. Rinse condensate pan with minimal amount of mild soap and water
or properly diluted sanitizer. Note: The condensate drain is ½”
diameter. Large debris is not intended to be washed down this
drain. Figure F
12. Repeat step 10 & 11 on rear condensate pan. Note: Be cautious
to not interfere with fan motors or wiring on rear of rail area.
13. Install front evaporator cover by holding bottom out and inserting
top edge above coil into stainless channel. The top will catch when
properly inserted and the bottom can be lowered into position. Look
at both ends to ensure the panel is centered left to right with no air
gaps to the coil area. Figure G.
14. Repeat step 13 for rear evaporator cover. Figure H
15. Insert screws at each end of rear evaporator cover. Do not over-
tighten.
16. Install three air ducts into rail opening.
17. Remove drain hoses from temporary pan and re-insert into the
condensate tray of the condensing unit.
18. Plug unit into wall.
19. Turn on main power switch.
20. The rail switch can be turned on the next day of operation.
Summary of Contents for Unified Brands Randell PH120F
Page 2: ......
Page 4: ......
Page 17: ...unifiedbrands net 15 Figure A Figure B Figure C Figure D Figure E Figure F Figure G Figure H ...
Page 20: ...18 888 994 7636 Electrical Diagram ...
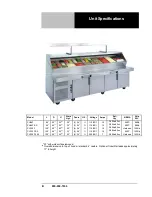
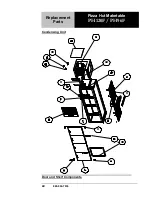
Page 22: ...20 888 994 7636 Replacement Parts Pizza Hut Maketable PH120F PH96F Unit Exterior ...
Page 25: ...unifiedbrands net 23 Replacement Parts Pizza Hut Maketable PH120F PH96F Coil Assembly ...


