Dimensions and technical information are subject to change without notice
Parallel Grippers | Maintenance and Assembly Procedure
168
DPP Series
DP
P
SE
RI
ES
Parallel Grippers
destaco
.com
1.106
AUTOMATION TECHNOLOGY
Dimensions and technical information are subject to change without notice
DPP Series
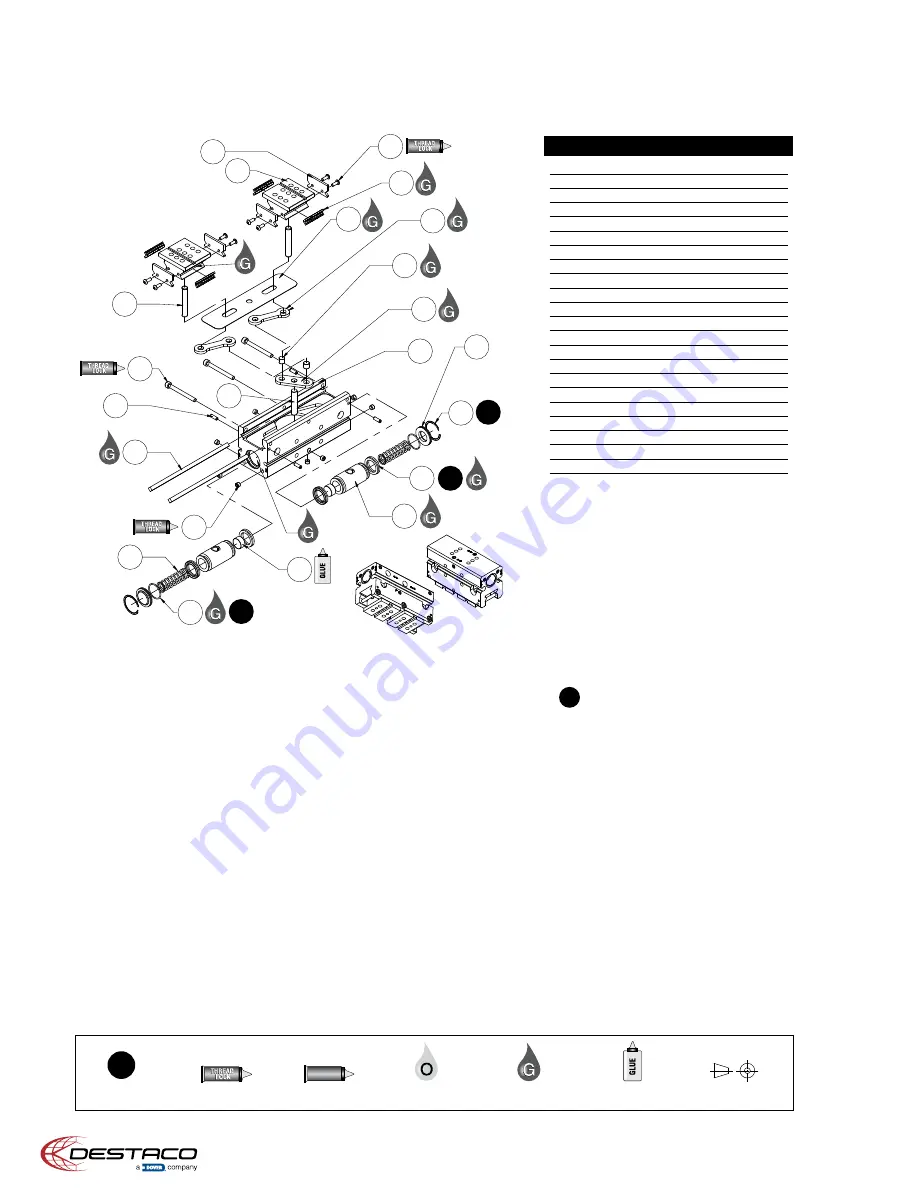
Exploded View
Third Angle
Projection
Seal Kit
Items
Thread
Locker
Krytox
™
Lubricant
Teflon
™
Based
Grease
Lightweight
Machine Oil
Super
Bonder
SK
KRYTOX
KRYTOX
Assembly Procedure:
1) Lubricate #1 body (jaw cavity & bore).
2) Plug cross ports in body with #13 set screws.
3) Press #14 pivot pin into body.
4) Insert #22 magnet(s) into each #4 piston
making sure magnets repel each other
between pistons.
5) Lubricate and install #18 seals onto pistons.
6) Insert pistons into body with magnet sides
facing in toward pivot pin.
7) Press #7 equalizer pins into #5 equalizer.
8) Assemble equalizer with #6 links and place
onto pivot pin in body making sure holes in
links line up with holes in pistons.
9) Place #8 linkage cover over equalizer and
link assembly and seat in body pocket.
10) Press #12 drive pin into each #2 jaw.
11) Lubricate jaw bearing surfaces and install
#9 wiper on each jaw end with #21
mounting screws.
12) Place #23 cage and roller bearing
assemblies on jaw bearing grooves.
13) Place jaws into body aligning the drive pins
with the holes in the linkage cover, links,
and pistons. If jaws have off center key slot
in them, jaws should be installed with this
slot farther away from the gripper’s center.
14) Slide #10 ways into body trapping them
between body and jaws.
15) Install #16 way locating pins at each end
of body to secure ways.
16) For –C spring closed option, insert #20
springs into pistons.
17) Place # 17 seals onto #3 caps and install
onto body with #19 retaining rings.
18) Install #15 preload screws and torque
per preload adjustment procedure.
Preload Adjustment Procedure:
1) Tighten center preload screw first and
then outer ones to the torque specification
in step 2.
2) Use the following torque specification
per gripper.
DPP-10M – 6 in-lbs [0.68 Nm]
DPP-14M – 8 in-lb [0.90 Nm]
DPP-20M – 13 in-lb [1.47 Nm]
Note:
Torque specifications provided are
factory settings. Fine adjustment may be
needed based on intent & application.
Non-Synchronous Procedure:
1) Remove preload screws, press out way
locating pins, and slide out ways.
2) Pull out jaws and roller bearing assemblies.
(If
-C
spring closed option, remove retaining
rings, caps, and springs first.)
3) Remove linkage cover from body.
4) Remove equalizer and links from body.
5) Re-install linkage cover into body.
6) Re-install jaws and roller bearing assemblies
into body aligning the drive pins with the hole
in the linkage cover and each piston.
7) Re-install ways, press in way locating pins,
and re-install preload screws. (If
-C
spring
closed option, re-install springs, caps and
retaining rings.)
Notes:
1) Contact the Robohand Sales Department for
a complete spare parts list with order number
and prices.
2)* Item #21 quantity varies per gripper size.
Size -10M has 4 per unit. Sizes -14M, -20M
have 8 per unit.
3)* Item #22 quantity varies per gripper size.
Size -10M has 4 per unit. Sizes -14M, -20M
have 2 per unit.
4)* Item #23 quantity and number of different
sub-assemblies varies per gripper model.
Contact Sales to determine the correct quantity
and part numbers needed.
SK
Seal Repair Kit Order #’s
See Product Data Sheets
1
2
3
19
18
4
22
20
17
13
10
16
15
12
14
5
7
6
23
21
9
8
SK
SK
SK
Item
Qty
Name
01
1
Body
02
2
Jaw
03
2
Cap
04
2
Piston
05
1
Equalizer
06
2
Link
07
2
Equalizer Pin
08
1
Linkage Cover
09
4
Wiper
10
2
Way
12
2
Drive Pin
13
10
Set Screw – Air & Purge Plug
14
1
Pivot Pin
15
3
Preload Screw
16
4
Way Locating Pin
17
2
O-Ring – Cap Seal
18
4
U-Cup – Piston Seal
19
2
Retaining Ring
20
2
Spring for -C Spring Closed Option
21*
–
BHCS – Wiper Mounting Screw
22*
–
Magnet
23*
–
S’assy, Cage & Roller Bearings


