2 PK3646_07_18
dormakaba
Oracode 660i Wireless Lock Activation/Programming
WIRELESS LOCK ACTIVATION (Continued)
2. ACTIVATION PROCESS (WITH ORACODE LIVE)
• Once the Activation number is provided, a new field will be presented where
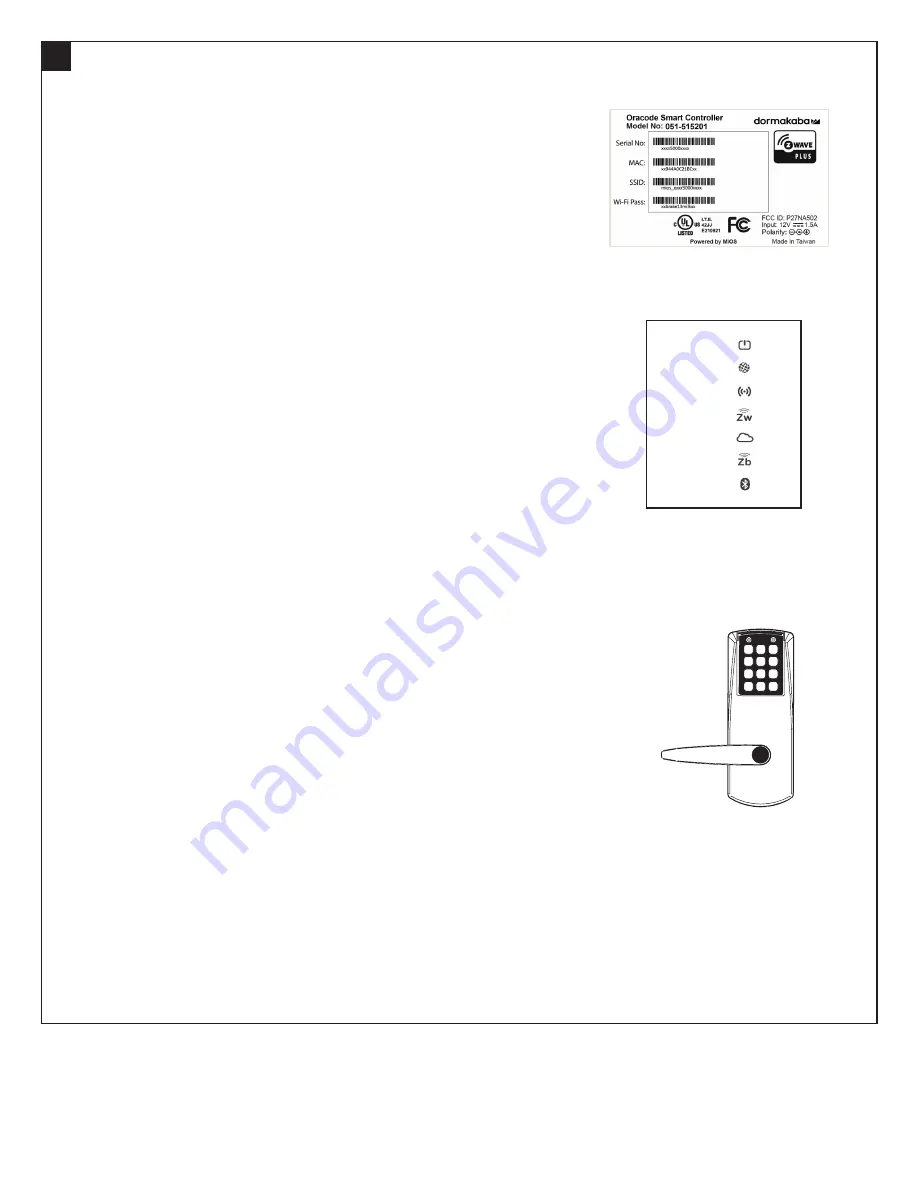
the Smart Controller’s MAC address is to be entered.
• Enter the controller’s MAC address (located on Bottom Label), and then
click the “Enable Discovery Mode” button.
• The Smart Controller will be in ZigBee “Join” mode for 10 mins, and the
ZigBee LED on the Smart Controller will be blinking.
• On the lock keypad, press * # * # and enter the 8-digit Activation Code to
start the activation process.
• The lock’s green LED will blink once at the beginning of the activation
process (the activation process could last from a few secs to 2 mins).
• A green LED and a high-pitch beep indicates a successful connection to the
Oracode Server.
• A series of silent green LED blinks will follow. This is the lock programming
being received from the Oracode Server. Once there are no more silent
green LED blinks, the lock programming is complete.
• After a few moments, the Door Details page within Oracode Live for the
activated door will be displayed, confirming that the Activation Process
is complete.
• A red LED and a low-pitch beep at the end of the activation process
indicates a failure. In this case, consult Point 3.
2. ACTIVATION PROCESS (WITH BEHOME247)
• Log into your BeHome247 account (vr.behome247.com).
• Select the property where you are installing the Smart Controller, then click
the “Settings” tab.
• Notify BeHome247 of the controller’s Serial ID prior to the activation
process, so they can create the gateway on their server and assign it to the
account for activation.
• In the “BeHome247 Automation” area, enter the Smart Controller’s serial
number (located on Bottom Label) in the field labeled “Gateway Number”,
and click “Save.”
• Scroll down to the “KABA Lock System” area, enter the door’s name in the
field labeled “Door name”, check the “This property uses wireless I-locks”
box, and click “Save.”
• Check the “Show advanced controls” box, and click “Join” under “Zigbee
powered locks’.” The Smart Controller will be in ZigBee “Join” mode for
10 minutes.
• On the lock keypad, press * # * # and enter the 8-digit Activation Code to
start the activation process.
• The lock’s green LED will blink once at the beginning of the activation
process (the activation process could last from a few seconds to 2 minutes).
• A green LED and a high-pitched beep at the end of the activation process
indicates success.
• A series of silent green LED blinks will follow. This is the lock programming
being received from the Oracode Server. Once there are no more silent
green LED blinks, the lock programming is complete.
• You can now access the lock from the BeHome247 and Oracode
Live websites.
• A red LED and a low-pitched beep at the end of the activation process
indicates a failure. In this case, consult Point 3.
Oracode 660i (Front)
2
Smart Controller
(Bottom Label)
1. Power
2. Internet
3. Wi-Fi
4. Z-wave
5. Service
6. ZigBee
7. Bluetooth
Smart Controller
(LED Panel)


