background image

3.5

В

ставка PT 20

insert PT 20

3.4

3 ..

7

5

4

3.3

3.2

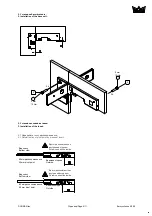
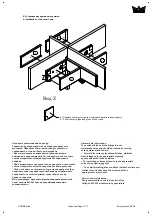
3. Установка осевой вставки:

3. Installation of the insert:

Страница/Page 7/11

Выпуск/Issue 09.08

DORMA-Glas

3.

4

 Установит

е

 пластиковую  втулку во вставку PT 20 c помощью наж

а

тия с 

небольшим усилием. В случае разрушения стекла осевая вставка защитит петлю 

от падения.

3.

4

  To overcome the rim in the bushing (PT 20), the insert should be pressed slightly 

with small force. This creates antifall guard protection if glass should break.

Summary of Contents for PT 41

Page 1: ...Installation instruction DORMA PT 41 Patch fitting for overpanel and sidelight with fin fitting on both sides Issue 09 08 003312 800 52 373 6 32 DORMA Glas DORMA PT 41...

Page 2: ...age 2 11 Issue 09 08 DORMA Glas overpanel sidepanel fin fitting glass fin fitting glass Component Mounting sequence 1 1 1 1 1 All glass clamping areas have to be cleaned with standard glass cleaning p...

Page 3: ...2 6 7 3 13 12 11 10 9 8 7 3x 4x 2x 6 5 4 3 2 1 Scope of delivery Page 3 11 Issue 09 08 DORMA Glas 1 5...

Page 4: ...1 2 1 2 1 2 Dispose the spacer 2 5 3 5 1 1 1 1 1 1 1 1 1 1 1 1 1 1 Preparation of the base unit Page 4 11 Issue 09 08 DORMA Glas 1 2 1 2 1 2 1 2...

Page 5: ...ting profil 2 2 Installation of the base unit 1 5 1 9 1 9 1 3 1 9 1 5 1 6 1 7 1 3 Pull off the backing tape 1 9 and stick on the gasket 1 5 1 6 1 7 into right place 1 8 1 8 1 8 1 7 1 7 1 5 1 5 1 6 1 6...

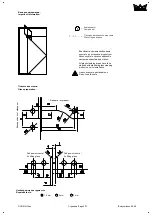
Page 6: ...2 2 Installation of the base unit Page 6 11 Issue 09 08 DORMA Glas 3 1 3 1 Determination of pivot point by means of insert Outside Bottom view 55 55 mm pivot point Screw connection inside Screw connec...

Page 7: ...2 3 3 Installation of the insert Page 7 11 Issue 09 08 DORMA Glas 3 4 PT 20 c 3 4 To overcome the rim in the bushing PT 20 the insert should be pressed slightly with small force This creates antifall...

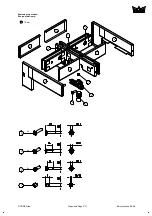
Page 8: ...4 1 4 1 4 4 Installation of the cover caps 3 3 Installation of the insert 9 8 12 5 6 6 3 6 3 6 Page 8 11 Issue 09 08 DORMA Glas...

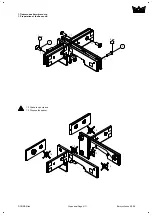
Page 9: ...Installation of the cover caps Page 9 11 Issue 09 08 DORMA Glas 1 8 1 8 1 8 1 4 1 3 5 2 5 2 5 1 5 1 5 1 5 5 Installation of the counter plates 1 5 1 5 1 5 4 2 4 2 Loosen grub screws and fix the cover...

Page 10: ...5 4 5 4 5 5 Installation of the counter plates Page 10 11 Issue 09 08 DORMA Glas 5 5 3 5 3 5 3 3 3 15 3...

Page 11: ...material and texture For metallic surfaces anodised finishes stainless steel please only use appropriate cleaning agents without abrasive additives For varnished surfaces please only use appropriate...

Reviews: