background image

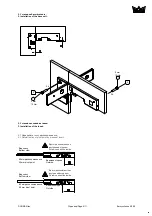
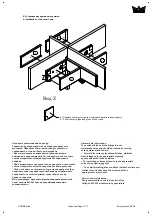
3. Установка осевой вставки:

3. Installation of the insert:

5 мм

15 

Нм

15 

Нм

5 мм

2

2

2.4

2.4

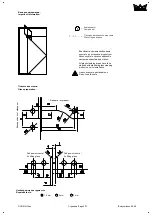
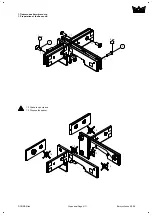
2. Установка базы фитинга:

2. Installation of the base unit:

Страница/Page 6/11

Выпуск/Issue 09.08

DORMA-Glas

3.1

 Определите точку расположения оси

:

3.1 Determination of pivot point by means of insert:

Внешняя сторона

Outside

Вид снизу 

Bottom view

55 мм расположение оси 

55 mm pivot point

Винты распол

а

гаются с 

внутренней стороны 

Screw connection inside

Винты распол

а

гаются с 

внутренней стороны 

Screw connection inside

Вид снизу 

Bottom view

Внешняя сторона

Outside

65 мм расположение оси  

65 mm pivot point

Summary of Contents for PT 41

Page 1: ...Installation instruction DORMA PT 41 Patch fitting for overpanel and sidelight with fin fitting on both sides Issue 09 08 003312 800 52 373 6 32 DORMA Glas DORMA PT 41...

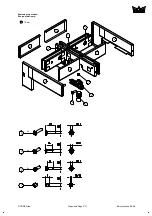
Page 2: ...age 2 11 Issue 09 08 DORMA Glas overpanel sidepanel fin fitting glass fin fitting glass Component Mounting sequence 1 1 1 1 1 All glass clamping areas have to be cleaned with standard glass cleaning p...

Page 3: ...2 6 7 3 13 12 11 10 9 8 7 3x 4x 2x 6 5 4 3 2 1 Scope of delivery Page 3 11 Issue 09 08 DORMA Glas 1 5...

Page 4: ...1 2 1 2 1 2 Dispose the spacer 2 5 3 5 1 1 1 1 1 1 1 1 1 1 1 1 1 1 Preparation of the base unit Page 4 11 Issue 09 08 DORMA Glas 1 2 1 2 1 2 1 2...

Page 5: ...ting profil 2 2 Installation of the base unit 1 5 1 9 1 9 1 3 1 9 1 5 1 6 1 7 1 3 Pull off the backing tape 1 9 and stick on the gasket 1 5 1 6 1 7 into right place 1 8 1 8 1 8 1 7 1 7 1 5 1 5 1 6 1 6...

Page 6: ...2 2 Installation of the base unit Page 6 11 Issue 09 08 DORMA Glas 3 1 3 1 Determination of pivot point by means of insert Outside Bottom view 55 55 mm pivot point Screw connection inside Screw connec...

Page 7: ...2 3 3 Installation of the insert Page 7 11 Issue 09 08 DORMA Glas 3 4 PT 20 c 3 4 To overcome the rim in the bushing PT 20 the insert should be pressed slightly with small force This creates antifall...

Page 8: ...4 1 4 1 4 4 Installation of the cover caps 3 3 Installation of the insert 9 8 12 5 6 6 3 6 3 6 Page 8 11 Issue 09 08 DORMA Glas...

Page 9: ...Installation of the cover caps Page 9 11 Issue 09 08 DORMA Glas 1 8 1 8 1 8 1 4 1 3 5 2 5 2 5 1 5 1 5 1 5 5 Installation of the counter plates 1 5 1 5 1 5 4 2 4 2 Loosen grub screws and fix the cover...

Page 10: ...5 4 5 4 5 5 Installation of the counter plates Page 10 11 Issue 09 08 DORMA Glas 5 5 3 5 3 5 3 3 3 15 3...

Page 11: ...material and texture For metallic surfaces anodised finishes stainless steel please only use appropriate cleaning agents without abrasive additives For varnished surfaces please only use appropriate...

Reviews: