background image

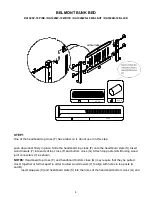
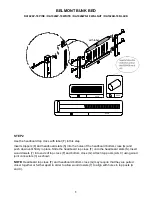
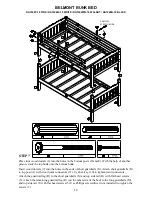
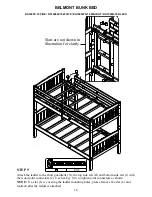
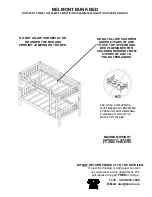
STEP 9

BELMONT BUNK BED

DA1026P-18 PINE / DA1026W-18 WHITE / DA1026WN-18 WALNUT / DA1026B-18 BLACK

Attach the ladder to the short guardrails (N), the top side rail (H) and bottom side rail (I) with
the wood joint connectors (2). Use hex key (10) to tighten joint connectors as shown.

NOTE:

  If a slat (L) is covering the ladder mounting holes, please remove the slat (L) and

reattach after the ladder is attached.

Slats are not shown in 
illustration for clarity

12

Summary of Contents for BELMONT DA1026B-18

Page 1: ...DA1026W 18 DA1026B 18 DA1026P 18 DA1026WN 18 0 72000 96501 6 0 65857 15766 6 0 72000 96502 3 0 65857 14462 8 WHITE BLACK PINE WALNUT BELMONT BUNK BED...

Page 2: ......

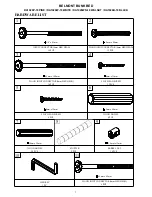
Page 3: ...NNECTOR 4mm HEX HEAD 6 5mm x 100mm 16 PCS BARREL NUT 11 8mm x 15mm 16 PCS FLAT HEAD SCREW 4mm x 35mm 32 PCS FLAT HEAD SCREW 4mm x 30mm 6 PCS WOOD DOWEL 10mm x 50mm 28 PCS 1 HARDWARE LIST 3 4 2 WOOD JO...

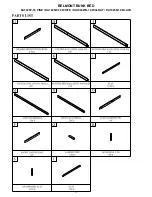
Page 4: ...DA1026W 18 WHITE DA1026WN 18 WALNUT DA1026B 18 BLACK A A B C D D E F F G G H J K L M N L L R R S S T T A B PARTS LIST C D E F TOP POST 2 PCS BOTTOM POST 2 PCS HEADBOARD TOP CROSS 4 PCS TOP POST 1 PC T...

Page 5: ...BELMONT BUNK BED DA1026P 18 PINE DA1026W 18 WHITE DA1026WN 18 WALNUT DA1026B 18 BLACK 3...

Page 6: ...ottom cross G and push down until firmly in place Slide the headboard top cross F onto the headboard slats S Insert wood dowels 7 into ends of top cross F and bottom cross G Attach top posts A B using...

Page 7: ...e headboard bottom cross G and push down until firmly in place Slide the headboard top cross F onto the headboard slats S Insert wood dowels 7 into ends of top cross F and bottom cross G Attach top po...

Page 8: ...ole in the headboard bottom cross G and push them down until firmly in place Slide headboard top cross F onto headboard slats S Insert wood dowels 7 into ends of top cross F and bottom cross G Attach...

Page 9: ...A1026WN 18 WALNUT DA1026B 18 BLACK Attach the two headboards with the bottom posts D and E to the bottom side rails I and K by the joint connectors 1 and barrel nuts 9 as shown Use hex key 10 to tight...

Page 10: ...e long guardrails M Attach the two long guardrails M and the two top side rails H and J to the top posts A and B and A and C as shown Use the joint connectors 1 with the barrel nuts 9 to fasten the to...

Page 11: ...the bottom side rails I and K of the bottom bunk as shown Insert slats L into remaining slots of the bottom side rails I and K of the bottom bunk Attach slats L onto the bottom side rails I and K with...

Page 12: ...s in the ends of short guardrails N Attach short guardrails N to top post A with wood joint connectors 11 Use hex key 10 to tighten joint connectors Attach the guardrail leg R to the short guardrails...

Page 13: ...d dowels 7 into the end of the ladder steps Q and screwing long ladder end O and short ladder end P to ladder steps Q with wood joint connectors 2 as shown Use hex key 10 to tighten joint connectors S...

Page 14: ...hort guardrails N the top side rail H and bottom side rail I with the wood joint connectors 2 Use hex key 10 to tighten joint connectors as shown NOTE If a slat L is covering the ladder mounting holes...

Page 15: ...side rails from all headboards top and lower bunks Re assemble the headboards with tall posts and footboards with short posts to side rails Note Switching the headboards will allow the two single beds...

Page 16: ...DA1026W 18 WHITE DA1026WN 18 WALNUT DA1026B 18 BLACK MAXIMUM WEIGHT CAPACITY 165 LBS 75 KGS PER LEVEL DO NOT ALLOW CHILDREN UNDER 6 YEARS OF AGE TO USE THE UPPER BUNK BED IS DESIGNED FOR CHILDREN RAN...

Reviews: