background image

*

*

*

*

*

*

*

12345 Albert-Hudon Boulevard, Suite 100

CUSTOMER SERVICE    

If you are missing parts or have any questions about this product, contact our customer 
service representative first!

CALL 1-800-295-1980      

You can also order parts by writing to the address listed below. Please include the 
product model number, color and a detailed description of the part.

Customer Service Department No. 413

Montreal, Quebec

Canada H1G 3L1

E-MAIL: [email protected]

NOTES

Ensure all parts and components are present before beginning assembly.

Assembly and handling will require two people.

Assemble on a soft, smooth surface to prevent damage to the product finish.

Read all instructions completely before assembly.

DO NOT

 use power tools.

CAUTION: Adult assembly required.

Estimated assembly time: 15


minutes. 

    WARNING:  Should this product become damaged, and/or 

components are broken or missing, DO NOT USE.

CARE AND CLEANING      

Dust regularly with a soft, dry cloth to prevent soil build up.  Keep away from heat to avoid glazing, 
melting or scorching.  Use a professional cleaning service to clean the fabric.

MAINTENANCE

Check bolts/screws periodically and tighten them if necessary.

LIMITED WARRANTY

Dorel warrants its product to be free from defects in material and workmanship and agrees to remedy 
any such defect. This warranty covers 1 year from the date of original purchase. This warranty is valid 
only upon presentation of proof of purchase.  This is solely limited to the repair or replacement of 
defective furniture components and no assembly labor is included. This warranty does not apply to any 
product which has been improperly assembled, subjected to misuse or abuse or which has been altered 
or repaired in any way. Any wearing, tearing or fading of the fabric is not covered under the warranty. 
This warranty gives you specific legal rights and you may also have other rights which vary from State to 
State.

Summary of Contents for 0-65857-17408-3

Page 1: ...rniture piece by taking a few minutes to go through this booklet It contains important information on our warranty and care tips to keep your furniture looking as good as new Customer satisfaction is...

Page 2: ...broken or missing DO NOT USE CARE AND CLEANING Dust regularly with a soft dry cloth to prevent soil build up Keep away from heat to avoid glazing melting or scorching Use a professional cleaning serv...

Page 3: ...F G H I J K SECTIONAL SOFA DA7567 SEC 1 PC 2 PCS 1 PC 1 PC LEFT ARM FRONT RAIL CHAIR BACK SEAT PANEL 1 PC 1 PC 3 PCS 1 PC BACK CUSHION SUPPORT LEG SEAT CUSHION RIGHT ARM LONG SEAT CUSHION 1PC OTTOMAN...

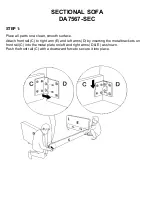
Page 4: ...smooth surface Attach front rail C to right arm E and left arms D by inserting the metal brackets on front rail C into the metal plate on left and right arms D E as shown Push the front rail C with a...

Page 5: ...STEP 2 SECTIONAL SOFA Place seat panel B on a clean smooth surface Flip the metal bars on seat panel B up as shown below DA7567 SEC...

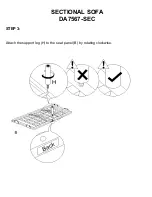
Page 6: ...STEP 3 SECTIONAL SOFA Attach the support leg H to the seat panel B by rotating clockwise DA7567 SEC...

Page 7: ...chair back A into the metal glides on left and right arms D E Slide chair back A halfway down the metal brackets on arms D E DO NOT fully insert the chair back A Leaving it partially raised will faci...

Page 8: ...ing the matal brackets on seat panel B into the metal glides on left arm D and right arm E Push the seat panel B with a downward force to secure it into place DA7567 SEC Seat panel B must be placed un...

Page 9: ...A with a downward force to secure it into place Secure the fabric flap on chair back A to the left and right arms using the velcro strips NOTE 1 Both sides must be instered at the same time This step...

Page 10: ...STEP 7 SECTIONAL SOFA Attach the ottoman feet K to ottoman J by rotating clockwise Turn the ottoman J upright and place it in front of the assembled sofa DA7567 SEC...

Page 11: ...STEP 6 SECTIONAL SOFA Place the cushions F G I onto the sofa DA7567 SEC...

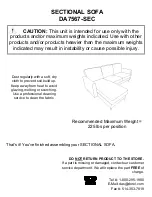
Page 12: ...away from heat to avoid glazing melting or scorching Use a professional cleaning service to clean the fabric DA7567 SEC That s it You ve finished assembling your SECTIONAL SOFA DO NOT RETURN PRODUCT T...

Page 13: ...vice Fax Number 514 353 7819 Request Date Name Shipping Address Street Number City State Zip Code Day Time Phone Number including area code Date Place of Purchase Part s description and quantity Pleas...

Page 14: ...n importante sobre nuestra garant a y consejos de cuidados para que su mueble siempre conserve su apariencia de nuevo Le damos mucha importancia a Dorel Home Furnishings Canada a la satisfacci n de nu...

Page 15: ...a fecha de compra original Esta garant a es v lida solamente con presentaci n de una prueba de compra Esto se limita a la reparaci n o reemplazo de componentes defectuosos del mueble y no se incluye n...

Page 16: ...ESPEALDAR DELSOF A DOS PLAZAS PANEL DEL ASIENTO 1 PZA 1 PZA RIEL DELANTERO BRAZO IZQUIERDO 1 PZA 1 PZA BRAZO DERECHO COJINES DEL ASIENTO 1 PZA 2 PZAS COJINES DE RESPALDO PATA DE APOYO 3 PZAS 1 PZA PAT...

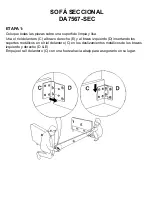
Page 17: ...a y lisa Una el riel delantero C al brazo derecho E y al brazo izquierdo D insertando los soportes met licos en el riel delantero C en los deslizamientos met licos de los brazos izquierdo y derecho D...

Page 18: ...ETAPA 2 SOF SECCIONAL DA7567 SEC Coloque el panel del asiento B sobre una superficie limpia y lisa Voltee la barra de metal en el panel del asiento B hacia arriba...

Page 19: ...ETAPA 3 SOF SECCIONAL DA7567 SEC Fije la pata de apoyo H al panel del asiento B gir ndola en el sentido de las agujas del reloj...

Page 20: ...la silla A a los deslizadores met licos de los brazos izquierdo y derecho D E Deslice el respaldo de la silla A hasta la mitad en los soportes de metal y en los brazos D y E NO inserte completamente e...

Page 21: ...cos en el panel del asiento B a los deslizamientos met licos del brazo izquierdo D y del brazo derecho E Empuje el panel del asiento B con una fuerza hacia abajo para asegurarlo en su lugar El panel d...

Page 22: ...on una fuerza hacia abajo para asegurarla en su lugar Fije la solapa de tela en la parte posterior de la silla A a los brazos izquierdo y derecho usando las tiras de velcro NOTA Ambos lados deben ser...

Page 23: ...TAPA 7 SOF SECCIONAL DA7567 SEC Fije las patas del otomano K al otomano J girandolas en el sentido de las agujas del reloj Gire el otomano J a su posici n vertical y col quelo delante del sofa montado...

Page 24: ...ETAPA 8 SOF SECCIONAL DA7567 SEC Coloque los cojines del asiento F G y I sobre la silla del sofa...

Page 25: ...ntenga alejado del calor para evitar que se agriete se funda o se queme Utilice un servicio de limpieza profesional para limpiar la tela Listo Acaba de armar su sofa NO DEVUELVA EL PRODUCTO A LA TIEND...

Page 26: ...Descripci n de pieza s y cantidad Por favor aseg rese de incluir n mero de modelo o n mero SKN Servicio a la Clientela POR FAVOR CONTACTE LOS REPRESENTANTES DEL SERVICIO A LA CLIENTELA A LOS SIGUIENT...

Page 27: ...Il contient de l information importante concernant notre garantie et des conseils d entretien pour vous assurer de garder votre meuble aussi beau qu aux premiers jours La satisfaction de nos clients e...

Page 28: ...im 15 minutes SOIN ENTRETIEN poussettez r guli rement avec un chiffon doux et sec pour emp cher la poussi re de s accumuler Gardez loin des sources de chaleur pour viter le gla age la fusion ou les br...

Page 29: ...LAIRE DA7567 SEC DOSSIER DU CANAP PANNEAU DU CANAP 1 PCE 1 PCE RAIL AVANT BRAS DROIT 1 PCE 1 PCE BRAS GAUCHE COUSSINS DE L ASSISE 1 PCE 2 PCES DOSSIER PATTE DU SUPPORT 3 PCES 1 PCE PIED DE POUF 4 PCES...

Page 30: ...e propre et lisse Fixez le rail avant C au bras droit E et aux bras gauche D en ins rant les supports m talliques sur le rail avant C dans les glissi res m talliques sur les bras gauche et droit D E P...

Page 31: ...TAPE 2 SOFA MODULAIRE DA7567 SEC Placez le panneau du si ge B sur une surface propre et lisse Retournez la barre m tallique sur le panneau du si ge B vers le haut...

Page 32: ...TAPE 3 SOFA MODULAIRE DA7567 SEC Fixer la patte du support H au panneau du si ge B en la vissant dans le sens des aiguilles d une montre...

Page 33: ...dans les patins m talliques des bras gauche et droit D E Faites glisser le dossier de la chaise A mi course dans les crochets m talliques sur les bras D E NE PAS ins rer compl tement le dossier de la...

Page 34: ...m talliques sur le panneau du si ge B dans les patins m talliques sur le bras gauche D et le bras droit E Pousser le panneau du si ge B avec une force vers le bas pour le fixer en place Le panneau du...

Page 35: ...A avec une force vers le bas pour le fixer en place Fixez le rabat en tissu sur le dossier de la chaise A aux bras gauche et droit l aide des bandes de velcro NOTE 1 Les deux c t s doivent tre ins r...

Page 36: ...TAPE 7 SOFA MODULAIRE DA7567 SEC Fixez les pieds de le pouf K au pouf J en tournant dans le sens des aiguilles d une montre Tourner l ottoman J la verticale et le placer devant le canap assembl...

Page 37: ...TAPE 8 SOFA MODULAIRE DA7567 SEC Placez les coussins F G et I sur le sofa...

Page 38: ...ussi re de s accumuler Gardez loin des sources de chaleur pour viter le gla age la fusion ou les br lures Utilisez un service de nettoyage professionnel pour nettoyer le tissu C est tout Vous avez fin...

Page 39: ...vince Code Postal No de t l phone jour incluant le code r gional Date Nom du Magasin Description quantit de pi ce s S V P ne pas oublier le num ro de mod le ou de SKU D partement du Service la client...

Reviews: