background image


23 

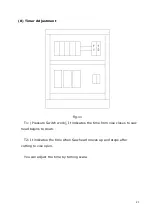
(8) Timer Adjustment 


Fig.11


T1: (Pressure Switch work), It indicates the time from vise closes to saw 

head begins to down. 

T2: It indicates the time when Saw head moves up and stops after 

cutting to vise open. 

You can adjust the time by turning scale. 

Summary of Contents for DCS - Series

Page 1: ...ng Dong Jin s High Speed Circular Sawing Machine DCS series In order to use DCS series more efficiently please read this manual before operation ADDRESS 115BL 4LT NAMDONG Industrial complex 685 3 Gojan dong Namdong gu Incheon Korea T E L 82 32 813 3041 4 F A X 82 32 672 0111 W E B www djmc co kr E m a i l djmc djmc co kr ...

Page 2: ...s might be caused by so doing Operators have to endure trainings of safety and machine operations After certified and authorized by the employer they can thus be allowed to operate the machine If machine is treated improperly or safety regulations are ignored injuries and damages will be caused by so doing Please contact us once questions regarding this manual or safety regulations arise This manu...

Page 3: ... precautions are not taken WARNING The sign of WARNING in this manual or on the machine s labels means loss of life severe personal injury or substantial property damage CAN entail if proper safety precautions are not taken CAUTION The sign of CAUTION in this manual or on the machine s labels means minor injury or property damage CAN entail proper precautions are not taken DANGER Children and irre...

Page 4: ...ansportation 11 3 Cleaning before operation 12 4 Coolant 12 5 Power Source Facility 13 4 The description of Control box 14 5 Operation 1 The adjustment of cutting stroke 17 2 The adjustment of vise stroke 18 3 Angular Cut 19 4 Fixed Vise Jaw 20 5 Stopper block 20 6 Saw Blade 21 7 Vise Pressure Adjustment 22 8 Timer Adjustment 23 9 Saw Head Speed Control 24 ...

Page 5: ...List 27 8 Electric System 1 Electric Circuit 28 2 Part List 30 9 Maintenance 1 Chip Scrapper 32 2 Chip Box 32 3 Coolant Tank 32 4 Assembly DWG 33 Stand Assembly 33 Table Assembly 35 Column Assembly 37 Coolant Blade Cover Assembly 39 Moving Vise Assembly 41 Gear Box Assembly 43 ...

Page 6: ... and no vibration High drive efficiency makes it possible to perform a powerful and fast cutting Specially designed vise structure brings it to perform a powerful clamp capacity Knurling process and a high frequency heat treatment of vise surface help the material to stick to the vise well The support vises can be adjustable depending on the length of material and they can move freely according to...

Page 7: ... 50Hz 22 44 60Hz 27 52 50Hz 19 38 60Hz 23 46 C H I P S C R A P P E R URETHAN ROLLER S A W H E A D M O V E M E N T HYDRAULIC AUTOMATIC M A I N V I S E HORIZONTAL TYPE HYDRAULIC C U T F E E D I N G S P E E D 3 300mm min HYDRAULIC D E V I C E PUMP MOTOR 0 75kW W O R K I N G P R E S S U R E 30kgf O I L T A N K V O L U M E 45ℓ C O O L A N T C O O L A N T P U M P 60Wx4Px220Vx3 C O O L A N T V O L U M E ...

Page 8: ...N T R O L B O X 12 MAIN VISE CYLINDER 4 C U T T I N G S T R O K E A D J U S T D E V I C E 13 H A N D L E 5 G E A R B O X 14 M A I N V I S E 6 R O U N D T A B L E L O C K S C R E W 15 R O U N D T A B L E 7 SPEED CONTROL VALVE 16 C O L U M N 8 S T A N D 17 T A B L E 9 B E L T C O V E R 18 F I X E D V I S E ...

Page 9: ...9 2 Layout Drawing Fig 2 ...

Page 10: ...ve a severe hit or impact to its main body Please be careful not to break the gauges sensors and other fragile important parts on the machine The location of installation should be safe from vibration and other influence of machines Also its floor should be flat and strong enough to endure the weight of machine ...

Page 11: ...carrier or crane For lift carrier the two legs of lift carrier should be placed the below of the stand in order to carry safely When you carry the machine with a lift carrier you should take into consideration of the center of gravity to prohibit the machine from dropping out of the lift carrier When you use crane use four 4 M12 hexagon bolts on the machine and over 12mm wire Fig 3 The weight of D...

Page 12: ... we coat the rust inhibitor in order to prevent the rust Before operation please remove the rust inhibitor thoroughly If not it can affect the machine operation Please clean the sliding parts with kerosene or clean benzene 4 Coolant WARNING Please put the coolant before operation If not it brings damage the coolant pump motor If necessary please mix the coolant and water properly and put it into t...

Page 13: ...er the condition that the volume of breaker of factory should be more than 20A Please connect power line over 2 0mm 2 with 4 core wire with tunnel of breaker Please connect ground wire before connecting power line Please wear the safety glove and be off the power before connecting power line When operating the hydraulic pump motor you must check if the direction of motor rotation is as same as arr...

Page 14: ...ect switch is not on please check the breaker in the control panel Control On In order to operate the machine you must push this S W after turning power to on After pushing emergency S W you must push this switch after release the emergency S W and return to the initial point Manual Auto You can select the operation mode with this switch Manual Auto ...

Page 15: ...tch can only work under manual operation mode If you want to change Auto mode please select Open position Emergency In case of there is dangerous and emergency please push this button If you push this button the machine stops operation In order to restart release the Emergency s w first and check the Manual Auto S W If the mode s w is Manual Mode return to the initial point with vise select s w an...

Page 16: ...ad Down Saw Head Up and Stop Saw Stop Vise Open Saw Up Down In the manual mode you can raise or down the saw head by selecting this switch Before auto feed cutting make it sure to set the appropriate saw head s stroke upper limit and lower limit with this switch depending on the material thickness ...

Page 17: ...d Upper Limit Adjustment Fix upper adjust dog to the height that there is no interference of material Lower Limit Adjustment Please down the Saw Head until the point of finishing cutting and stop the saw head At that point fix the lower adjust dog to the limit switch WARNING Please check upper limit switch is touched If not the automatic operation is not working ...

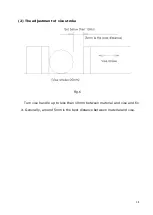
Page 18: ...18 2 The adjustment of vise stroke Fig 6 Turn vise handle up to less than 10mm between material and vise and fix it Generally around 5mm is the best distance between material and vise ...

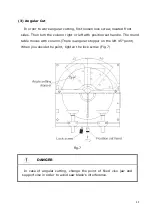
Page 19: ...umn right or left with position set handle The round table moves with column There is angular stopper on the left 45 point When you decide the point tighten the lock screw Fig 7 Fig 7 DANGER In case of angular cutting change the point of fixed vise jaw and support vise in order to avoid saw blade s interference ...

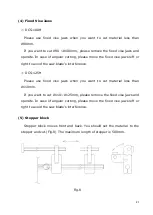
Page 20: ...void the saw blade s interference DCS 125H Please use fixed vise jaws when you want to cut material less than Ø110mm If you want to cut Ø110 Ø125mm please remove the fixed vise jaws and operate In case of angular cutting please move the fixed vise jaws left or right to avoid the saw blade s interference 5 Stopper block Stopper block moves front and back You should set the material to the stopper a...

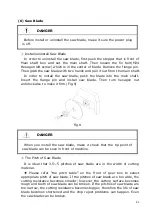
Page 21: ... turn hexagon nut anticlockwise to make it firm Fig 9 Fig 9 DANGER When you install the saw blade make it check that the tip point of saw blade can be seen in front of machine The Pitch of Saw Blade It is ideal that 3 5 5 pitches of saw blade are in the width of cutting material Please refer the pitch table on the front of gear box to select appropriate pitch of saw blade If the pitches of saw bla...

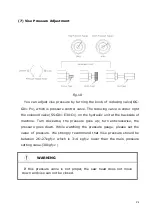
Page 22: ...ydraulic unit at the backside of machine Turn clockwise the pressure goes up turn anticlockwise the pressure goes down While watching the pressure gauge please set the value of pressure We strongly recommend that Vise pressure should be between 26 27kgf which is 3 4 kgf lower than the main pressure setting value 30kgf WARNING If this pressure valve is not proper the saw head does not move down and...

Page 23: ... Fig 11 T1 Pressure Switch work It indicates the time from vise closes to saw head begins to down T2 It indicates the time when Saw head moves up and stops after cutting to vise open You can adjust the time by turning scale ...

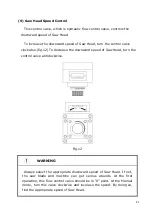
Page 24: ... fig 12 To decrease the downward speed of Saw Head turn the control valve anticlockwise Fig 12 WARNING Always select the appropriate downward speed of Saw Head If not the saw blade and machine can get serous wounds At the first operation this flow control valve should be in 0 point At the Manual mode turn this valve clockwise and increase the speed By doing so find the appropriate speed of Saw Hea...

Page 25: ...uto Start switch WARNING If you do not set Vise as OPEN Saw Head Upper Limit as STOP or Control On as ON the automatic operation does not work The Saw Blade Low Stop High Cam Switch can work regardless of operation mode Therefore please select the saw rotation speed in advance CAUTION When it finishes cutting material and open the vise the cut material can drop to your foot or leg Don t be near th...

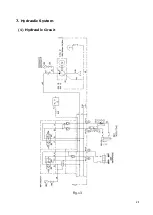
Page 26: ...26 7 Hydraulic System 1 Hydraulic Circuit Fig 13 ...

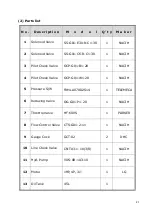
Page 27: ... Valve OCP G01 B1 20 1 NACIH 4 Pilot Check Valve OCP G01 W1 20 1 NACIH 5 Pressure S W FXMLA070D2S14 1 TELEMECA 6 Reducing Valve OG G01 P1 20 1 NACIH 7 Throttle Valve HF 600S 1 PARKER 8 Flow Control Valve CTS G01 2 11 1 NACIH 9 Gauge Cock GCT 02 2 DHC 10 Line Check Valve CN T03 1 10 3 8 1 NACIH 11 Hyd Pump VDS 0B 1A3 10 1 NACIH 12 Motor 1HP 4P 3 1 LG 13 Oil Tank 45L 1 ...

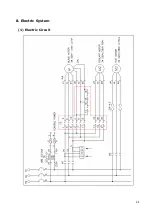
Page 28: ...28 8 Electric System 1 Electric Circuit ...

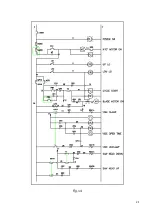
Page 29: ...29 Fig 14 ...

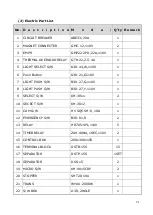
Page 30: ...tton K30 21 G110V 1 7 LIGHT PUSH S W B30 27 G 110V 1 8 LIGHT PUSH S W B30 27 Y 110V 1 9 SELECT S W KH 3011 2 10 SECECT S W KH 3012 1 11 CAM S W HY SQ5 SH 6 10A 1 12 EMERGENCY S W B30 81 R 2 13 RELAY HR705 4PL 110V 5 14 TIMER RELAY ZAH 40NA 1SEC 110V 2 15 CONTROL BOX 200x300x150 1 16 TERMINAL BLOCK DSTB 15S 15 17 SEPARATOR DSTP 15S 1SET 18 SEPARATOR DSS 15 2 19 MICRO S W KH 9015CRP 2 20 STOPPER SHT...

Page 31: ...1 26 FLEXIBLE TUBE 22mm 2M 27 CABLE LOCKER HYC M2 5 28 CABLE LOCKER KA PG 13 5 3 29 CABLE LOCKER 15C 1 30 PLUG 4P20A 1 31 PCB 1 32 S W BRACKET 95x140x50 3 2T 1 33 ACRYLIC Ø30 2 34 TERMINAL BLOCK 15A 5 35 CONECTOR YH 396 03V 2 36 CONECTOR YH 396 04V 1 37 CONECTOR YH 396 05V 1 38 CONECTOR YH 396 06V 1 39 CONECTOR YH 396 10V 1 40 FUSE 20mm 3A 2 ...

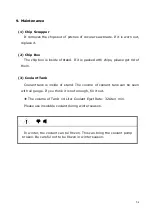
Page 32: ...ase get rid of them 3 Coolant Tank Coolant tank is inside of stand The volume of coolant tank can be seen with oil gauge If you think it is not enough fill it out The volume of Tank 14 Liter Coolant Eject Rate 32Liter min Please use insoluble coolant during winter season 주 의 In winter the coolant can be frozen This can bring the coolant pump broken Be careful not to be frozen in winter season ...

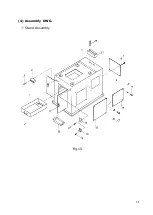
Page 33: ...33 4 Assembly DWG Stand Assembly Fig 15 ...

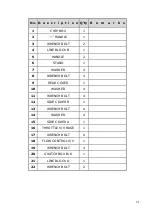
Page 34: ...LOCK B 1 5 HANDLE 2 6 STAND 1 7 WASHER 4 8 WRENCH BOLT 4 9 REAR COVER 1 10 WASHER 4 11 WRENCH BOLT 4 12 SIDE COVER B 1 13 WRENCH BOLT 4 14 WASHER 4 15 SIDE COVER A 1 16 THROTTLE V V BASE 1 17 WRENCH BOLT 4 18 FLOW CONTROL V V 1 19 WRENCH BOLT 4 20 SWITCH BOX B K 1 21 LINE BLOCK A 1 22 WRENCH BOLT 2 ...

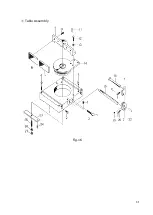
Page 35: ...35 Table Assembly Fig 16 ...

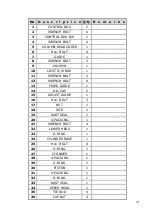
Page 36: ...ENCH BOLT 4 7 FIXED VISE JAW R 1 8 FIXED VISE JAW L 1 9 FIXED VISE 1 10 Hex BOLT 4 11 PIN 2 12 Hex BOLT 2 13 SPRING WASHER 2 14 ROUND TABLE 1 15 GUIDE ROD 1 16 STOPPER 1 17 STOPPER B K 1 18 HANDLE 1 19 SOCKET HEAD BOLT 1 20 HANDLE 1 21 STOPPER BLOCK 1 22 HINGE PIN 1 23 TABLE B K 1 24 PIN 1 25 M12x60 1 26 NUT 1 27 NUT 1 ...

Page 37: ...37 Column Assembly Fig 17 ...

Page 38: ...10 LIMIT S W BOX 1 11 WRENCH BOLT 2 12 WRENCH BOLT 8 13 FIXED GUIDE 1 14 OIL CAP 2 15 ADJUST GUIDE 1 16 Hex BOLT 3 17 NUT 1 18 ROD 1 19 DUST SEAL 1 20 U PACKING 1 21 WRENCH BOLT 4 22 LOWER HEAD 1 23 O RING 1 24 CYLINDER BASE 1 25 Hex BOLT 4 26 O RING 1 27 CYLINDER 1 28 U PACKING 1 29 O RING 1 30 PISTON 1 31 U PACKING 1 32 O RING 1 33 DUST SEAL 1 34 UPPER HEAD 1 35 TIE ROD 4 36 CAP NUT 4 ...

Page 39: ...39 Coolant Blade cover Assembly Fig 18 ...

Page 40: ... BOLT 4 10 COIL SPRING 1 11 ROD BOLT A 1 12 NUT 1 13 CHIP REMOVE ARM 1 14 CHIP REMOVE ROLLER 1 15 ROD BOLT B 1 16 BLADE COVER 1 17 NUT 1 18 NOZZLE 2 19 INJECTION MANIFOLD 1 20 WRENCH BOLT 1 21 NIPPLE 1 22 HOSE 1 23 M5X70 1 24 WRENCH BOLT 1 25 NUT 1 26 Hex BOLT 4 27 COOLANT PUMP 1 28 Hex BOLT 4 29 HOSE 1 30 COOLANT TANK COVER 1 31 COOLANT TANK 1 32 OIL GAUGE 1 33 Hex BOLT 4 ...

Page 41: ...41 Moving Vise Assembly Fig 19 No D e s c r i p t i o n Q ty R e m a r k s 1 KNOB 3 2 HANDLE 3 3 COLLAR 1 4 BEARING COVER 1 5 THRUST BEARING 1 6 PIN 1 7 SOCKET HEAD BOLT 1 ...

Page 42: ...RING 1 17 O RING 1 18 DUST SEAL 1 19 WRENCH BOLT 4 20 SLIDE BUSH 1 21 REAR COVER 1 22 THRUST BEARING 1 23 MOVING SCREW 1 24 BAD 1 25 Hex BOLT 2 26 T NUT 2 27 GUIDE B K 1 28 WRENCH BOLT 1 29 MOVING VISE 1 30 SOCKET HEAD BOLT 4 31 NUT 4 32 WRENCH BOLT 1 33 PIN 1 34 Hex BOLT 1 35 GUIDE 1 36 MOVING VISE JAW 1 37 WRENCH BOLT 4 38 HOSE NIPPLE 2 39 HOSE 2 40 HOSE NIPPLE 2 ...

Page 43: ...43 Gear Box Assembly Fig 20 ...

Page 44: ...ING 1 11 BALL BEARING 1 12 BEARING WASHER 1 13 LOCK NUT 1 14 SOCKET HEAD BOLT 1 15 BEARING COVER A 1 16 LOCK NUT 1 17 BEARING WASHER 1 18 BALL BEARING 1 19 19NT GEAR 1 20 KEY 1 21 BALL BEARING 1 22 76NT GEAR 1 23 BEARING WASHER 1 24 LOCK NUT 1 25 SOCKET HEAD BOLT 1 26 SNAP RING 1 27 BALL BEARING 1 28 44NT GEAR 1 29 SPACER 1 30 BEARING COLOR 1 31 WRENCH BOLT 3 32 BALL BEARING 1 33 SNAP RING 1 ...

Page 45: ...AP RING 1 44 SNAP RING 1 45 BALL BEARING 1 46 BALL BEARING 1 47 KEY 1 48 11NT GEAR A 1 49 GEAR BOX 1 50 GEAR BOX COVER 1 51 WRENCH BOLT 6 52 SOCKET HEAD BOLT 1 53 OIL GAUGE 1 54 LIMIT SWITCH B K 1 55 LIMIT DOG 2 56 SOCKET HEAD BOLT 2 57 WRENCH BOLT 1 58 UPPER LIMIT SWITCH B K 1 59 WRENCH BOLT 2 60 WRENCH BOLT 3 61 LIMIT GUIDE ROD 1 62 LOWER LIMIT SWITCH B K 1 63 WRENCH BOLT 1 64 WRENCH BOLT 2 ...

Reviews: