background image

23

Dominator Select 

Instruction Manual

23. Warranty

This Warranty is given by Dominator a division of B&D Door NZ Limited,  

46 Braeburn Drive, Hornby, Christchurch, New Z64 3 384 5145,  [email protected].
PLEASE NOTE:

• This Warranty is in addition to any statutory, non-excludable guarantees or warranty rights and remedies under the law. See section 5 below.

• This warranty applies to the original purchaser only and may not be transferred.

• This Warranty is to be read in conjunction with the owner’s copy of the installation instruction manual.

• In this warranty, ‘Dominator Representative’ means an entity authorized by Dominator to service Dominator products. Please check the 

Dominator website for details.

NOTE: CONSUMABLES (eg Batteries in remote control transmitters and 

light bulbs and fuses) are  not covered by this warranty

1.  MAKING A CLAIM

(a) The product parts in the above table should operate in accordance with 

the product manual for the time period shown or for the number of cycles, 

whichever occurs first; provided you comply with the manufacturer’s 

instructions concerning installation, operation, maintenance and testing. 

Failure to do so may void all or part of this warranty.

(b) If, during the relevant warranty period, a product part in the table above 

appears to contain a defect, call the retailer from whom you purchased the 

product, or Dominator on 0800 366 462, and they will instruct you what to 

do next.

(c) You are responsible for the cost of making a claim under this Warranty. 

Additional access expenses where the Product is not readily accessible must 

be borne by you.

(d) If Dominator or Dominator’s Representative confirms the product is defective 

and covered by this Warranty, Dominator will repair or replace it (at 

Dominator’s sole option) at no cost to you. Goods presented for repair may 

be replaced or repaired by refurbished goods or parts of the same type. 

2.  WARRANTY CONDITIONS

It is a condition of this warranty that:

(a) you provide a copy of the receipt of original purchase of the product, and 

the serial number of the Product which can be found on the label adhered 

to the Product.

(b) the door and opener are properly maintained by being serviced by a 

qualified professional at regular, appropriate intervals. What is appropriate 

may vary based on environmental factors (eg. weather, salt exposure) 

and level of usage. Based on average use and environmental conditions, 

Dominator recommends that the product is serviced by Dominator or a 

Dominator Representative, within 12 months of installation (to allow for new 

doors to settle) and at regular intervals not exceeding 2 years. 

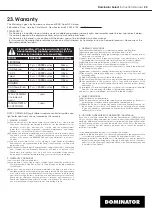
It is a condition of the below warranties that the 

manual operating (opening and closing) force of 

the door by hand does not exceed 20kg.

MODEL

WARRANTY

DOOR (MAX)

SECTIONAL

CAD Smart

7 yrs / 20,000 cycles

236kg

CAD Secure

7 yrs / 20,000 cycles

236kg

CAD S

7 yrs / 20,000 cycles

175kg

Select

5 yrs / 10,000 cycles

140kg

Panel Pro

5 yrs / 10,000 cycles

110kg

ROLLING

CAD PowerDrive

7 yrs / 20,000 cycles

110kg 

EXTRAS
TRACK ASSEMBLY

(includes all 

parts)

1 year

TRANSMITTERS & 

ACCESSORIES

1 year

3.  WARRANTY EXCLUSIONS

This warranty excludes defects or improper operation resulting from:

(a) excessive wear and tear that may cause the product to fail;

(b) accidental, deliberate or negligent damage or damage cause by insects,   

dirt, plants or other objects;

(c) blown fuses, electrical surges, power surges or power spikes or faulty or  

unsuitable electrical wiring of structures to which the product is affixed;

(d) theft, fire, flood, rain, water, lightning, storms or any other acts of God;

(e) salt or other corrosion due to environmental conditions,

(f)  any installation, configuration or use of the product contrary to the instructions 

supplied with the product;

(g) maximum continuous operating time exceeding 1 minute in10 minutes;

(h) the manual operating (opening and closing) force of the door by hand 

exceeding 20kg;

(i)  weight exceeding amounts listed in table above;

(j)  the door used with the product not being in safe working order and condition;

(k) any modification to the product or acts of any person in respect of the 

product which are not authorized by Dominator and which impact Product 

performance;

(l)  installation of a residential garage door opener in a commercial or industrial 

premises or in a dwelling other than a single-family dwelling; or

(m) radio or electrical interference or lack of availability of signal.

4.  OTHER CONDITIONS

(a) This Warranty is not transferable.

(b) The warranty period stated in the table will not be extended for Products or 

parts repaired or replaced during the relevant warranty period.

(c) Where the Product is sold by any person other than Dominator, except for 

the warranty set out above, such person has no authority from Dominator 

to give any warranty or guarantee on Dominator’s behalf in addition to the 

warranty set out above.

5.  STATUTORY GUARANTEES OR WARRANTIES IN AUSTRALIA

If you are a consumer under the Consumer Guarantees Act (NZ) (the ‘Act’), 

our goods come with guarantees that cannot be excluded under the Act. This 

warranty certificate and other documents or statements provided by Dominator 

do not exclude, restrict or modify the application of the Act or the exercise 

of rights conferred by other statutory provisions which cannot be excluded, 

restricted or modified.

To the extent permitted by the Act or other laws, Dominator:

(a) limits its liability for breach of a statuatory guarantee to the payment of the 

cost of replacing the Product or acquiring an equivalent Product; and

(b) expressly excludes any liability for consequential loss and incidental or 

indirect damages (including but not limited to damages for loss of business 

profits, income, business, goodwill or reputation, or business interruption) due 

to a defect of the Product.

Summary of Contents for Select DSO-1

Page 1: ...ese instructions are intended for professional garage door installers All references are taken from inside looking out Select Doc 160407_00 Part 87186 Released 12 11 19 Sectional Door Opener Select DSO 1 ...

Page 2: ...e position 21 F Setting up Tilt Door 22 23 Warranty 23 Home Owner Instructions WARNING IMPORTANT SAFETY INSTRUCTIONS FOLLOW ALL INSTRUCTIONS SINCE INCORRECT INSTALLATION CAN LEAD TO SEVERE INJURY before installing the drive remove all unnecessary ropes or chains and disable any equipment such as locks not needed for powered operation before installing the drive check that the door is in good mecha...

Page 3: ...s Practice correct lifiting techniques when required to lift the door as per installation instructions Fall from ladder Ensure ladder is the correct type for job Ensure ladder is on flat firm ground that will take the weight without the legs sinking Ensure user has 3 points of contact while on ladder Crush injury from unsecured door Place a 2 metre exclusion zone around area under the door while i...

Page 4: ...m force required to move the door should not exceed 20kg d Lift the door to about halfway When released the door should stay in place 2 1 Examine the conditions in the garage a Look at the ceiling i Is it plastered The opener is mounted to a perforated angle which MUST be securely fastened to a structural support You will need to locate the structural beams in the ceiling which are generally 400mm...

Page 5: ... x Track Bracket 16 1 x Pre Assembled track 5 Position The Opener a MUST BE installed in a dry position protected from weather b REQUIRES properly earthed 3 pin single phase power on the ceiling within an arms length of the opener c Requires a MINIMUM HEADROOM of 57mm between the highest point of the door s travel and the ceiling d Use the diagram below as a reference when completing the installat...

Page 6: ...O NOT DO IT YOURSELF If sufficient structural support can not be found contact a door profressional for installation DIY c Using step ladder and a level transfer this height to the wall above the door and mark a line 60mm above it across the centre line 7 2 Mounting the Wall Bracket a Draw two lines extending 21 5mm from each side of the centre point b Centre the wall bracket 6 over the intersecti...

Page 7: ... the door requires 2 x perforated L shape metal strips and 2 x shorter perforate L shape metal drop down strips Not supplied 9 Mounting Brackets and Arms 9 1 Mounting the Door Bracket a The door bracket locator 7 is placed over the door bracket 8 on the door s centre line one third down the top panel and mounted using M6 or equivalent screws not supplied b STEEL DOORS ONLY Bracket can be welded in...

Page 8: ...range 230V 240Va c Rated frequency 50Hz 60Hz Rated power input 165W Door opening Maximum Door Area Maximum Door Weight Door must be well balanced and able to be operated by hand as per warranty conditions and AS NZS 4505 2012 15m2 140kg Minimum headroom 57mm Rated Operating Time 4 mins Rated Temp 5 o C to 40 o C Short Term Peak force 700N Door travel speed mm sec 140mm Rated load 400N Nominal forc...

Page 9: ... button on the opener it will cycle through all three speed modes as shown in table iii Once at the desired speed release the CLOSE button iv To set the close limit inch the door by making single presses of the CLOSE button to the desired position We recommend the CLOSE limit position being the first point of contact of the rubber strip at the bottom of the door with the ground v If the door overs...

Page 10: ...oor does not reverse readily when closing or stop when opening put the door into manual by pulling down on the manual release string to diesengage the motor and contact 13 62 63 for support 13 3 Test the Manual Door Operation Periodically disengage the opener and manually operate the door The door must be smooth to operate by hand The force required on the bottom rail should not exceed 20kg CAUTIO...

Page 11: ...n this mode the timer starts counting down only when the safety beam is triggered ie car leaving the garage To enable the Auto Close function a Press the MODE button repetitively until the GEAR LED starts flashing b Press the OPEN button until the GEAR LED flashes i two 2 times to get to PE auto close or ii three 3 times to get to standard auto close c Press STOP SET button to enter parameter d Th...

Page 12: ...nstallation of the Wall Mounted Transmitter a Store the transmitter code as per instructions above Test the transmitter button b Mount the transmitter in a convenient location yet out of reach of children and at least 1 5m off the ground c Make sure the door is visible from this location 15 5 Remotely Coding Transmitters Using this method transmitters can be coded without access to the opener s co...

Page 13: ...age door balanced Sticking or binding doors must be repaired Garage doors door springs brackets and their hardware are under extreme tension and can cause serious personal injury DO NOT attempt any garage door adjustment DO NOT use if repair or adjustment is needed Call for a professional garage door service CAUTION Emergency access If your garage has no pedestrian entrance door an emergency acces...

Page 14: ...med transmitter button until your door begins to move usually 2 seconds Make sure you can see the door when you use the transmitter b If you are in a vehicle you should aim the transmitter through your windscreen as shown c Check that the door is fully open or closed before you drive in or away d If you press the transmitter whilst the door is moving the door will stop The next press of the transm...

Page 15: ...ROW Green Opens the door 5 UP ARROW LED Green Illuminates when the door is open and flashes when the door is open with the auto close timer running obstructed on opening or stopped 6 MODE Yellow Enables Load Diagnostics Mode 7 MODE STATUS LED Yellow Illuminates when in Diagnostics Mode 8 REMOTE CONTROL STATUS LED Red Flashes on remote lockout and flickers on remote control activity 9 ADJUSTMENT LE...

Page 16: ...nditions e g temperature or external interference The battery life is exhausted Position of the transmitter in the motor vehicle Make sure you can see the door when you use the transmitter Check the battery status by pressing a button flashing or no light battery need changing Aim the transmitter through the windscreen The Courtesy light does not work LED has failed Change LED The door reverses fo...

Page 17: ...o move the door and suspect beam is faulty enter Safety Beam Emergency Close by pressing and holding a pre coded button on transmitter for more than five seconds and the door will start closing 3 Wireless LOCK battery is low Change LOCK battery 4 Wireless PE battery is low Change PE Battery 5 Wireless LOCK is not unlocked and preventing door moving Check LOCK test by pressing emergency release but...

Page 18: ...erminals must be securely insulated with a non conductive material to prevent any two batteries from short circuiting and generating heat during storage or transport Battery terminals may be insulated with electrical tape or batteries may be individually packaged in a non conductive material e g plastic bag or original packaging 21 3 Battery Disposal Battery Type 3V Lithium Battery CR2032 To test ...

Page 19: ...utoclose timer running Opening Obstructed on Open Closed Closing Obstructed on Close Stopped Partial Open MODE LED 3 flashing Load Diagnostics mode BATTERY LED 4 off solid flashing rapid flashing Battery not used not fitted Battery charged Battery charging when connected to power without power battery in use holding STOP for 10s will shutdown Battery failed REMOTE CONTROL STATUS LED 5 flashing rap...

Page 20: ... change accordingly e Press STOP SET button to save the parameter s new value or press MODE to leave the value unchanged f Continue from a above to select another parameter or press MODE to exit adjustment mode The Safety Obstruction Force is calculated automatically during setup Adjusting this is normally only necessitated by environmental conditions such as windy or dusty areas and areas with ex...

Page 21: ...mote to move the door in the OPEN direction vi When the door is at the desired CLOSE position press the SET button 2 the GREEN LED on the OPEN button will now flash Button 1 inch Open Button 2 Set Button 4 inch Close OPEN limit i Using the programmed transmitter press and hold the button 1 to open To inch the door single presses of the button 1 will move the door to desired limit ii While inching ...

Page 22: ...on repetitively until the GEAR LED starts flashing b Press and hold STOP SET button for 2 seconds to check the door type until the main courtesy light turns solid ON or OFF Main courtesy light ON Tilt type J Type only Main courtesy light OFF Sectional type c Press and hold STOP SET for 6 seconds to change the door type until the main courtesy light turns solid ON or OFF If required repeat step b t...

Page 23: ...CAD Smart 7 yrs 20 000 cycles 236kg CAD Secure 7 yrs 20 000 cycles 236kg CAD S 7 yrs 20 000 cycles 175kg Select 5 yrs 10 000 cycles 140kg Panel Pro 5 yrs 10 000 cycles 110kg ROLLING CAD PowerDrive 7 yrs 20 000 cycles 110kg EXTRAS TRACK ASSEMBLY includes all parts 1 year TRANSMITTERS ACCESSORIES 1 year 3 WARRANTY EXCLUSIONS This warranty excludes defects or improper operation resulting from a exces...

Page 24: ...Hornby Christchurch New Zealand Dominator Locations Nationwide PH 0800 DOMINATOR 366 462 or visit dominator co nz dealer locations dominator co nz Prefixed trademarks are the property of B D Door NZ Ltd Dominator Garage Doors Openers is a division of B D Group Pty Ltd ABN 25 010 473 971 2019 B D Group Pty Ltd ...

Reviews: