10
Trouble-Shooting
Refrigerators & Freezers • Trouble-Shooting
The trouble-shooting guidelines below are arranged
sequentially and should be followed in order. Start with
“General Trouble-Shooting” A, B & C; then go to “Specific
Trouble-Shooting of Electrical Components”, starting with
“A” and working through systematically to “F”.
General Trouble-Shooting
A. Appliance Does Not Operate
Check that:
1. The thermostat is not set to “STOP” or “OFF”.
2. The electrical system circuit-breaker for the appliance is
“ON”.
3. The fuse between the electronic control unit and the
power source has not blown.
4. The power supply cable is not faulty, loose or poorly
connected.
5. The fan is operating and there are no blockages.
6. The battery is delivering sufficient power. If the battery
voltage is less than 10.4V (on a 12VDC system) or
22.8V (on a 24VDC system), the unit will not operate.
7. The voltage on the electronic control unit terminal board
corresponds to that of the battery. If there is a voltage
drop of over 0.2-0.4V check that:
a. The size of the cable connecting the battery to the
electronic control unit corresponds to specifications
(see Electrical Wiring Guidelines in this manual).
b. All connection points in the power circuit are
properly tightened and secure.
c. There are no signs of oxidation on the battery poles
or contact points and the battery is properly main-
tained.
B. Excessive Appliance Noise
Check that:
1. The appliance and refrigerating unit are positioned on
flat surfaces.
2. The appliance is not touching other objects that may
cause vibration.
3. The refrigerant lines at the back of the unit (if appli-
cable) are not touching or vibrating against the appli-
ance.
C. Insufficient Refrigerating Capacity
Check that:
1. The door/lid is sealed properly and the hinges are
working correctly.
2. The appliance is not positioned close to heat sources.
3. The appliance and remote refrigerating unit (if appli-
cable) are sufficiently ventilated.
4. Excess frost has not accumulated on the evaporator
(frost acts as an insulator).
5. Dust has not blocked the condenser ventilation sources.
6. The fan rotates freely (in forced air models).
7. The appliance is not over-full.
Specific Trouble-Shooting of
Electrical Components
A. Check Incoming Voltage
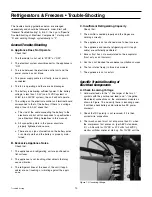
1. Hold meter leads to the “+” (the larger of the two “+”
symbols with the positive, red lead) and “–” (negative,
black lead) connections on the compressor module as
shown in Figure 1.0 and verify there is incoming power.
If not then check battery and/or alternative DC power
source(s).
2. Check that DC polarity is not reversed. If it is then
correct wire connections.
3. The inrush current must not drop more than 3% when
the compressor first comes on (per ABYC standards,
3% = 0.36 volts for 12VDC or 0.72 volts for 24VDC),
monitor volt/ohm meter at start-up. For 12VDC unit the
Figure 1.0 - Incoming Voltage


