6
5. Using the appliance
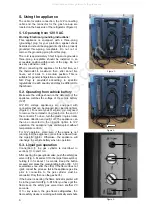
The cable for mains connection, the 12V connecting
cable and the connector for the gas hook-up are
located on the back side of the refrigerator (Figure 3).
5.1. Operating from 120 V AC
Warning: Electrical grounding instructions:
This appliance is equipped with a three-prong
(grounding) plug for your protection against shock
hazards and should be plugged directly into a properly
grounded three-prong receptable. Do not cut or
remove the grounding prong from this plug.
The cord is approximately 5 feet long and a grounded
three-prong receptable should be installed in an
accessible position within reach of the plug. Do not
use any extension cords!
When connecting the appliance for the first time, set
the thermostat to maximum; then, after about five
hours, set it back to a medium position. This is
suitable for general refrigeration requirements.
NB: Plug is provided according to specific
regulations in each country and may be different to
that shown.
5.2. Operating from vehicle battery
Make sure the voltage shown on the data plate of the
appliance matches the voltage of the vehicle battery
(12V).
12V DC voltage appliances are equipped with
connectors that can be plugged into cigarette lighters
(Figure 4.). For some types of vehicle, you may need
to remove the red plastic ring located on the end of
the connector. To do so, turn the plastic ring in an anti-
clockwise direction and pull it off. The appliance can
then be connected to the cigarette lighter. In 12V
operation, the appliance runs uninterrupted without
temperature control.
For 12V operation, make sure, if the engine is not
running, that the appliance connector is removed from
the cigarette lighter. Otherwise, the appliance will
discharge the vehicle battery when in operation.
5.3. Liquid gas operation
Connection to the gas cylinder is described in
sections 10.3. and 10.4.
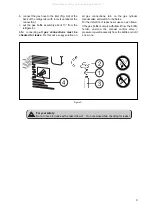
After opening the gas cylinder valve, push the safety gas
valve in (Fig. 5.A) and set it to the large flame symbol,
holding it in for about 10 seconds. Keep the button
pressed and press the piezo-igniting button (Fig. 5.C)
several times one after the other. If the flame does not
ignite, repeat the process. (Air in the appliance gas line
prior to connection to the gas cylinder must be
evacuated. Only then can the gas be lit.)
If the burner is working the flame indicator pointer will
be in the green field (Fig. 5.D). After you have got the
flame keep the safety gas valve down another 20
seconds.
If, for any reason, the gas flame extinguishes, the
flame safety device is working automatically and shuts
Figure 4.
Figure 5.
C
A
B
D
Figure 3.
All manuals and user guides at all-guides.com
all-guides.com

