background image

About this task

Attention:

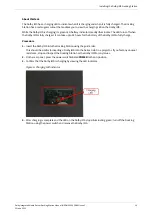
The back panel displays two LEDs: 

Wrong Polarity

 and 

Over Voltage

. If your power adapter is of the

correct voltage and polarity, then neither of these LEDs will illuminate.

Figure 5: Back panel with LEDs labeled

If you connect a power supply and the wiring has reversed polarity (tip negative), the 

Wrong

Polarity

 LED will illuminate. To fix this issue, change the polarity of the wiring to be tip positive.

If you connect a power supply that has higher voltage than what is specified (12V), the 

Over Voltage

LED will illuminate. To fix this issue, replace the power supply with a 12V model.

If you use a power supply with insufficient voltage, then no warning will illuminate.

Procedure
1.

Connect one end of the power adapter into the AC outlet and the other end into the Dolby IMS Docking
Station rear-panel power input labeled 

DC 12V

.

2.

Confirm that neither the 

Wrong Polarity

 nor 

Over Voltage

 LEDs are illuminating.

Important:

The 

Wrong Polarity

 and 

Over Voltage

 circuitry was designed to verify the DC input prior to the

POWER

 on switch. This provides you the ability to verify the stability of the DC input prior to

turning on the Docking Station and delivering the power to the Dolby IMS.

Related information

Power supply requirements

 on page 9

3.4 Charging the Dolby IMS battery

You can charge the battery for a Dolby IMS1000, Dolby IMS2000, and Dolby IMS3000.

Prerequisites

Dolby recommends that the Dolby IMS is placed into the Docking Station without its hard drives installed.

Make sure the power switch is in the off position on the Docking Station. The power switch is labeled as

POWER

 on the side panel.

Charging the Dolby IMS battery

Dolby Integrated Media Server Docking Station Manual IMS.OM.005903.DRM Issue 3

13

23 June 2020

Summary of Contents for CID1020

Page 1: ...Dolby Integrated Media Server Docking Station Manual 23 June 2020 IMS OM 005903 DRM Issue 3...

Page 2: ...r trademarks remain the property of their respective owners Patents THIS PRODUCT MAY BE PROTECTED BY PATENTS AND PENDING PATENT APPLICATIONS IN THE UNITED STATES AND ELSEWHERE FOR MORE INFORMATION INC...

Page 3: ...qualified service personnel only 4 Where applicable ensure fuses fitted are the correct rating and type as marked on the unit 5 This product may require installation in a restricted access location 6...

Page 4: ...IMS Docking Station 10 3 1 Placing the Docking Station in the horizontal position 11 3 2 Standing the Dolby IMS Docking Station 11 3 3 Plugging in the power adapter 12 3 4 Charging the Dolby IMS batte...

Page 5: ...structions for setting up and operating the Dolby Integrated Media Server Dolby IMS Docking Station About the Dolby Integrated Media Server Docking Station Contacting Dolby Dolby Integrated Media Serv...

Page 6: ...0 Dolby IMS2000 and Dolby IMS3000 Important Non supported devices that do not have a rechargeable battery include the integrated media block IMB with Dolby ShowVault and CAT745 IMB Media blocks made b...

Page 7: ...Dolby You can contact Dolby Cinema Solutions and Support using email or regional telephone numbers You can also access documentation by visiting the Dolby customer portal Contact Dolby Cinema Solution...

Page 8: ...requires specific hardware components and the correct power supply for proper and safe operation Packing list Power supply requirements Hardware components Dolby Integrated Media Server Docking Stati...

Page 9: ...power supply with these requirements Output DC voltage 12 V Output rated current 5 A or higher Connector type P1J inner diameter 2 1 mm outer diameter 5 5 mm connector length 11 mm 0 5 mm The connect...

Page 10: ...tion depending on your operating environment Placing the Docking Station in the horizontal position Standing the Dolby IMS Docking Station Plugging in the power adapter Charging the Dolby IMS battery...

Page 11: ...tion in a standing vertical position by installing the supplied metal feet About this task Out of the box the Dolby IMS Docking Station comes without the metal feet installed which allows it to be use...

Page 12: ...ply outlet and the other end to the Dolby IMS Docking Station Prerequisites The power switch must be in the off position The Docking Station must be empty with no Dolby IMS inserted inside Installing...

Page 13: ...into the Dolby IMS Docking Station rear panel power input labeled DC 12V 2 Confirm that neither the Wrong Polarity nor Over Voltage LEDs are illuminating Important The Wrong Polarity and Over Voltage...

Page 14: ...using the guide rails This should be similar to inserting a Dolby IMS into the Series II slot in a projector If you feel any unusual resistance stop and inspect the Docking Station or the Dolby IMS fo...

Page 15: ...e Dolby IMS Docking Station and replace one or both fans and replace the fuse if it is damaged Replacing the fan Replacing the circuit board fuse Dolby Integrated Media Server Docking Station Manual I...

Page 16: ...rewdriver to remove the four screws on each fan and the four screws on each fan guard You also need three zip ties to tie down the cables Procedure 1 With a Phillips screwdriver remove the four screws...

Page 17: ...supply and then remove the Dolby IMS About this task The Docking Station has a fuse designed to protect the Dolby IMS from any overvoltage or short circuit issues Figure 8 Fuse location If the fuse fa...

Page 18: ...t to do next To test the new fuse functionality plug the power supply into the Docking Station and then switch the power on Check whether the fuse is working properly Troubleshooting Dolby Integrated...

Page 19: ...lications of the Dolby Integrated Media Server Docking Station Manual Date Issue Description 06 March 2020 1 Initial release 11 March 2020 2 Updates made to chapters 3 and 4 23 June 2020 3 Small text...

Reviews: