Dodge Industrial, Inc.
1061 Holland Road
Simpsonville, SC 29681
+1 864 297 4800
All Rights Reserved. Printed in USA.
MN16007 07/22
*16007-0722*
© DODGE INDUSTRIAL, INC.
AN RBC BEARINGS COMPANY
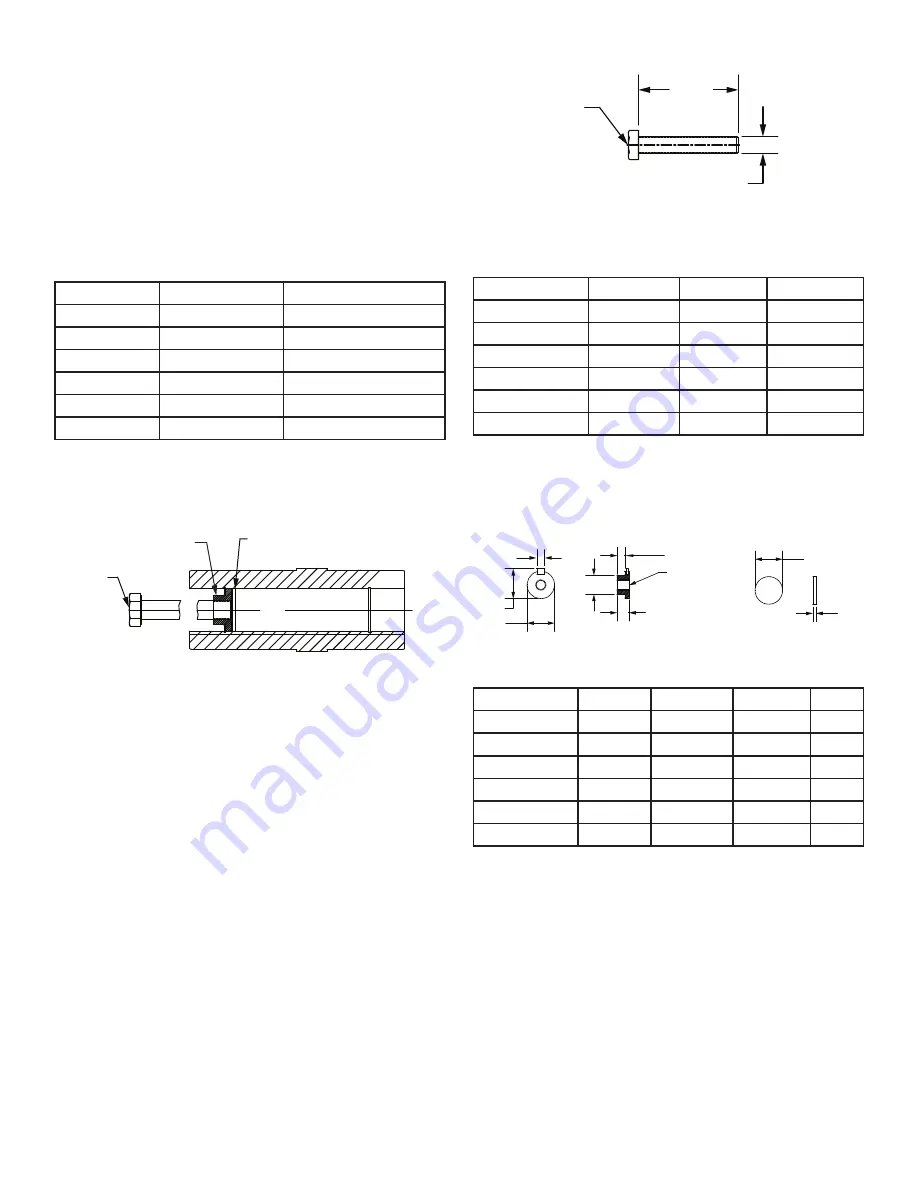
Table 3–Removal Bolt Dimensions
Unit Size
M1
VB1
S
MSM/RHB 38
3/8-16
6.00
0.31
MSM/RHB 48
5/8-18
7.00
0.5
MSM/RHB 68
3/4-10
8.00
0.63
MSM/RHB 88
7/8-14
9.50
0.81
MSM/RHB 108
7/8-14
12.50
0.81
MSM/RHB 128
7/8-14
14.00
0.81
Note: The retaining bolt supplied with the gear unit cannot be used for the
purpose of disassembly and must be replaced by the bolt in Table 3. The round
keyed nut and disk should be made from 1045 steel and the removal bolt should
be a minimum of SAE Grade 5.
Table 4–Removal Rounded Key Nut and Disk Dimensions
Unit Size
Y Max
UY Max
ØUE
GF
MSM/RHB 38
0.250
1.367
1.245
0.12
MSM/RHB 48
0.312
1.52
1.370
0.12
MSM/RHB 68
0.375
1.669
1.495
0.25
MSM/RHB 88
0.500
2.22
1.995
0.25
MSM/RHB 108
0.625
2.65
2.370
0.31
MSM/RHB 128
0.625
3.03
2.745
0.31
7. Turn reducer upright or on its side. Use caution not to damage
either type of seals and install drive shaft through the adapter
housing into the reducer. Line up the keyway in the drive shaft
with the keyway in the reducer hub bore. Slide or gently tap
key into reducer through the input shaft side of the output
hub.
8. Install the retaining ring (411) into the snap ring groove. Install
keeper plate (402) flush against retaining ring.
9. Install spring washer (406) and retaining bolt (405) making
sure the drive shaft is fully seated into the reducer. Tighten
the retaining bolt to the tightening torque specified in Table 2.
Install dust cap (401).
Table 2–Tightening Torques for Retaining Bolt
Unit Size
Bolt Thread Size
Torque
MSM/RHB 38
3/8-16
248 in-lb
MSM/RHB 48
3/8-16
248 in-lb
MSM/RHB 68
5/8-11
611 in-lb
MSM/RHB 88
3/4-10
1221 in-lb
MSM/RHB 108
3/4-10
1221 in-lb
MSM/RHB 128
3/4-10
1221 in-lb
DRIVE SHAFT REMOVAL
To remove the drive shaft from the reducer, the following steps
are required. Reference Figure 2 for disassembly arrangement.
1. Remove the dust cap (401), the driveshaft retaining bolt
(405) and lock washer (406), the keeper plate (401) and the
retaining ring (411).
2. For ease of disassembly, it is recommended that the following
tools be made and used as described: (A) round keyed nut,
dimensions in Table 3, (B) removal bolt, dimensions in Table
4.
3. The round keyed nut (A) is inserted into the free space
between the retaining ring in the gear unit’s hollow shaft and
the end of the machine’s drive shaft.
4. The removal bolt (B) is screwed into the nut (A) which
presses a disk (C) against the screw conveyor drive shaft.
The resulting force pushes the gearbox off of the drive shaft.
5. The driveshaft can now be easily removed from the reducer
by pulling the driveshaft straight out.
Figure 2 - Screw Conveyor Diassembly
B
A
C
ROUND KEYED NUT
UY
Y
ØUE
FG
ØFH
FV
M1-TAP
DISK
ØUE
GF
REMOVAL BOLT
M1
VB1
S


