background image

37

Объяснение о монтаже опоры

Шаги по монтажу:
После соединение опоры с основным аппаратом, нажмут основной аппарат до
места по полному соединению с опорой.

Рис.1

Рис.1

Summary of Contents for S1+

Page 1: ......

Page 2: ...duct Features 06 Product Structure 08 Use and Installation 09 Operating Instruction 10 Files Saving and Videos Playing 13 Button Function 14 Menu Setup 15 Specifications 16 Package Accessories 17 Easy...

Page 3: ...2 S1 19 20 21 23 24 25 30 31 32 34 35 36 37...

Page 4: ...3 38 39 40 42 43 44 47 48 49 50 51 51 52...

Page 5: ...lso be used as a DV for video recording taking photos It is exquisite in appearance and has won many patents and certifications in a word S1 will make your life more wonderful This manual will teach y...

Page 6: ...ing recorder to cater to the market demand It has leading functions such as high definition video recording photos taking hi speed USB data transmission USB charging and car charging Widely Used Conve...

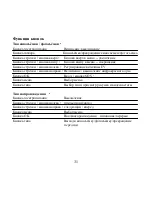
Page 7: ...en 2 5 inch high definition TFT LCD 4X digital zoom Infrared rays In built microphone loudspeaker High capacity rechargeable lithium battery Support high capacity SD SDHC memory card Cycle video recor...

Page 8: ...ze etc 1G 2G 4G 8G 1440 1080 FPS15 17min 34min 69min 139min 1280 720 FPS30 16min 32min 65min 130min 848 480 FPS60 18min 36min 73min 146min 10M 287photos 574photos 1148photos 2296photos 8M 354photos 70...

Page 9: ...8 Product Structure...

Page 10: ...1 Insert memory card into the slot as instructed until it is fixed in the slot 2 When taking memory card out press it down gently and take it out after the card pops up Attentions 1 Insert in the SD...

Page 11: ...et auto off time in the menu When no operation happens within the setting time it will shut down automatically 3 Turn the power on press MENU button twice to switch to Setup Menu and then press Down t...

Page 12: ...frared rays in nonluminous condition you can see photos through screen that cannot be seen due to darkness Photo Mode Turn the power on the camera is then started Press MODE button in video mode then...

Page 13: ...the default displacement the record is started automatically Each time the record lasts for 15s after that the machine will continue detecting When the power is on press MENU button to select detected...

Page 14: ...t will turn on automatically and starts recording meanwhile the battery will be charged Attention when the car stops it will use battery power until auto power off Files Saving and Videos Playing USB...

Page 15: ...ct Down to zoom out Arrow Key Left Adjust EV value Arrow Key Right Open Close infrared rays OK Confirm SOS button Menu Menu Mode Mode selection browse photos and videos Replay Mode Power Off Arrow Key...

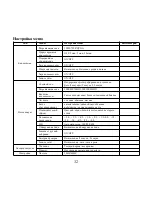
Page 16: ...alance Auto sunlight cloudy bulb daylight lamp Special effect Color black white nostalgic Exposure compensation 2 0 5 3 4 3 1 0 2 3 1 3 0 0 1 3 2 3 1 0 4 3 5 3 2 0 ISO Auto 100 200 400 Face detection...

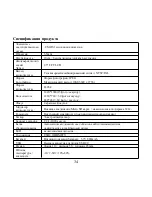
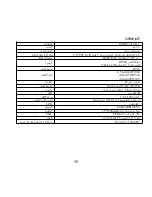
Page 17: ...l 1440 1080 15 s 1280 720 30 s 848 480 60 s Zoom 4x digital zoom Video medium SD card maximum 32G Audio Built in microphone loudspeaker Mono Shutter Electronic shutter Shutter speed 1 2 1 1000s White...

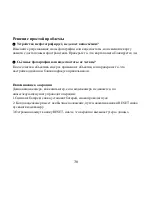
Page 18: ...eo recording or replace a memory card with sufficient space and check whether the memory card is locked or not Photo or video not clear Please use it after wipe clean the lens or check whether the far...

Page 19: ...18 Installation Instruction for Bracket Installation Steps After assembling the bracket to the machine knock the host machine to engage it with the bracket...

Page 20: ...19 DOD S1 1 270 180 DV S1...

Page 21: ...20 USB USB...

Page 22: ...21 100 EV 2 0 2 2 5 TFT LCD 4X SD SDHC SOS G SENSOR...

Page 23: ...22 1G 2G 4G 8G 1440 1080 FPS15 17 34 69 139 1280 720 FPS30 16 32 65 130 848 480 FPS60 18 36 73 146 10M 287 574 1148 2296 8M 354 708 1416 2832 5M 572 1144 2288 4576 3M 1003 2006 4012 8024...

Page 24: ...23...

Page 25: ...24 1 2 3 4 1 2 1 SD 2 SD 3 4...

Page 26: ...25 1 MENU 2 OK OK MENU 1 1 3 2 3 MEN OK OFF 2 5 10 MENU OK...

Page 27: ...26 OK OK OK 1 2 REC REC 3 MODE...

Page 28: ...27 1 2 REC MENU OK 1 2 5 10 1 MODE 2 MODE 1 MODE REC 2 MENU OK...

Page 29: ...28 OK OK 15 MENU ON OFF G SOS SOS...

Page 30: ...29 3...

Page 31: ...30 USB USB USB DCIM 1 TV...

Page 32: ...31 EV OK SOS OK...

Page 33: ...32 1080I 720P QVGA OFF 2 5 10 ON OFF ON OFF ON OFF ON OFF 2 5 10 10M 8M 7MHD 5M 3M 2MHD 2 0 5 3 4 3 1 0 2 3 1 3 0 0 1 3 2 3 1 0 4 3 5 3 2 0 ISO 100 200 400 ON OFF 2 5 50HZ 60HZ...

Page 34: ...33 2 5 10 OFF 2 5 10 NTSC PAL S12012...

Page 35: ...34 CMOS 1 3 5mm 10cm 2 5 TFT LCD NTSC PAL JPEG 10M 3648 x 2736 H 264 1440 1080 15 1280 720 30 848 480 60 4 Micro SD 32G 1 2 1 1000 LED USB2 0 HDMI TV 3 7V 800mAh USB USB2 0 111 53 28mm 10 60 10 80...

Page 36: ...35 1 USB 1 2 1 3 1 4 1 5 1 6 1...

Page 37: ...36 1 2 RESET 3 RESET...

Page 38: ...37 1 1...

Page 39: ...38 180...

Page 40: ...39...

Page 41: ...40 100 2 2 0 2 5 4...

Page 42: ...41 4 2 1 139 69 34 17 15 1808 1440 130 65 32 16 30 720 1280 146 73 36 18 60 840 848 2296 1148 574 287 10 2832 141 708 354 8 4576 2288 1144 572 5 8024 4012 2006 1003 3...

Page 43: ...42...

Page 44: ...43 1 2 3 4 1 2 1 2 3 4...

Page 45: ...44 1 2 1 2 3 5...

Page 46: ...45 1 2 3 1 2 10 5 2 1 2...

Page 47: ...46 1 2 15...

Page 48: ...47 DCIM 1...

Page 49: ...48 EV...

Page 50: ...49 1080I 720P QVGA 5 10 5 2 10M 8M 7MHD 5M 3M 2MHD 2 0 5 3 4 3 1 0 2 3 1 3 0 0 1 3 2 3 1 0 4 3 5 3 2 0 400 200 100 5 50HZ 60HZ 10 5 10 5 NTSC PAL S12012...

Page 51: ...50 CMOS 1 3 5 10 2 5 TFT LCD 2 5 NTSC PAL JPEG 3648 x 2736 10 H 264 15 1440 1080 30 1280 720 60 848 480 4x 32 1 2 1 1000 LED USB2 0 HDMI TV 3 7V 800mAh USB USB2 0 20 59 111 10 60 10 80...

Page 52: ...51 1 1 2 1 3 1 AV 4 1 5 1 6 1 1 2 3...

Page 53: ...52...

Page 54: ......

Reviews: