background image

Rejecting Calls from Specified Phone Numbers

A

n

sw
er
in

g

 C
al

ls

59

The default setting is “Disable”.

You can set your mova to reject calls from specified callers in your phonebook. Calls from 
other numbers (including those where the caller does not send their number) are connected.
To set Reject calls, register the phone numbers of all members registered in the 
phonebook whom you wish to reject to the list and set collectively later.

When a call is received from a caller who is set in Reject calls without sending their number, 
the call is connected. It is recommended that services such as the “Caller ID Display 
Request Service”, in which a guidance informs the caller to send their number, and rejecting 
by reason also be set.
When Accept calls is set, Reject calls cannot be set.
Callers set to be rejected hear a busy signal. In such cases, “* missed calls” is displayed and 
information such as the name is recorded in the received calls history.
Short mail and i-mode mail are received regardless of this function.

You can save up to 20 callers in Reject calls.

Setting/Disabling Accept Calls

Kt64L

1

In the stand-by, press 

t

 and select 

, press 

t64

, enter 

your terminal security code (4 digits), and then press 

1

.

The accept calls screen is displayed.

When “Disable reject calls” is displayed

Reject calls, Reject unknown, Reject number unset, Reject payphone, or Reject not support 
is set. Disable the setting and try again.

2

Press 

1

 (Set).

If Accept calls list is empty, the save list screen is displayed. Register before setting 
(

n

P.57). 

To disable

Press 

2

.

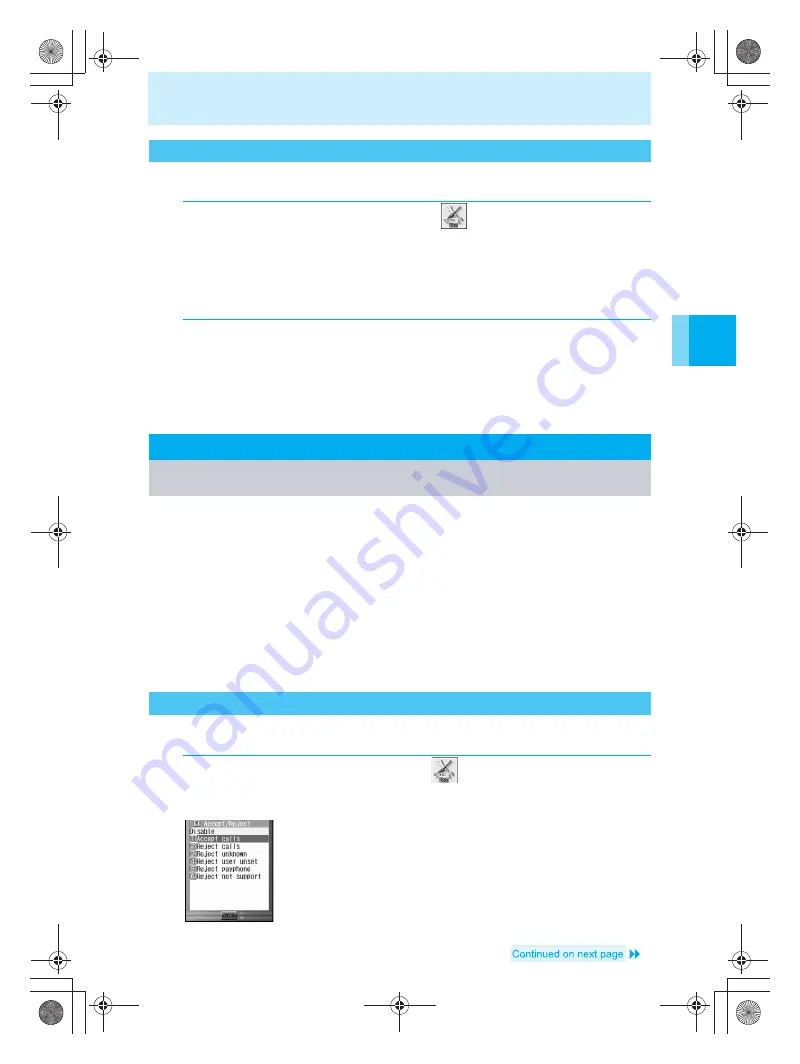
Reject Calls

Rejecting Calls from Specified Phone Numbers

Saving a Caller in Reject Calls

Kt64L

1

In the stand-by, press 

t

 to select 

, press 

t64

, and 

then enter your terminal security code (4 digits).

Each entered digit is displayed as “

b

”.

e̲n500.book  Page 59  Tuesday, August 9, 2005  1:15 PM

Summary of Contents for mova SH506iC

Page 1: ...turn used battery packs to NTT DoCoMo any NTT DoCoMo retailer or a recycling agency Don t forget your mobile phone or your manners Sales NTT DoCoMo Group NTT DoCoMo Hokkaido Inc NTT DoCoMo Inc NTT DoC...

Page 2: ...signal and sent to the other party If you move to a location where signals are weak the digital signal may not be reconverted properly and the voice you hear may differ from its actual sound Take care...

Page 3: ...edia Inc Copyright 1995 2004 Macromedia Inc All rights reserved Macromedia Flash and Macromedia Flash are trademarks or registered trademarks of Macromedia Inc in the United States and other countries...

Page 4: ...tting Manner Mode 95 Manner mode Original manner mode Vibrator Keypad sound Charge start sound Charge end sound 7 Changing the Ring Tone and Other Sounds 101 Sound settings Setting sound effects volum...

Page 5: ...e control 20 Managing Data 443 miniSD memory card Managing miniSD memory card 21 Using Other Functions 459 e Dictionary Book Document viewer Assistant view Shortcut menu Side key settings Close operat...

Page 6: ...with the auto focus feature Set image quality and size High image quality is maintained when an image shot in 2 megapixel size is printed in 2L size In addition shoot with frame use Continuous mode o...

Page 7: ...composing a mail nP 478 Security settings Features you do not wish to be seen such as mail My picture Phonebook history and schedule can be collectively kept private nP 202 Side keys The mova is equip...

Page 8: ...vate i ppli when i ppli stand by is set nP 401 Press the side clear key for at least 1 second in the stand by when the mova is closed or in Viewer position to illuminate the spotlight Press the side c...

Page 9: ...et as the stand by press to activate the i ppli nP 401 i Power End On hold key H Press for at least 2 seconds to turn the power ON OFF nP 35 Press to disconnect a call end i mode or to place a call on...

Page 10: ...Normal position or in Viewer position It is recommended that the mova be closed when transporting as shown in step 1 To rotate the mova display from the Normal position open the display partially unt...

Page 11: ...s the function displayed on the bottom left t Performs the function displayed on the bottom center C right guidance key Performs the function displayed on the bottom right w The arrows indicate the di...

Page 12: ...that can be added to the Shortcut menu 6 miniSD memory card nP 444 Gray Displayed when a miniSD memory card is inserted Pink Displayed when a miniSD memory card is being viewed flashing Displayed whe...

Page 13: ...ging nP 34 Displays the status of the battery pack p i navi link PlayStation connection n nP 506 Displayed when connected to a car navigation system or a PlayStation q Message R icon Message F icon LM...

Page 14: ...mediately result from improper use Warning This symbol indicates that death or serious bodily injury may result from improper use Caution This symbol indicates that serious bodily injury and or proper...

Page 15: ...t of the reach of young children k Don t Doing so may cause a malfunction If a child is using the mova have a guardian teach them the proper handling procedures In addition check that the child is usi...

Page 16: ...ent to malfunction k Don t Doing so may damage eyesight In addition this may cause momentary sight loss or startle someone and cause an accident To remove the miniSD memory card press the miniSD memor...

Page 17: ...electric shock Handling the Battery Pack Check the type of battery recorded on the battery pack label Display Battery type Li ion Lithium ion Danger Do not remove the seal wrapped around the battery...

Page 18: ...to leak overheat explode or catch fire If battery fluid comes into contact with your skin or clothing stop using the mova immediately and rinse it off with clean water Do not use or leave the battery...

Page 19: ...ammable gases accumulate Do not leave the cord of the adapter or charger near heating appliances k Don t Doing so may result in explosions or fires k Don t Doing so may result in melting the cord insu...

Page 20: ...ys pull the plug out of the power outlet or cigarette lighter socket before cleaning the adapter charger q Instruction Use in temperatures not in this range may cause the battery pack to leak overheat...

Page 21: ...fic instructions prohibiting the carrying and use of mobile phones observe those instructions strictly If your mobile phone has the Auto power function set ON disable this function before turning off...

Page 22: ...nearby Keep away from places where the mova is likely to become soiled The back of the mova speaker and the earpiece contain parts that generate magnetic waves Keep credit cards and other objects like...

Page 23: ...ly removing the miniSD memory card may damage the miniSD memory card or the mova The battery pack is a consumable product Though usage time varies if the battery usage time becomes extremely short eve...

Page 24: ...anty miniSD memory card miniSD memory card Adapter Sample 16MB Sample miniSD memory card miniSD memory card adapter user s manual User s manual this manual i Separate mova SH506iC i ppli manual nRefer...

Page 25: ...on guidance You can change the icons Menu icon settingsnP 196 Making Menu Selections Selecting Functions from the TOP Menu Icon Menu Function Icon Menu Function i mode 1 7Menu Library 1 My picture 2 M...

Page 26: ...7 is the Library 8 is Tools and 9 Keitai viewer for the first number of the function number Refer to P 547 to P 551 for details on the function number key operation for each function This will describ...

Page 27: ...il functions Write mail Screen to enter receiver subject message for Compose message P 307 View all rcvd msgs Subject list sender list still picture name and subject display subject and text display s...

Page 28: ...are performed from the Zoom menu again characters will be displayed in large size Changes to font size are not reflected when operations are performed from the TOP menu The displays for Phonebook mail...

Page 29: ...l 34 Turning the Power ON OFF 35 Switching the Display Language to English Select Language 36 Initial Settings Initial Settings 36 Setting the Date Time Date Settings 37 Sending Your Phone Number to t...

Page 30: ...ova when inserting 3 Reattach the rear cover 4 Place the rear cover on the mova as shown Push down on the rear cover and make sure the PUSH button is back in place Note Use of unnecessary force when i...

Page 31: ...his is called the i mode cache Always charge the battery pack for approximately 140 minutes before using for the first time or after replacing the battery pack The battery pack is not fully charged at...

Page 32: ...s are composed or downloaded i ppli are activated or set as stand by display Some i ppli software may continue data exchange after downloading You can set them in advance so that they do not connect A...

Page 33: ...of the connector unplug the connector and then close the external connector terminal cover When not in use for long periods unplug the AC adapter from the outlet Note You cannot charge the battery pa...

Page 34: ...is complete When not in use for long periods unplug the AC adapter from the outlet Note The mova can also be charged in Viewer position with the desktop holder Close the mova when placing in the deskt...

Page 35: ...r is for use in negatively grounded vehicles Both 12V and 24V The DC adapter power switch is interlocked with the car ignition switch but the interlock may not work with some vehicles Make sure that t...

Page 36: ...t32 The battery level graphic is displayed A different sound will be emitted for each battery level Wait 3 seconds or press c to return to the general settings menu Note The Battery level sound does...

Page 37: ...at least 2 seconds The power turns off If the mova is turned off while i mode is in use nP 255 the i mode end confirmation screen is displayed and it may take some time before the mova turns off The...

Page 38: ...o English Days are also displayed in English To switch to Japanese display Press 1 Note This setting also applies to the sub display Initial Settings Initial Settings Kt L Settings Details Page Date s...

Page 39: ...ot set the setting screen for items not set will be displayed each time the mova is turned ON If a call is received while setting only the settings that have been completed will become effective Date...

Page 40: ...to Able nP 210 you will need to enter your terminal security code to change the date and time settings Send Own Number Sending Your Phone Number to the Other Party Kt65L 1 In the stand by press t and...

Page 41: ...one during a call from the in call menu To view Owner information press t Details and enter your terminal security code 4 digits Saving Owner Information Icon Saved item Name max 16 full pitch 32 half...

Page 42: ...own i mode mail address requires an i mode subscription In the stand by press it In the JMenu press 8 Option setting press 1 Mail setting select Check address Confirm Mail Address and then press t In...

Page 43: ...ting Send Own Number On Off for Each Call 186 184 45 Short Dialing and Reject Wangiri one ring Calls Short Dialing and Reject Wangiri one ring Calls 46 Sending Messages to a Pager Send Pager 47 Making...

Page 44: ...igit you wish to delete and then press c to delete a digit in the middle of a number Press c for at least 1 second to delete all digits Returns to the stand by display 2 Press s When name and still pi...

Page 45: ...hout moving When g is displayed the mova is set on Self mode nP 504 When set to Self mode you cannot make receive calls or send receive e mail Note When making a call do not cover the antenna You can...

Page 46: ...r information on Security settings In the Redial list press i to display the sent address screen Refer to P 341 for viewing the history and P 343 for information on using the Sent address history If d...

Page 47: ...ed 2 Press C2 Delete The delete screen is displayed 3 Press 1 Delete one To delete all redials Press 2 4 Select Yes and then press t To not delete Select No and then press t Note If the following func...

Page 48: ...landline phone numbers generating unwanted calls to the DoCoMo network and reject calls from them By doing so you will no longer receive calls from those registered numbers Using Short Dialing 1 Press...

Page 49: ...ial number 00 Saved phone numbers can be used as a Short dial 1 Press 0 O 2 digit reject call number O the phone number to save Enter numbers from 01 to 19 for You cannot save a number in Reject call...

Page 50: ...ouch Tone Signals 1 Make a call from the Phonebook in which a touch tone signal is saved Refer to P 86 to P 89 When the call is connected the numbers that come after the P saved in the touch tone func...

Page 51: ...king international calls using a mobile phone have changed Consequently with the offering of the MYLINE service the current dialing procedure the procedure listed above without 010 cannot be used Dire...

Page 52: ...ngs must be made in advance Setting Numbers Other Than WORLD CALL Numbers Int l Prefix Kt50L 1 In the stand by press t and select press t50 select an item and then press t To save a new number select...

Page 53: ...Receiving Calls Only from Specified Phone Numbers Accept Calls 57 Rejecting Calls from Specified Phone Numbers Reject Calls 59 Rejecting Calls with No Caller ID Rejecting by Reasons for Non disclosur...

Page 54: ...e of the following messages is displayed User unset Caller wishes to withhold their caller ID Payphone Includes calls from NTT payphones and DoCoMo car payphones Not support Call from a network not en...

Page 55: ...to phonebook settings Background patterns are not displayed during calls If you have a contract for the mova Voice Mail Service Call Forwarding Service or Call Waiting Service and you have 1450 set wh...

Page 56: ...and then press t to display the received calls details screen Also press t to make a call When in Viewer position press in the received calls history details screen to make the call Press right guidan...

Page 57: ...calls history screen menu items Received calls details screen menu items Function 1 Add to phonebook 1 Add to phonebook Save a phone number to phonebook 2 Delete 2 Delete one Delete a saved phone numb...

Page 58: ...ss t to set the volume Note Once the volume is adjusted it remains set even after the power is turned off Ring Volume Adjusting the Ring Volume Kt111L 1 In the stand by press t and select and then pre...

Page 59: ...received calls history Even if Set i mode rcv nP 281 is set to i mode answer calls from numbers in the phonebook that do not have Accept calls set are not connected Short mail and i mode mail are rec...

Page 60: ...nge the display of the Phonebook in the submenu display all phone numbers and then perform this operation nP 90 Remote keypad lock can be performed from numbers rejected with Accept calls When the set...

Page 61: ...a busy signal In such cases missed calls is displayed and information such as the name is recorded in the received calls history Short mail and i mode mail are received regardless of this function Yo...

Page 62: ...deleted However if Reject calls is set you cannot edit or delete the phonebook entry Except when performing Delete all in group and Delete all Refer to P 433 for information on the Caller ID Display R...

Page 63: ...he Phonebook list 3 Press C9 and then enter your terminal security code 4 digits Each entered digit is displayed as b 4 Select the number of the list to save and then press t Only the selected phone n...

Page 64: ...stand by press t to select press t64 and then enter your terminal security code 4 digits Each entered digit is displayed as b 2 Select the type of reason for non disclosure Reject user unset payphone...

Page 65: ...electing 9Display all in the received calls history submenu In this case the submenu changes to 9Limit display By selecting this you can set to not display the history again When Record message or Voi...

Page 66: ...64 LMEMO9 e n500 book Page 64 Tuesday August 9 2005 1 15 PM...

Page 67: ...ng Incoming Calls While Driving Drive Mode 66 Verifying Missed Calls Missed Calls 68 Recording a Message When You Cannot Take a Call Record Message 69 Recording a Message When You Cannot Answer a Call...

Page 68: ...ll and the connection is maintained To disconnect the call while on hold Press H The call is saved in the received calls history If the caller disconnects while on hold The call is ended The call is s...

Page 69: ...ll Forwarding Service to Start while Drive mode is set The call is not connected to the mova but is forwarded to the set forwarding destination instead These calls are saved in the received calls hist...

Page 70: ...When set to Forward without message is set the call is forwarded without playing the guidance Notification A guidance informs callers that you are driving and the call is disconnected Voice Mail Serv...

Page 71: ...y When in Viewer position Press Note When a call from someone using Dial in is received a number different from the caller s Dial in number may be displayed When Keypad lock nP 207 is set Missed calls...

Page 72: ...0 seconds The caller hears the answering message To answer a call while the message is playing While the answering message is playing press s 2 The caller s message is automatically recorded During re...

Page 73: ...Voice Mail Service nP 414 is set messages are held at the Voice Mail Service Center even after 3 Voice mail messages are recorded Even if Record message is not set you can set and record messages wit...

Page 74: ...re is displayed and nothing is recorded Note If the mova is closed press to answer with Record message When in Viewer position press twice to answer with Record message Recorded content may be lost du...

Page 75: ...eived during playback playback is automatically stopped If the set alarm time arrives during playback playback is automatically stopped and the alarm sounds When the date and time are not set on the m...

Page 76: ...74 LMEMO9 e n500 book Page 74 Tuesday August 9 2005 1 15 PM...

Page 77: ...arch Phonebook 86 Editing Phonebook Entries Edit Phonebook 90 Deleting Phonebook Entries Delete Phonebook 91 Protecting Private Phonebook Entries Secret Mode 92 Checking the Registration Status of the...

Page 78: ...ge the group names for groups 1 to 19 9 Phone number You can register 3 phone numbers Each phone number can be categorized using 5 icons B Mail address You can register 3 mail addresses Each mail addr...

Page 79: ...or the loss of data registered in the phonebook Basic Registration Method Kai or a for at least 1 secondL 1 In the stand by press t and select and then press ti When Phonebook lock is set Enter your t...

Page 80: ...ss v to move the cursor to the digit you wish to delete and then press c Press c for at least 1 second to delete the entire phone number Enter the correct number To enter a pause Press o where you wis...

Page 81: ...ed enter a memory number to overwrite an existing entry Other ways to specify the number Enter a single number for the hundreds digit and then press t The information is registered to the smallest ope...

Page 82: ...set You can change the group name or set ring tones and Called LED colors for each group You can also register a still picture for each group nP 84 Registering Personal Data 1 Select the G line in th...

Page 83: ...t for 1 mail address Refer to P 347 to register your own secret code If the Mail address is registered in the phonebook as phone number secret code docomo ne jp mail may not be sent or replied to prop...

Page 84: ...is OFF Still pictures set for Picture call may take time to open the first time depending on the size of the data Setting the Ring Tone Select Ring Tone Mail Ring Tone Priority ranking High Low Ring t...

Page 85: ...Picture light Called LED color changes each time you select a color To disable Called LED Mail Message LED Press i Not set 3 Press t The Called LED color is set To end phonebook registration press i...

Page 86: ...by press t to select and then select a group Press C2 and then proceed to step 4 2 Press 6 Group settings The current group name is displayed 3 Select a group name to register change and then press t...

Page 87: ...nd then press 2 Select ring tone To select the mail ring tone Press 3 2 Select the ring tone and then press t The ring tone is set Select the ring tone and then press i Play to play the ring tone Pres...

Page 88: ...ture is set When settings are complete press i Complete 8 is displayed next to the group name in the group selection screen Note Still pictures that cannot be set are crossed out Search Phonebook Maki...

Page 89: ...idance key for at least 1 second to scroll up a page at a time or press right guidance key for at least 1 second to scroll down a page at a time However this will only scroll within the group when sea...

Page 90: ...try Press u to select one item at a time To select an entry by entering the memory number As you enter each digit of the desired memory number similar phonebook entries are shown sequentially For exam...

Page 91: ...numbers no reading 3 Select an entry Press v to display the previous or next group which has phonebook entries registered Press u to select one item at a time To select an entry by entering the readi...

Page 92: ...and then press C4 When still pictures are displayed in the Phonebook list only the first phone number and mail address can be displayed selected To select other registered phone numbers and mail addre...

Page 93: ...n a selected group Press 2 select the group to delete and then press t Enter your terminal security code 4 digits To delete all phonebook entries Press 3 and then enter your terminal security code 4 d...

Page 94: ...the phonebook as secret data 2 touch dialing is not available unless Secret mode is activated Mail addresses set as secret data in phonebook entries also cannot be retrieved unless the mova is in Sec...

Page 95: ...digits Each entered digit is displayed as b 2 Press 1 ON Set Secret mode To disable Secret mode Press 2 disappears 3 Press 1 No auto disable To automatically disable Secret mode Press 2 When the stan...

Page 96: ...the last digit of the memory number 0 to 9 or the last 2 digits of the memory number 10 to 99 Example When memory number 5 is entered 2 Press s The phone number registered in the phonebook entry with...

Page 97: ...ner Mode Original Manner Mode 97 Notifying Incoming Calls and Alarms by Vibration Vibrator 98 Silencing the Sounds of the Keys Keypad Sound 99 Setting the Charging Confirmation Sound Charge Start Soun...

Page 98: ...ill be switched to Vibrator Various ring tones alarms timer sounds limit alarms etc Record message is set automatically Record message cannot be set or disabled by menu operations nP 69 Note When in V...

Page 99: ...is displayed To set Record message Press 1 3 To disable the Vibrator press 2 OFF The manner talk screen is displayed To set the Vibrator Press 1 4 To set Manner talk press 1 ON To disable Manner talk...

Page 100: ...ess t When Vibrator mode is set b is displayed in the stand by display You can sample the vibration patterns by using u to select from patterns 1 to 3 When sampling the Picture light Called LED flashe...

Page 101: ...t and select and then press t114 2 Press 1 Keypad sound The keypad sound screen is displayed 3 Refer to the screen to select the volume nP 56 select Silent and then press t To change the Keypad sound...

Page 102: ...100 LMEMO9 e n500 book Page 100 Tuesday August 9 2005 1 15 PM...

Page 103: ...by the Phone Setting Sound Effects Volume 107 Recording Voice Melodies and Setting Them as the Ring Tone Voice 109 Playing a Melody My Melody 110 Changing the Mail Ring Tone Duration Mail Ring Durati...

Page 104: ...ing Tone Select Ring Tone Kt121L 1 In the stand by press t and select and then press t121 2 Select the ring tone you wish to use Press i Play to play the ring tone The ring tone is played back in Volu...

Page 105: ...ow Note While in i mode stand by J flashes the ring tone set in Set i mode rcv of i mode menu sounds nP 283 It is recommended that saved i melodies be saved to a miniSD memory cards nP 444 You can als...

Page 106: ...een is displayed To change the Message Request ring tone Press 2 To change the Message Free ring tone Press 3 3 Select the ring tone you wish to use Press i Play to play the ring tone The ring tone is...

Page 107: ...changed with this function The default setting for Keypad sound shutter sound open sound close sound rotation sound and timer sound is Setting the Mail Ring Tone for Chat Mail Chat Mail Tone Kt123L 1...

Page 108: ...d return to the previous screen To silence the Keypad sound Select Silent 4 Press t When the screen to set the ring duration for Keypad sound are displayed Select the ring duration 0 1 seconds 0 5 sec...

Page 109: ...1 Keypad sound 3 Select from Volume 1 to Volume 5 and then press t To silence the Keypad sound Select Silent and then press t Note Refer to P 99 for how to silence the Keypad sound Changing the Volum...

Page 110: ...ume Mail Ring Volume Kt1121 t1122 t1123L 1 In the stand by press t and select and then press t112 The screen to select the mail ring tone volume is displayed 2 Press 1 Mail ring tone The mail ring ton...

Page 111: ...imately 6 seconds recording automatically ends Indicator and scale are estimates To change the location where the i melody is saved Select No press tc and then select the melody to save again To end i...

Page 112: ...y to delete and then press C6 T Press 1 Delete one To delete all Melodies Voices press 2 and then enter your terminal security code 4 digits To delete a selected Melody Voice press 3 select a Melody V...

Page 113: ...range emphasis Pops mid range emphasis and Classic high range emphasis 1 During melody playback press C 2 Press 1 Change volume To set the Equalizer Press 2 3 Select the item to set and then press t C...

Page 114: ...hen press t3 The My melody screen is displayed 2 Press 2 Internal data The screen to select the melody is displayed When selecting a Melody Voice Press 1 3 Select the first melody to play and then pre...

Page 115: ...g the Mail Ring Tone Duration Kt171L 1 In the stand by press t and select and then press t17 2 Press 1 ON Sound ring tone To not sound the ring tone Press 2 3 Enter the ring duration 2 digits 01 to 30...

Page 116: ...Earphone ring tone volume is set in the ring tone volume setting nP 56 If the ring tone volume is set to Silent the ring tone does not sound from the earphone When the earphone is connected the keypad...

Page 117: ...Settings for Shooting 140 Viewing Saved Still Pictures My Picture 149 Editing Still Pictures Edit Images 158 Designating the Printing of Still Pictures DPOF 169 Scanning Characters Character Reader O...

Page 118: ...a accommodates various shooting scenes including focus lock by half pressing the shutter key Closeup Portrait and Landscape by switching AF mode You can switch to Manual focus and adjust the focus man...

Page 119: ...t image quality based on intended use Set image settings to SUPER FINE when you wish to shoot a high quality image Data volume will increase you will be able to save fewer pictures and i shot transmis...

Page 120: ...screen Use this size when you plan on editing image size later based on the intended use of the image When sending these with i shot these images are automatically reduced to i shot S 144 144 or i sh...

Page 121: ...0 Approx 400 Approx 210 Approx 240 Approx 400 Approx 140 Approx 170 Approx 260 VGA 480 640 Approx 110 Approx 130 Approx 260 Approx 65 Approx 75 Approx 150 Approx 45 Approx 50 Approx 120 XGA 768 1024 A...

Page 122: ...becomes low U Red Displayed when there is no memory for still pictures 7 Image brightness nP 125 Q R S T U Dark Normal Bright 8 Image quality nP 141 X Displayed when set to SUPER FINE mode W Displaye...

Page 123: ...mode 3 Focus lock nP 146 m Green Displayed when focus is locked m Red Displayed when focusing 4 miniSD memory card Pink Displayed when miniSD memory card is being viewed flashing Displayed when the mi...

Page 124: ...lock nP 146 m Green Displayed when focus is locked m Red Displayed when focusing 5 Image brightness nP 125 Q R S T U Dark Normal Bright 1 Picture light nP 125 N Displayed when Picture light is lit C D...

Page 125: ...ch operation The display may vary when in Viewer position Still picture mode Camera Mode What Camera Mode Can Do Key Operation Reference r Zoom in P 126 q Zoom out P 126 a Instant zoom in P 126 m Inst...

Page 126: ...der P 171 4 Bar code reader P 179 5 Select size P 140 6 Image quality P 141 9 Switch AF mode P 146 Key Operation Reference o Brightness up P 125 p Brightness down P 125 s Focus lock P 146 1 Still pict...

Page 127: ...return to the stand by display Delete unnecessary data on the miniSD memory card nP 157 and try again Adjusting brightness 5 levels When in Normal position press o Brightness up p Brightness down Whe...

Page 128: ...ake pictures while charging the mova nP 117 Do not use the camera with the Picture light close to the eye Try to prevent your hands from shaking The larger the shot size and higher the image quality t...

Page 129: ...shoot using Auto focus press the shutter It may take a little while before the picture is taken If t is pressed pictures are shot immediately The camera shutter sound is heard and the preview screen...

Page 130: ...ave location before shooting nP 144 Note The switch can be used to release the shutter if a switch equipped earphone microphone sold separately is being used nP 145 When a call or mail is received whi...

Page 131: ...ure to a preset person Quick i shot nP 382 To shoot using Focus lock nP 146 Press the shutter half way lock the focus and then press the shutter all the way to shoot When Auto save mode nP 148 is set...

Page 132: ...the way for at least 1 second in the stand by to activate camera The display becomes a viewfinder 2 Turn the camera towards yourself An inverted image is displayed The display returns to normal when t...

Page 133: ...utomatically shoots still pictures at 0 1 second intervals Standard Automatically shoots still pictures at 0 2 second intervals Manual You operate the shutter to shoot consecutive still pictures Brack...

Page 134: ...properly if the camera is moved Hold the mova firmly with both hands to eliminate shaking when shooting Picture light color Purple Picture light color Red Picture light color Yellow Image brightness 2...

Page 135: ...e image is not saved and the mova returns to the still picture shooting screen The last shot taken in Manual multishot or Manual overlap is deleted When set to manual Press t or shutter until the numb...

Page 136: ...performed not even manual zooming If a call is received or the alarm operates while shooting in Continuous mode the still picture being shot is protected and Continuous mode is canceled overlap 4 stil...

Page 137: ...o cancel settings Press 0 3 Press t or shutter A still picture with the effect is taken Note If shot size nP 140 is changed or Continuous mode nP 133 is set while Effect shot is set Effect shot is can...

Page 138: ...t flashes The picture is taken approximately 10 seconds 5 seconds or 2 seconds after the Auto timer tone begins The default setting is 10 seconds Shooting with Focus Frame Displayed Display Focus Lock...

Page 139: ...er is still set when the shot is canceled 4 Shooting or recording automatically occurs approximately 10 seconds 5 seconds or 2 seconds later The camera shutter sound is heard The Auto timer stays enga...

Page 140: ...memory area runs out during recording Memory is full Unable to record is displayed If you press t the confirmation screen to save is displayed 5 Press 1 Save Movies are saved in My movie on a miniSD m...

Page 141: ...You can half press the shutter set Focus lock and then shoot by pressing the shutter all the way The Camera recording start sound is heard and the recording starts The Camera recording start sound is...

Page 142: ...ed during recording or when saving recording stops automatically and you can answer the call When mail is received shooting automatically stops After call or after mail is received the confirmation sc...

Page 143: ...ere are preserved Setting the Image Quality Image Quality 1 In the still picture shooting screen nP 127 or the Shoot movie screen nP 138 press C6 Still picture shooting screen Movie shooting screen Th...

Page 144: ...the still picture shooting screen nP 127 press C 4 To set the Picture light color when recording movies In the Shoot movie screen nP 138 press C 2 2 Select the Picture light color and then press t The...

Page 145: ...he Folder to Save Save Location 1 In the still picture shooting screen nP 127 press C 2 2 Press 1 Select the folder to save to and then press t To change the folder to save Multishot to Press 2 and th...

Page 146: ...niSD memory card If the number of still pictures in the destination folder exceeds 400 a new folder is automatically created and new still pictures will be saved in the new folder When the destination...

Page 147: ...the Switch equipped Earphone Microphone Release Settings 1 In the still picture shooting screen nP 127 press C 5 2 Press 1 Release settings To cancel Release settings Press 2 Note Image may not be sho...

Page 148: ...Focus lock is canceled if the mova is opened closed or the display is rotated To reset Focus lock If s is pressed press s to disable Focus lock Press s again If you pressed the shutter half way remove...

Page 149: ...gain in the Switch AF mode screen Note If camera is ended still picture and movie is set to Standard and Character reader Bar code reader is set to Closeup Saving Original Mode Original Mode 1 Press C...

Page 150: ...icture shooting screen nP 127 press C 1 2 Press 1 Auto save mode To not save automatically Press 2 Note The preview screen after taking pictures is not displayed when Auto save mode is set to ON Also...

Page 151: ...eturn to the original screen 3 Select a still picture and then press t To fit the image to the size of the display When the still picture or other JPEG image is larger or smaller than 240 pixels press...

Page 152: ...n the image cannot be sent with i shot and when the image is set for a schedule It is recommended that still pictures saved in My picture be saved on miniSD memory cards nP 444 You can also use Data L...

Page 153: ...music while a slideshow is running You can set the tone and volume of the background music The default settings are Oriental Energy for the tone and Silent for the volume 1 Display the still picture n...

Page 154: ...imately 1 second intervals Normal Changes the displayed image at approximately 5 second intervals Slow Changes the displayed image at approximately 10 second intervals Wipe Still pictures are consecut...

Page 155: ...ew mode The screen to switch view mode is displayed When in the My movie list Press C6 3 Select the display method and then press t The display method changes Note Enter up to 12 full pitch 24 half pi...

Page 156: ...tand by press t and select press t2 select a folder and then press t To reorder the print specification screen In the stand by press t and select press t4 select a folder and then press t 2 Press C7 S...

Page 157: ...y movie screen In the stand by press t and select press t2 select a folder and then press C3 2 Press 2 Delete folder and then enter your terminal security code 4 digits To delete all the still picture...

Page 158: ...ill pictures in a folder Move selected Moves multiple selected still pictures 1 In the stand by press t and select press t1 select a folder and then press t The still picture list is displayed To move...

Page 159: ...Deletes all the still pictures in a folder Delete Selected Deletes multiple selected still pictures 1 In the stand by press t and select press t1 select a folder and then press t The still picture li...

Page 160: ...een display nP 159 press i End and then save If you select another effect type after you have finished editing you can add more effects to the same still picture You cannot use this feature when effec...

Page 161: ...picture is redisplayed the appearance may differ from that during editing Pasting an Image Stamp Image Stamp 1 Display the editing screen nP 158 Displaying the editing screen 2 Press C7 Image stamp Ty...

Page 162: ...not save still picture Select No and then press t 8 Press 1 OK The still picture is saved To change title Press 2 enter the title and then press t You can enter up to 12 full pitch 24 half pitch char...

Page 163: ...of the characters all may not fit into a still picture To change the color of characters Press C1 select a color and then press t Choose between orange black white red yellow green and blue To select...

Page 164: ...me images such as those with little color variations corrections may not appear obvious Combining Two Still Pictures to Make One Composite Image Combine Panorama 1 Display the editing screen for the f...

Page 165: ...ess t Processing FX is displayed and then the processed image is displayed Press C L R to interchange the image on the left and right 5 Press t 6 Save the still picture nStep 6 to 8 on P 160 The compo...

Page 166: ...mouth wearing glasses has a beard etc Face effects cannot be applied to still pictures that are larger than i shot L You can edit images after resizing still pictures to an appropriate size nP 168 2...

Page 167: ...ion is automatically extracted After Processing FX is displayed the processed still picture is displayed to the right To set the contour of each part manually Press 12 Position Refer to Setting the co...

Page 168: ...er C Complete is pressed or the edited image is saved When editing again it is done based on this contour information Press w to align the cursor to the upper left and then press t OK Press w to align...

Page 169: ...ses has a beard etc You cannot paste face stamps to still pictures that are larger than i shot L You can edit images after resizing still pictures to an appropriate size nP 168 Pasting a Face Stamp Fa...

Page 170: ...ved Rotating Still Pictures Rotate 1 Display the editing screen nP 158 Displaying the editing screen 2 Press C1 Rotate Types of image rotations Rotate 90 right Rotate 90 left Invert up down Invert L R...

Page 171: ...ize of the original still picture Sizes that cannot be resized are displayed in gray 3 Select the new size and then press t Opening image is displayed and the screen to change image size is displayed...

Page 172: ...then press 1 ON When Index Print is necessary This is a function to print thumbnails to postcard and A4 size paper with file name attached After setting the number of prints with Specify group press...

Page 173: ...characters The mova can automatically recognize data type URL Mail address Phone number English word of the read characters and use them in Character reader i mode connections mail composing calling o...

Page 174: ...scan reverse texts white letters with background in black Press C2 and then press the number of the type of Reverse mode The default setting is Automatic If scanning cannot be done properly set to Nor...

Page 175: ...e number or the e Dictionary Book screen when English words is displayed depending on the type of characters read Note When the data type of the characters to read is Phone number is recognized as hyp...

Page 176: ...onebook entry is displayed Read characters are entered into the appropriate categories Proceed with adding to phonebook operations nP 77 To add a phonebook entry Press 4 Select Yes and then press t Th...

Page 177: ...ings of play size is valid until My movie is ended To playback in Full screen display Press while paused Press again to return to the original screen Settings of full screen size are valid until My mo...

Page 178: ...3 Movies saved in the Library are stored on miniSD memory cards nP 444 You can also use Data Link software nP 553 and a USB cable sold separately to save to your PC Movies transferred to a PC can be p...

Page 179: ...u wish to save as still picture The movie is paused Press v while paused to forward reverse Adjust the image The movie is also paused when the key is let go when fast forwarding rewinding 2 Press CC E...

Page 180: ...point will be the starting point 3 Press t Playback starts and the Play key for the segment that is about to be cut changes color 4 Press t at the desired ending point The movie is paused Press v whi...

Page 181: ...ype or size you may not be able to read some bar codes You may not be able to read characters due to scratches dirt tears light reflections or the version of QR code Bar Code Reader Using Bar Code Rea...

Page 182: ...sible and none of the characters are copied To copy a portion of read characters Press C4 in the message received results screen Press t at the beginning and end of the character string to copy To sav...

Page 183: ...ress 3 1 In the scan results screen press C nSteps 1 to 4 on P 179 and P 180 The submenu is displayed 2 Press 1 New entry To add a phonebook entry Press 2 To register a Bookmark Press 3 3 Select Yes a...

Page 184: ...182 LMEMO9 e n500 book Page 182 Tuesday August 9 2005 1 15 PM...

Page 185: ...ng the Sub Display Switch Sub Display 187 Setting Power Saver Mode Power Saver Mode 189 Setting Display and Key Lights Display Light Time 189 Setting the Illumination Called LED Color Called LED 190 C...

Page 186: ...nd then press t to enlarge the still picture to fill the display If you select No and then press t the image is displayed in the original size Note Saved Flash movies may differ in appearance from whe...

Page 187: ...ting is OFF Displaying the Clock Clock Display Kt212L 1 In the stand by press t and select and then press t212 The clock display settings screen is displayed 2 Press 1 ON Clock display To not display...

Page 188: ...y is set press c in the stand by to switch between Stand by image display and Calendar display Only 1 i ppli compatible with the Stand by display can be set Switching Between the Display Screens Stand...

Page 189: ...tely 10 seconds Brightness Adjusting the Display Brightness Kt219L 1 In the stand by press t and select and then press t219 2 Select a brightness level Press o to increase brightness and press p to de...

Page 190: ...me or still picture Press 2 Adjusting the Sub display Contrast Contrast Kt222L 1 In the stand by press t and select and then press t222 The current contrast is displayed 2 Select a contrast level Pres...

Page 191: ...default setting is 15 seconds Power Saver Mode Setting Power Saver Mode Kt210L 1 In the stand by press t and select and then press t210 The screen to set Power saver mode is displayed 2 Select the dis...

Page 192: ...Setting the Illumination Called LED Color Setting the Called LED Color Kt251 t252L 1 In the stand by press t and select and then press t25 2 Press 1 Called LED color The screen to set the Called LED c...

Page 193: ...alled LED ON The called LED ON screen is displayed To set LED operation for incoming mail Mail Msg LED set Press 4 3 Press 1 Melody ON The Called LED operation is set To set to Without melody Press 2...

Page 194: ...then press t243 The My picture screen is displayed 2 Select a folder and then press t To preview still pictures Select a still picture and then press i Preview 3 Select a still picture and then press...

Page 195: ...s that cannot be used for Popup windows These still pictures cannot be selected When still pictures from My picture are set as popup windows the image remains set until the popup window settings are c...

Page 196: ...hen press i Preview 3 Select a still picture and then press t The make call screen is set When the still picture is larger than the outgoing incoming call screen W240 H84 The still picture is reduced...

Page 197: ...te Still pictures that cannot be used for the incoming or send mail screens have diagonal lines through them and cannot be selected When still pictures from My picture are set as outgoing or incoming...

Page 198: ...When a My picture still picture is set as a guidance key even when the original still picture is deleted the guidance key will remain until its setting is changed Still pictures stored in a miniSD mem...

Page 199: ...estination position and then press t Setting the TOP Menu Background Set Background 1 Press C3 in the TOP menu Set background The My picture screen is displayed 2 Select a folder and then press t The...

Page 200: ...restore the default settings of the TOP menu display Enabling or Disabling Title Display Dsp Icon Name 1 Press C4 in the TOP menu Dsp icon name 2 Press 1 ON Set display icon name To not display a titl...

Page 201: ...Setting 202 Prohibiting Calls Made Using the Keypad Keypad Dial Lock 205 Preventing Shutter and Side Key Errors Key Guard 206 Preventing Use by Another Person Keypad Lock 207 Setting to Notify You Whe...

Page 202: ...ecurity code is required for the following functions Changing the Terminal Security Code Changing the Terminal Security Code Set Disable Send own number P 38 Reconnect P 488 Save Set Disable Accept ca...

Page 203: ...s where the specific information service provider IP may require the use of a password independent of this password The default setting for the terminal security code for mobile phone functions is 000...

Page 204: ...code when security is set to temporarily disable security Received address You can set your mova to not display the received address history nP 341 to prevent unwanted viewing by another person Even...

Page 205: ...code to start the play back of Voice memos Even when security for Record message and Voice memo is set to E Record message and Voice memo can still be set or recorded Even if security for Voice memo i...

Page 206: ...ion on P 204 When Mail security is set Mail linked i ppli cannot be downloaded In addition Mail linked i ppli that creates a new folder cannot be downloaded again When Mail security is set Mail linked...

Page 207: ...Do ON In the stand by press t82 to display the ToDo list To set security for Money calculator ON In the stand by press t84 to display the Money calculator To set security for Voice memo ON In the stan...

Page 208: ...t dialing Phone To function Making calls using Bar code reader and Character reader Receiving Phonebook data by Ir Key Guard Preventing Shutter and Side Key Errors 1 With the mova closed or in Viewer...

Page 209: ...also set Keypad lock remotely from a different telephone or a payphone nP 208 Keypad Lock Preventing Use by Another Person Note To disable Keypad lock use the mova security code If you forget your se...

Page 210: ...s or Any key answer Set Quick silent using Recorded message answering when this is already set Missed call display You cannot do the following when receiving a call Manual call transfer using t or t...

Page 211: ...e number you wish to delete and then press t2 Select Yes and then press t Proceed to step 5 To change a license number Select the number you wish to change and then press t1 4 Select the input method...

Page 212: ...nouncement is not played Instead a beep tone sounds to signify that Keypad lock is set Even if a call is made from a phone which the Remote keypad lock license number is set to a mova it is not counte...

Page 213: ...me and alarm duration and then press i Complete nP 219 and P 220 6 Press 2 OFF Automatic reset To reset automatically Press 1 Call times and call costs are reset on the 1st of every month at 0 o clock...

Page 214: ...212 LMEMO9 e n500 book Page 212 Tuesday August 9 2005 1 15 PM...

Page 215: ...g the Power OFF Automatically Auto Power OFF 215 Sounding an Alarm After a Specified Time Timer 216 Sounding an Alarm at a Specified Time Alarm 217 Using the Calendar Calendar 224 Saving Your Schedule...

Page 216: ...rohibited such as on an airplane or in a hospital The default setting is OFF Disable Auto Power ON Turning the Power ON Automatically Kt36L 1 In the stand by press t and select and then press t36 2 Pr...

Page 217: ...y until it is disabled Set the date and time beforehand nP 37 The default setting is OFF Disable If operations a display other than stand by is displayed i e using Alarm ringing Calculator Timer etc a...

Page 218: ...y display and sound the alarm If power is turned on at the set time the alarm sounds Also the mova does not turn off while an i ppli is operating even when the time set for this function comes The Aut...

Page 219: ...n Alarm at a Specified Time Kt86L Setting an Alarm 1 In the stand by press t and select press t6 select setting number and then press t Alarm setting screen 2 Press 1 Enter time and then enter the ope...

Page 220: ...ng for Ring duration is 15 seconds and will play once and is set by time Snooze setting You can set the alarm interval and number of times the alarm sounds The default setting is OFF Alarm tone You ca...

Page 221: ...to play melody 1 to 9 and then press t 3 Enter the ring duration 2 digits 02 to 99 seconds and then press t To end alarm settings Press i Complete 1 Press 4 in the alarm setting screen nP 217 The scre...

Page 222: ...Press 5 in the alarm setting screen nP 217 2 Select the alarm tone and then press t Press i Play to play the alarm Even if the Alarm volume is set to silent it plays at Volume 1 Press i Stop again to...

Page 223: ...ull pitch 60 half pitch characters of text can be entered 2 Enter the message and then press t To end alarm settings Press i Complete 1 Press 0 in the alarm setting screen nP 217 2 Press the number fo...

Page 224: ...es when a phone number is displayed at alarm activation nP 223 Releasing an Alarm 1 In the stand by press t and select press t6 and then select the number of the alarm to release Select a number displ...

Page 225: ...dial the number being displayed Note If the selected Alarm or Schedule time arrives during Infrared data exchange data transmissions Software Update or Infrared remote control transmission is ended an...

Page 226: ...nt month When the date is a single digit enter 01 09 Calendar Using the Calendar Kt81L Displaying the Calendar 1 In the stand by press t and select and then press t1 The calendar for the current month...

Page 227: ...t Schedule entry contents for the selected day are displayed in a list nP 237 1 month icon display Today Highlighted in the color of the day Selected day Displayed in a black box Day set as holiday Di...

Page 228: ...able the holiday To set a weekly holiday or to disable all holidays the dates to set disable do not need to be selected 2 Press C6 Set holidays 3 Press 1 Set today The holiday is displayed in red To c...

Page 229: ...ss t and select press t1 and then press C0 2 Select the day of the week to change and then press t 3 Select the color to use and then press t Repeat steps 2 and 3 when you wish to set additional days...

Page 230: ...d agenda You can set an alarm to sound prior to the schedule start time or save the schedule as secret data nP 235 P 236 Schedule Saving Your Schedule Kt81L Saving Schedules 1 In the stand by press t...

Page 231: ...Select Ctgry and then press t Refer to P 230 for information on types of categories 7 Select the schedule category and then press t The selected category name is displayed When a category is set the...

Page 232: ...obby School Holiday Drive Date Business trip Travel Exercise Karaoke Appreciation Business Anniversary Party Hospital Note To copy to a miniSD memory card You can copy schedules registered on your mov...

Page 233: ...230 LDetails registered to a schedule Received mail Sent mail Unsent mail Date Received date Sent date Mail edit date Category No category Alarm OFF Image Downloaded i shot still pictures Cannot be r...

Page 234: ...aving screen is displayed To save a schedule from Received Address History Sent Address History Press C4 3 Add agenda to the schedule nSteps 2 to 16 on P 228 to P 230 LDetails registered to a schedule...

Page 235: ...e if set to be saved on a miniSD memory card Set the save location to the mova Schedules cannot be created directly from still pictures in a miniSD memory card Copy them to the mova before setting Sav...

Page 236: ...1 Month Icon Calendar 1 In the stand by press t and select press t1 and then press C5 2 Press 1 and then move the cursor to the day to register using w 3 Press i Icon select a category and then press...

Page 237: ...t the volume of the alarm The default setting is Volume 3 Vibrator Set Vibrator to activate when the alarm activates The default setting is OFF LED Set Picture light Called LED to flash when alarm act...

Page 238: ...utes prior to the schedule start time and then press t Press i Complete to return to the schedule saving screen Setting a Quick Alarm 1 In the stand by enter the time to sound an alarm Enter the time...

Page 239: ...g i When a contact is saved you can call the contact by pressing t Phone t Call When multiple schedules are registered press q to display previous schedules and r to display upcoming schedules To copy...

Page 240: ...ress t and select press t1 and then press C2 All saved schedule entries are displayed in a list Next select a schedule entry to confirm and then press t The schedule agenda is displayed To display ent...

Page 241: ...phonebook list is displayed 2 Select the contact and then press t Only the saved schedules with the selected contact are displayed Select a schedule entry to confirm and then press t The schedule agen...

Page 242: ...y press t and select press t1 and then select the day to view The calendar screen is displayed 2 Press C9 View money calc The total saved on the day to view is displayed Money calc does not exist for...

Page 243: ...e selected schedule Delete selected Deletes multiple selected schedules Delete all past Deletes all schedules up until the day prior to the specified date Delete all Deletes all schedules 1 In the sta...

Page 244: ...on 4 Press 1 Delete one To delete all previous schedules Press 2 and then enter your terminal security code 4 digits To delete all schedules Press 3 and then enter your terminal security code 4 digits...

Page 245: ...screen the first 9 full pitch characters of a brief are displayed if a brief is saved If a brief is not saved the first 9 full pitch characters of the agenda are displayed To enter a brief Next select...

Page 246: ...r PC Malfunctions repairs or other handling of the mova may cause loss of registered contents DoCoMo cannot be held responsible in any way for the loss of data registered in the ToDo list Notifying an...

Page 247: ...t has a still picture set 3 Press 1 To change the duration of the alarm Press 2 Refer to steps 2 and 3 of Changing the duration of the alarm on P 219 for subsequent steps To change the alarm tone Pres...

Page 248: ...enda are displayed when there is no brief saved 2 Select a task and then press t The agenda in the selected task is displayed ToDo list details screen To copy Press C2 To change the font size for the...

Page 249: ...elect press t2 and then press C4 Show by status The show by status screen is displayed To show by category Press C5 2 Select the item to specify and then press t Only tasks matching the specified para...

Page 250: ...sks 1 In the stand by press t and select press t2 and then select the task you wish to delete 2 Press C6 Delete 3 Press 1 Delete one To delete all completed tasks Press 2 and then enter your terminal...

Page 251: ...ownloading Images and Melodies from Sites Downloading Images from Sites and Messages Saving Images 276 Downloading Frames and Stamps from Sites Save Frame Stamp 277 Displaying Flash Movies Display Fla...

Page 252: ...ice Works Note Charges for i mode service are based on the amount of information number of packets sent and received This manual does not contain information related to service charges Refer to the i...

Page 253: ...h to visit and connect to it from this list n Tokusuru Menu Information about exciting campaigns giveaways discount coupons and the like Information is updated every week Presented by D2 COMMUNICATION...

Page 254: ...nformation can be exchanged with other mobile phones and personal computers that have an Ir exchange function installed There are even wider applications Using Ir exchange with i ppli you can work wit...

Page 255: ...lticolored animations and richly expressive sites Flash movies can also be downloaded using i mode compatible mobile phones and set as the stand by display nP 277 i mode password An i mode password is...

Page 256: ...ht law Data including texts and movies you have downloaded to your mova from these sites programs or web pages cannot be modified and sold or redistributed in whole or in part without permission from...

Page 257: ...s the image display location Menu Function Reference Page URMenu Connects to the i mode center P 257 VMessage Displays received messages P 296 WBookmark Displays your favorite sites programs and Inter...

Page 258: ...ode stand by Disconnecting appears and the mova returns to the stand by display i mode ends at this point R lights While in i mode stand by mode R flashes even if you do not end by pressing H i mode e...

Page 259: ...right guidance key for at least 1 second to scroll down 1 screen at a time Press left guidance key for at least 1 second to scroll up 1 screen at a time You can also set the mova to not load images wh...

Page 260: ...mpting to display a page where the SSL certificate is expired or different from the certificate employed by the mova Exercise caution in this case since safe transmission of personal information such...

Page 261: ...n received mail it cannot be viewed as image mail In this case select the URL to view the JPEG image or Flash movie using the Web To function nP 280 When images other than GIF JPEG or Flash movies are...

Page 262: ...the linked page This may not work on some sites Selecting items within the site or webpage and entering text Within some sites and webpages you enter text and select items as follows Site Screen and O...

Page 263: ...pages are displayed in B A order When pages are displayed in the order A B C B D Returning to the Previous Page Advancing to the Next Page Note Flash movies Flash is an animation technique that uses...

Page 264: ...ps 1 and 2 on P 257 press C1 The reloading will begin To cancel reloading While connecting flashes press C Cancel Note Even though reloading is performed it may be impossible to reload some site or we...

Page 265: ...essage Refer to steps 2 to 6 of Composing Sending i mode Mail on P 307 and P 308 Note If a title is not set for a site or webpage the URL is set as the subject of the mail Registering Phone Numbers an...

Page 266: ...he item for My menu registration Example k My Menu Registration and then press t 2 Select the Password input field and then press t 3 Enter your i mode password 4 digits and then press t The entered i...

Page 267: ...the stand by press t and select and then press t1 iMenu is displayed 2 Press 82 Change i mode password 3 Select the Current password input field and then press t The screen to enter your current i mod...

Page 268: ...te the connection Press H twice Note In the screen to enter the URL press c for at least 1 second with the cursor positioned at the very end of the character string to delete all the entered text Pres...

Page 269: ...yed Note When the URL history exceeds 10 webpages previous pages are automatically overwritten starting with the oldest To connect while a site or webpage is being displayed Press C5 to display the UR...

Page 270: ...o the Bookmark folder Note Some sites cannot be registered to Bookmarks When the URL is already registered The same URL is saved Overwrite is displayed Select Yes and then press t The mova returns to...

Page 271: ...itle and then press t The page is displayed To cancel the connection While connecting flashes press t Cancel Note The Bookmarks list is displayed in the order of use To display a list of all registere...

Page 272: ...to enter the folder name is displayed 3 Edit the folder name and then press t You can enter up to 10 full pitch 20 half pitch characters Moving Bookmarks into Folders 1 In the stand by press t and se...

Page 273: ...okmarks in a folder Delete Selected Deletes all selected Bookmarks 1 In the stand by press t and select press t3 select a folder and then press t The Bookmark list is displayed 2 Select a Bookmark and...

Page 274: ...ark folder list folders are not deleted but all bookmarks saved in the folders are deleted Screen Memo Saving Site Content Saving Screen Memos 1 While a site or web page is displayed nSteps 1 and 2 on...

Page 275: ...isplayed You can also check by selecting a screen memo you wish to check in the screen memo list and then pressing C4 To check detailed information about a screen memo Properties In the screen of step...

Page 276: ...tection is displayed To set protection Press 1 Protected screen memos are displayed on the screen memo list with To cancel protection Press 2 Note You can also set this by pressing C3 in the screen me...

Page 277: ...When deleting all only unprotected screen memos are deleted You can also delete one by pressing C1 in the Screen memo screen Changing the Screen Memo List Display Method By date new old In order saved...

Page 278: ...ge select the images you wish to save and then press t 3 Press 1 Save to My pic Saved to My picture To set directly to stand by etc Press a key from 2 Stand by dsp to 8 Guidance key Refer to P 184 for...

Page 279: ...e and then press t When the download is finished Completed is displayed To display an image Press 1 2 Press 2 Save To not save Press 3 Note When downloading frames and stamps from a site check for the...

Page 280: ...load While downloading press c To play the downloaded melody Press 1 Select 1 Play all or 2 Play portion to play the melody To cancel playback press t or c If Manner mode is set the confirmation scree...

Page 281: ...te or webpage nSteps 1 and 2 on P 257 select the file and then press t When the download is finished Completed is displayed To check the data Press 1 To not save data Press 3 2 Press 2 select the numb...

Page 282: ...following conditions is identified as a phone number and the Phone To function can be used A string of 9 to 24 digits that starts with 0 A string of 5 to 24 digits that starts with or b including or b...

Page 283: ...d During i mode Setting Receive options during i mode Network services that must be subscribed to i mode answer The set ring tone sounds and calls can be answered as usual nP 283 Voice Mail The set ri...

Page 284: ...ppli ends missed calls is displayed on the display You can check missed calls nP 68 1 In the stand by press t and select press t911 Set J mode rcv 2 Select the receiving method and then press t The sc...

Page 285: ...mova returns to i mode stand by R flashes and the screen returns to the previous display When in Viewer position Press right guidance key Note If a call is received during i mode there may be a time l...

Page 286: ...to Call Forwarding Service Always connects to the forwarding destination that was set using 1421 start forwarding without notifying the mova of the call The options set with 1429 become effective for...

Page 287: ...e sent to the site provider depending on the site you are viewing Up to 10 hosts can be registered to the mova not counting Cannot be set during i mode stand by R flashes i mode is only accessible thr...

Page 288: ...ing used N displayed in the host selection screen will differ as shown below depending on the area where you are registered for i mode DoCoMo Hokkaido DoCoMo Tohoku DoCoMo DoCoMo Tokai DoCoMo Hokuriku...

Page 289: ...ivate image display To display Press 1 Note If image display settings are set to OFF R appears in place of the still picture In this case if the displayed screen is saved as a screen memo still pictur...

Page 290: ...933L 1 In the stand by press t and select press t933 and then select the certificate to enable disable Enabled certificates are indicated with a E and disabled certificates are indicated with a H 2 Pr...

Page 291: ...Default Certificates CA certificates 1 to 5 all enabled Reset i mode sets the Save signature setting to OFF but does not reset the saved signature Quick reply mail Mailing list settings i shot connec...

Page 292: ...e 4 digits Each entered digit is displayed as b t lights at the top of the display Note i mode is locked is displayed when you try to access i mode while i mode is locked Messages and bookmarks cannot...

Page 293: ...is Received Receive Messages 293 Checking for Messages at the i mode Center Check New Message 295 Displaying Messages in the Message Box Message R Message F 296 The screens shown in this manual may di...

Page 294: ...digits and the press OK Message What are Messages Message Request Message R By registering at sites that offer message services information of your choice will be delivered automatically Message Free...

Page 295: ...wish overwritten nP 298 Even when messages are held at the i mode center G I or S T may not be displayed Messages held at the i mode center may be overwritten when S T are displayed Displaying New Mes...

Page 296: ...omposed that message is saved as unsent mail Displaying Messages Automatically Auto Message Display Ki928L Msg R preferred When unread Message Request and Message Free are received simultaneously the...

Page 297: ...ption While receiving press t Messages that were canceled during reception are held at the i mode center G I lights Mail and messages may be received depending on when you cancel 2 The results of Chec...

Page 298: ...sage Request The message list is displayed To display a Message Free Press 2 3 Select the subject of the message to view and then press t The message display screen is displayed nP 297 Note When an im...

Page 299: ...ype Message number Protect mark Displayed when a message is protected J is displayed for Message Free Received date and time Subject Text Screen operations Press or dial key to stop auto scroll p scro...

Page 300: ...sage Request and 5 Message Free can be protected Reloading Images Contained in Messages Reload 1 In the message list nSteps 1 and 2 on P 296 select the message to reload and then press t 2 Press C1 Re...

Page 301: ...ead Protect mark changes to E Repeat this operation select all messages you wish to delete and then press i Complete 3 Select Yes and then press t To not delete Select No and then press t Note Delete...

Page 302: ...300 LMEMO9 e n500 book Page 300 Tuesday August 9 2005 1 15 PM...

Page 303: ...lying to i mode Mail 317 Forwarding i mode Mail to Other Addresses Forwarding i mode Mail 320 Saving i mode Mail Sender to the Phonebook Add to Phonebook 321 Extracting a Melody from an i mode Mail Sa...

Page 304: ...he i mode Operation Guide given to you when you subscribed to i mode for details i mode Mail About i mode Mail When newly signed up for i mode The part of the address before the mark will be made up o...

Page 305: ...mail may be rejected You can set to reject mail sent without the consent of the receiver for the purpose of advertising The initial setting is Reject Settings do not need to be altered to unsolicited...

Page 306: ...or pictographs in messages to receivers not using i mode compatible mobile phones Certain characters may not be displayed correctly Attached files cannot be sent or received The attached file is dele...

Page 307: ...P 380 Receiving i shot Received still pictures taken with a DoCoMo camera equipped phone are treated by i mode compatible phones as messages with image URLs attached You have to sign up for i mode to...

Page 308: ...guidance key Menu Function Page UInbox Display reply to or forward received mail nP 325 VOutbox Display or re edit sent mail nP 325 WUnsent messages Edit or send unsent messages nP 325 XCompose messag...

Page 309: ...characters and certain symbols can be entered docomo ne jp may be abbreviated when exchanging mail with other i mode compatible mobile phones Symbol conversion and Internet phrases can be used nP 517...

Page 310: ...t Select the signature to paste and then press t You can also paste a signature by pressing C3 in the mail composition screen If Auto signature is set to ON the signature is pasted automatically Howe...

Page 311: ...il can be saved However up to 100 sent or unsent messages can be saved The mova automatically overwrites unprotected sent mail starting with the oldest message if you send a new mail when more than 10...

Page 312: ...he unsent messages folder list is displayed 2 Select Unsentbox and then press t The unsent messages is displayed 3 Select a message and then press t The content of the mail is displayed When a melody...

Page 313: ...field using u and then press t The screen to select the data to paste is displayed 3 Press 2 Melody The screen to select the melody to paste is displayed To confirm a melody Select a melody to confirm...

Page 314: ...A screen to compose a message with the image URL entered in the message text is displayed 3 Compose and send the message nP 307 and P 308 Note You can only use this function to paste GIF images You c...

Page 315: ...d Mail larger than 250 characters are divided and received as multiple mail when you have increased the number of characters you can receive using the Character limit setting nP 355 Explanation of Mar...

Page 316: ...Viewer position press in the message received results screen step 2 select R mode mail and then press Select a folder press select a message and then press To use Vibrator mode to check whether or not...

Page 317: ...In the stand by press t and select and then press t8 The mova connects to the i mode center and a list of messages held at the i mode center is displayed When Receive option setting is set to OFF Ple...

Page 318: ...nd To cancel reception While receiving press t Press if the mova is closed When in Viewer position press Messages that were canceled during reception are held at the i mode center W lights Messages ma...

Page 319: ...on P 325 2 Press i or C2 Reply Re is included at the beginning of the subject of received mail Portions that exceed 15 full pitch 30 half pitch characters are deleted When you select a mail you canno...

Page 320: ...and select Switch window or press s for at least 1 second and switch to the original mail and then press u Press a to scroll down one screen at a time Press m to scroll up one screen at a time Press...

Page 321: ...ortions that exceed 15 full pitch 30 half pitch characters includes Re are deleted Portions including the and main text that exceed 250 full pitch 500 half pitch characters are deleted You cannot repl...

Page 322: ...t the address Finish phonebook operations before forwarding the mail The subject for the forwarded message is the subject of the original message with Fw at the beginning Portions that exceed 15 full...

Page 323: ...ebook Saving i mode Mail Sender to the Phonebook Adding a Sender Receiver Mail Address to the Phonebook 1 Display a message nSteps 1 to 3 on P 325 2 For received messages press C9 Save address For sen...

Page 324: ...on P 325 select the phone number or mail address you wish to add and then press C0 2 Perform steps 3 and 4 on P 321 Save Melody Extracting a Melody from an i mode Mail 1 Display a received message th...

Page 325: ...download is completed the image is displayed Even if the image mail setting is set to Download on open still pictures sent with i shot are not retrieved automatically Displaying images contained in re...

Page 326: ...Save image and then press t 3 Select the image and then press t The screen to save images is displayed 4 Press 1 Save to My pic The selected image is saved in the Download folder in My picture When th...

Page 327: ...sent messages can be saved You can save 334 to 1000 received messages the number of messages that can be saved changes depending on the size of received messages You can use folders to manage sent rec...

Page 328: ...ayed message Press C in the message display screen select Call from entry 8Call from entry for unsent messages 0Call from entry for sent messages and then press t Next press t Call to dial To check ot...

Page 329: ...nning of the message are displayed Press t to display a list of messages saved in the selected folder Created folder Numbers are added in order of creation Folder mark Number of unread messages in the...

Page 330: ...a saved on your mova onto a miniSD memory card nP 449 or display mail saved on a miniSD memory card nP 450 You can copy mail from a miniSD memory card to the mova nP 452 Ir exchange You can send mail...

Page 331: ...racters from the beginning of the message are displayed Press i to edit a message When data is attached Press C to move or delete a message Indicates a pasted melody A Indicates an image is attached I...

Page 332: ...Unread mail Protected Read mail Read mail Protected q Mail that has been read and replied to p Mail that has been read and replied to Protected r Mail that has been read and forwarded s Mail that has...

Page 333: ...en press t The key list is displayed When in Viewer position the display is sometimes different Subject Melody title whether or not an image is attached Refer to Note on P 326 for details Displayed wh...

Page 334: ...screen to enter the folder name is displayed 3 Enter the new folder name and then press t The folder is created You can enter up to 10 full pitch 20 half pitch characters Note When Mail linked i ppli...

Page 335: ...delete the outbox folder Press 2 4 Enter your terminal security code 4 digits select Yes and then press t When a folder contains protected messages Cancel the protection setting for any protected mess...

Page 336: ...then press C1 Move 3 Press 1 Move one To move all mail in a folder Press 2 To move multiple selected mail Press 3 select the mail to move and then press t The mark changes to E To cancel a selection...

Page 337: ...ture display Preview display Subject time if today and date if not today are displayed Name mail address if not registered in the phonebook time if today and date if not today are displayed Image regi...

Page 338: ...prfd In the order of protected mail O normal mail Melody mail prfd In the order of Melody mail O i shot mail O Image mail O normal mail i shot mail prfd In the order of i shot mail O Melody mail O Im...

Page 339: ...ed the display method returns to the default setting By date new old However if the display method is changed the mail display screen is viewed and c is pressed the display method remains changed Colo...

Page 340: ...Outbox Unsent messages Delete one Deletes a selected message Outbox Unsent messages or Sent Unsent message screen Deletion method Explanation Operation screens Delete all read Deletes all unprotected...

Page 341: ...the following steps in the Inbox folder list nP 327 To delete all read messages in a folder all unread messages in a folder or all received messages in a folder perform the following steps in the Inbo...

Page 342: ...lete Select No and then press t 1 Display the message list nSteps 1 and 2 on P 325 2 Press C2 Delete 3 For received messages press 5 Delete selected For sent unsent message Press 3 4 Select the messag...

Page 343: ...s t to display Submenu display Received calls history display For Sent address history the redial list Other party s name Displayed when the same address or phone number is saved in the Phonebook Type...

Page 344: ...i mode mail or i shot history items are selected and operated the i mode compose message screen is displayed the receiver field is filled in with the address of the receiver Refer to steps 5 and 6 on...

Page 345: ...turned OFF is displayed When there is no Sent address history No sent address history is displayed To display the Received address history Press q 2 Select the history item and then press t The sent a...

Page 346: ...select the history to delete this is not necessary when deleting all To delete mail from Sent address history In the stand by press r I i 2 Press C2 Delete 3 Press 1 Delete one To delete all historie...

Page 347: ...the stand by press t and select and then press t9 The screen to set mail message is displayed 2 Select Mail center setting and then press t The mova connects to i mode and the i mode center mail sett...

Page 348: ...ect Yes and then press t Address change is completed and then the new e mail address is displayed Note Cannot be used when mail functions are disabled Refer to Changing mail address in the latest i mo...

Page 349: ...eld and then press t The screen to enter your i mode password is displayed 7 Enter your i mode password and then press t Each entered digit is displayed as b 8 Select Yes and then press t Secret code...

Page 350: ...ess reset and then press t Address reset screen is displayed 4 Select the i mode password input field and then press t The screen to enter your i mode password is displayed 5 Enter your i mode passwor...

Page 351: ...ed 7 Select Save and then press t 8 Select the i mode password input field and then press t The screen to enter your i mode password is displayed 9 Enter your i mode password and then press t Each ent...

Page 352: ...ting Selected Mail Receive Reject Selected Mail 1 In the stand by press t and select press t9 select Mail center setting and then press t The mova connects to i mode and the i mode center mail setting...

Page 353: ...t are not received and an address unknown error message is sent However messages held at the i mode center before resetting the address can be retrieved after resetting the address To avoid nuisance m...

Page 354: ...settings are completed mail from addresses that have been set are not received and an address unknown error message is sent or displayed Messages received at the i mode center before applying rejecti...

Page 355: ...h to receive these messages When settings for Reject are complete applicable messages are rejected and an address unknown error message is sent or displayed Messages received at the i mode center befo...

Page 356: ...ode and the i mode center mail setting screen is displayed 2 Select Other settings in Receiving mail and then press t Receiving mail Other settings screen is displayed 3 Select Reject all short mail a...

Page 357: ...ess t The screen to select the character limit is displayed 4 Select the character limit to set and then press t 5 Select the i mode password input field and then press t The screen to enter your i mo...

Page 358: ...ur i mode password is displayed 4 Enter your i mode password and then press t Each entered digit is displayed as b 5 Select Confirm and then press t A confirmation screen is displayed Note Mail functi...

Page 359: ...splayed Note Mail rejection settings after mail functions are reactivated are the same as before being disabled Mail functions can only be reactivated from your mova Refer to the latest i mode User s...

Page 360: ...od and then press t Select or enter the mail address and then press t The first 20 half pitch characters of the mail address are displayed To sort by a character string contained in the subject Press...

Page 361: ...omatically when forwarding or replying with a quote 3 Select Yes and then press t 4 Press i Complete Adding a Signature to Messages Save Signature Km90L 1 In the stand by press t and select and then p...

Page 362: ...or at least 1 second Delete the saved signature and then press t To add a signature while composing a message The characters in the signature are included in the character count for the main message I...

Page 363: ...t mailing lists can be stored Charges are the same as when sending each mail individually When using mail groups to send mail the receiver will only see the sender s address Creating a mailing list 2...

Page 364: ...ted If a key other than 2 Direct input is pressed in the input method selection screen Overwrite is displayed Select Yes and then press t to select the address Select No and then press t to return to...

Page 365: ...2 2 Select the mail address and then press C There is no need to select anything in particular when deleting all addresses in a mailing list 3 Press 1 Delete one To delete all addresses Press 2 4 Sel...

Page 366: ...ng images in Image mail Disabling Attached Data Paste Data Km95L 1 In the stand by press t and select and then press t95 The screen to set pasted data is displayed 2 Press 2 Disable When set to Disabl...

Page 367: ...ge their mail addresses before using Chat mail Chat mail will not start if the Receive option setting is set ON Redo operations after setting to OFF nP 361 To use Chat mail members must be registered...

Page 368: ...r the mailing list in advance nP 361 When the mailing list is selected Current member will be deleted Are you sure is displayed Select Yes and then press t Select a list press t and then i Complete Th...

Page 369: ...at mail is sent to all members with E displayed Note Sent Chat mail is saved in the Outbox If the message conforms to the Sort rules the message is saved into the set folder Mail that failed to be sen...

Page 370: ...screen is displayed if a received mail whose mail text is already included in the chat mail text is selected the same contents will be included in the most recent chat mail When registration is disab...

Page 371: ...then press t Chat mail is ended To delete and end chat mail Select Yes and then press t Editing Members 1 In the stand by press t and select and then press t5 The Chat mail screen is displayed 2 Press...

Page 372: ...te all members Press 2 5 Select Yes and then press t To not delete Select No and then press t 6 Press i Complete Note Without deleting members from the member setting screen you can set to not send Ch...

Page 373: ...and f become spaces Half pitch symbols other than b Dakuten and Handakuten become half pitch spaces when sent In addition and are sent as and Switching the Chat Mail Screen 1 In the Chat mail screen p...

Page 374: ...mail may not be delivered and a guidance stating so is played in the following circumstances If the other party s mail functions have been disabled If the other party has set the Reject all short mai...

Page 375: ...g editing Press c in the message received results screen to return to the previous screen and resume editing this applies even when the receive results display disappears after a certain period of tim...

Page 376: ...XXXX If the sender is anonymous User unset If sent from a payphone Payphone 4 Press it Short mail is sent When sending is completed a guidance is played Confirm that the message has been sent correctl...

Page 377: ...immediately If no operations are performed for approximately 30 seconds in the message received results screen the mova automatically returns to the screen from before reception In the message receive...

Page 378: ...376 LMEMO9 e n500 book Page 376 Tuesday August 9 2005 1 15 PM...

Page 379: ...Using i shot Composing and Sending i shot Mail 380 Saving i shot Mail and Sending It Later Saving i shot Mail 383 Displaying Still Pictures Sent With i shot Displaying an i shot Image 384 Changing th...

Page 380: ...e mobile phone the recipient can download the image from that URL up to 50 times After 50 times the image cannot be viewed Using i shot messages with the same content can be sent to multiple addresses...

Page 381: ...transmission and the fee charged may vary when sending the same still picture depending on the signal status In some cases transmission charges may apply even when signal problems cause an i shot tra...

Page 382: ...imum data size for still pictures to be sent is 30KB The image sizes that can be sent are i shot S 144 144 and i shot L 288 352 You can convert to i shot S 144 144 or i shot L 288 352 when sending sti...

Page 383: ...ast mail is sent using i shot Titles and file names Still pictures taken with the mova are automatically assigned a Title and File name The file name is the name used when the picture is sent by i sho...

Page 384: ...on P 307 and P 308 to send i shot still pictures Note When Auto save mode nP 148 is set to ON the screen to confirm the still picture you took is not displayed Sending a Still Picture Immediately to...

Page 385: ...ge is entered while composing mail press H to display the end confirmation screen Select Yes and then press t to cancel message composition However messages canceled during composition are not saved S...

Page 386: ...splayed Sender indicates an i shot mail Always photo server docomo camera ne jp Sender s information The sender s mobile phone number etc is added to the top of the message Still picture URL Added to...

Page 387: ...et to Download on open still pictures sent with i shot are not retrieved automatically When Set image display is set to OFF images downloaded from the i shot service and Flash movies are not displayed...

Page 388: ...ng items and then press t Enter the various items and then press t to display the following settings The settings are changed when you finish entering the secondary DNS Host name You can enter up to 8...

Page 389: ...unning i ppli Run i ppli 392 Running i ppli Automatically Auto Start 397 Running i ppli From Sites or Mail i ppli To 399 Setting Up i ppli Stand by Display i ppli Stand by Settings 401 Managing i ppli...

Page 390: ...ng with i mode compatible mobile phone information such as mail or phone call history and phonebook data i ppli DX lets you compose mail with screens featuring your favorite characters and identifies...

Page 391: ...an specify parameters such as time date or day of the week and have software start automatically when specified There is also software that can automatically start according to a preset time interval...

Page 392: ...hird party could learn your mobile phone information because that information presence of unread mail message icons is sent through the Internet to the IP information provider along with information a...

Page 393: ...nd new folders can be created However if new folders are not created you cannot download Mail linked i ppli Mail linked i ppli cannot be downloaded when Mail security is set You cannot download or upg...

Page 394: ...un automatically after downloading is completed This type of software is not saved to your mova immediately after download After running the software choose whether to save or not when ending Network...

Page 395: ...pecified mail after ending the software Software is interrupted if you receive a call while software is running When the call is ended the i ppli is restarted When the set alarm time comes software is...

Page 396: ...ed 2 Select a software and then press C5 3 Press 1 YES To not communicate Press 2 To confirm each time i appli is run Press 3 Note Please note that when No is set for Network set the software may not...

Page 397: ...i stand by display is set to Yes there is a possibility a third party could learn your mobile phone information model and serial number because that is sent through the Internet to the IP information...

Page 398: ...the Background You can use this for the stand by display allowing you to use at your convenience Monster Farm Life A cute monster tells your fortune using various movements The monster also alerts you...

Page 399: ...ppli manual for information preset i ppli other than Dimo7 Pictograph mail There are 2 types of i ppli auto start Auto start from the software Auto start function that is preset in the software Auto s...

Page 400: ...e to Start Software Set Auto Start Date and Time Kii4L 1 In the stand by press t and select and then press t4 Auto start The Auto start settings screen is displayed 2 Press 3 Details set 3 Select the...

Page 401: ...ts Auto start Press 4 6 Enter the time and then press t Enter the time using the 24 hour format Use v to move the cursor Note If auto start fails the error is recorded in the Auto start error history...

Page 402: ...e or i mode mail The specified software must be downloaded in advance Starting i appli From Sites or Mail i appli To 1 In the site or mail select the i appli to start and then press t 2 Select YES and...

Page 403: ...e Function Kt88L 1 In the stand by press t and select and then press t8 2 Press 1 Receive The mova enters the receive stand by status for using the Ir exchange function 3 If a signal to start i appli...

Page 404: ...played again If an i ppli DX is set as the i ppli stand by display the software will test for validity when the i ppli stand by is first run When the i ppli stand by display has been set a confirmatio...

Page 405: ...of the software Automatic upgrade For some software upgrade information is automatically checked when run and an upgrade may be performed automatically When Upgrade available is displayed press t to a...

Page 406: ...The software list is displayed 2 Press C0 Sort 3 Select the sort method and then press t Deleting i appli 1 In the stand by press t and select and then press t1 The software list is displayed 2 Select...

Page 407: ...Mail linked i appli If the folder contains protected mail software and folders cannot deleted If the Mail linked i ppli folder has not been deleted and software is downloaded again the folder can be...

Page 408: ...ng Various Functions From i appli Displaying Sites From i appli 1 While an i appli is running select a URL and then press t The method for displaying sites varies depending on the i ppli software 2 Pr...

Page 409: ...e Bar Code Reader From i appli 1 While the i appli is running select the function to activate bar code reader and then press t The mova enters to Camera mode still picture shooting screen Bar code rea...

Page 410: ...in the center of the display and then press t 3 Press t Scan 4 Press 1 OK End reading Using Ir Exchange From i appli 1 While i appli is running activate Ir exchange The method for activating Ir exchan...

Page 411: ...409 17 Using the Felica What is FeliCa 410 e n500 book Page 409 Tuesday August 9 2005 1 15 PM...

Page 412: ...the FeliCa compatible services that you are using Data contained in the IC card may be deleted or modified in the event of malfunctions or repairs to the mova and the switching of models etc As a rule...

Page 413: ...e with the FeliCa mark Reading is not available from Viewer position Hold up the side with the FeliCa mark parallel to the reader writer external device Hold the mova up to the center of the reader wr...

Page 414: ...er FeliCa compatible i ppli cannot be run Precautions When Using the IC Card Function Note The i ppli software and Edy electronic money registered by default can also be used Reading and writing data...

Page 415: ...de from the DoCoMo e site Some payment plans are not available From i mode free packet transmission charges iMenu L s L DoCoMo e site From PCs http www nttdocomo co jp L L DoCoMo e site http www esite...

Page 416: ...ice Mail Service center Such calls are also noted in the stand by display and in received calls history However when 0 seconds is set for the ring time no entry is made in received calls history Incom...

Page 417: ...H QUICKCAST ring function 1418sOSet OH Set Change the ring time 1419sOSet OH Record Check Change reply message for message box optional 1416sOMain menuO5OSet OH Voice Mail Service Charges Operations f...

Page 418: ...ther call hears a busy signal Connecting manually when 1450 is set If a call is received during another call you are notified by a beep tone Perform the following operation while the beep tone is soun...

Page 419: ...1411 start 1410 stop You cannot use the manual connection operation 1450 when making calls to service numbers 110 police 118 emergencies at sea 119 ambulance fire 117 time and 14XX Voice Mail Service...

Page 420: ...message To re check the number of messages Press t411 in the stand by display The number of already checked messages is displayed Note If you are not subscribed to the Voice Mail Service you cannot pe...

Page 421: ...been started or stopped 1 In the stand by press t and select and then press t42 The voice mail screen is displayed 2 Select Play Voice mail and then press t A guidance message is played Follow the ins...

Page 422: ...sion charges iMenu L s LDoCoMo e site From PCs http www nttdocomo co jp L LDoCoMo e site or http www esite nttdocomo co jp Call Waiting Service Provides the Following Useful Functions Starting or Stop...

Page 423: ...e the call and left guidance key to switch calls Answering a Call After Finishing the Current Call 1 During a call press H The ring tone for the new call sounds In this case the call is not forwarded...

Page 424: ...oice Mail Service Call Forwarding Service or Call Waiting Service and you have 1450 set when a call is received during another call a beep tone is heard to notify you of the new call You can then take...

Page 425: ...answer the call during that time you can talk to the caller If you do not answer the call is forwarded to the set forwarding destination Such calls are also noted in the stand by display and in receiv...

Page 426: ...OMain menuO1 OSet ring timeO OH Enable or disable Set Fwd w Msg guidance 1429sOMain menuO2OSet O OH Check service options 1429sOMain menu O4OConfirm content O OH Note If you have a contract for the mo...

Page 427: ...selected with 1421 all the default settings for Set Fwd w Msg are set to ON Yes To set to OFF None follow the voice guidance played after pressing 1429 When set to ON Yes the caller hears the guidance...

Page 428: ...set This function is available only when a call from a third party is received during another call In other situations when you are out of the service area not available to answer the call or have tu...

Page 429: ...ng destination is busy out of the service area the phone is turned off or is set to Drive mode This function is only available when forwarding calls manually t This cannot be used when dialing or duri...

Page 430: ...co jp Note You can conduct a 3 way call with DoCoMo mobile phones other manufacturers mobile phones ordinary phones or PHS phones The call charge continues while calls are on hold and is charged to th...

Page 431: ...s placed on hold From this point on each time you press i Switch you can switch between the calls with B and C To terminate a call with the current party Press H to end the call In this case a ring to...

Page 432: ...press left guidance key to receive a call Press left guidance key to switch calls or right guidance key for a 3 way call Press for at least 1 second to disconnect the present caller and then press lef...

Page 433: ...ctions Note If Send own number is set to ON only the main number listed in the contract for your phone is displayed on the receiver s phone The Number Plus number is not displayed After terminating a...

Page 434: ...r with Number Plus When calls are received on the Number Plus number the calls are saved in received calls history The ring tone volume for the Number Plus is set to that used for normal calls When Ma...

Page 435: ...quest Service 1 In the stand by press 148s A guidance notifies you whether the current setting is Start or Stop 2 Press 1 Start or 0 Stop A guidance notifies you that the current setting will be chang...

Page 436: ...434 LMEMO9 e n500 book Page 434 Tuesday August 9 2005 1 15 PM...

Page 437: ...Ir Exchange 436 Sending and Receiving Data One Item at a Time Send Receive One 438 Sending and Receiving All Data Send Receive All 440 Using the Infrared Remote Control Function Infrared Remote Contr...

Page 438: ...settings Owner information is also sent when all Phonebook data is sent Schedule You cannot send secret information individually when Secret mode is OFF You cannot send alarm contact and image inform...

Page 439: ...wner information The information is saved as a Phonebook entry Infrared Exchange Mode Send one item Sends data selected from a Phonebook or mail screen etc 1 item at a time The data is added to the ap...

Page 440: ...he data you wish to send from the Phonebook list Display the data to send This can also be performed from the Phonebook details screen 2 Press C5 Send Ir data The submenu numbers differ depending upon...

Page 441: ...Note To Send Receive one Phonebook entry Received Phonebook data is automatically added to a memory number above 010 starting with the smallest available memory number However if there are no availabl...

Page 442: ...Sending and Receiving All Data Sending All Data 1 Set the receiver mova to stand by for receiving all data nP 441 2 Press C5 Send Ir data in the phonebook list screen The submenu numbers differ depen...

Page 443: ...ed for the sender 5 Enter the same password as the sender If the data is sent to the receiver mova the data is received automatically Note To Send Receive all Phonebook data You cannot receive Phonebo...

Page 444: ...the television or VCR Some i ppli can be operated in Viewer position The pre installed Picture Remote can be operated in Viewer position Actual operation procedures may differ depending on the softwar...

Page 445: ...443 20 Managing Data About the miniSD Memory Card miniSD Memory Card 444 Using miniSD Memory Cards 447 Managing miniSD Memory Cards 453 e n500 book Page 443 Tuesday August 9 2005 1 15 PM...

Page 446: ...formation on supported miniSD memory cards From the mova 7Menu m Menu list Mobile phone manufacturers SH MODE From a PC See http k tai sharp co jp products sh506ic shtml Keep in mind the following whe...

Page 447: ...ard with the printed surface facing upward Do not forcefully insert the miniSD memory card when it is not straight Doing so may damage the miniSD memory card Push all the way in until a click is heard...

Page 448: ...iSD memory card Do not remove the card with the miniSD memory card slot aimed at your face The card may pop out of the slot when you remove your finger When removing the miniSD memory card gently push...

Page 449: ...You can reply to or forward mail copied onto a miniSD memory card but they cannot be protected In addition i ppli To divided mail information attached i shot images and folder information cannot be co...

Page 450: ...ot size i shot S 144 144 Approx 800 Approx 400 Approx 400 i shot L 288 352 Approx 400 Approx 400 Approx 260 Stand by 240 320 Approx 400 Approx 400 Approx 260 VGA 480 640 Approx 260 Approx 150 Approx 1...

Page 451: ...or screen 1 In the stand by press t and select and then press t Select the data to copy To check the details of the entry before copying In the details screen press C0 Next proceed to step 4 2 In the...

Page 452: ...ll pictures are copied between the mova and a miniSD memory card the image may lose quality and the data size may change When there are more than 400 still pictures saved in the target folder a new fo...

Page 453: ...d Data is played if it is a melody Functions that can be used with data in a miniSD memory card and data in the mova are different For information on operations while data is displayed refer to each f...

Page 454: ...iniSD memory card is displayed 3 Select the data to copy and then press C2 Cpy main memory 4 Press 1 Copy one To copy all Press 2 and then enter your terminal security code 4 digits Copy all cannot be...

Page 455: ...be used when you wish to back up owner data share data with another mova or other devices that support miniSD memory cards or to transfer your data to a new phone when you purchase a new phone You ca...

Page 456: ...il information attached i shot images folder information and marker information will not be backed up 1 In the stand by press t and select and then press t9 The miniSD memory card management screen is...

Page 457: ...mail may take some time 1 In the stand by press t and select and then press t9 The miniSD memory card management screen is displayed 2 Press 2 Transfer group The screen to forward as a group is displa...

Page 458: ...r deleting normal data To copy data to the mova Press C2 From this point on the operation is the same as for copying normal data If a file with a name in Kanji or Hiragana is copied the file name is c...

Page 459: ...when manager information is updated titles of image files other than Exif format files shot on SH series mobile phones are deleted If i ppli stand by is set nP 401 End i ppli is displayed Select Yes...

Page 460: ...y level before performing A miniSD memory card that has been formatted by a PC or other device may not be used by the mova Formatting miniSD Memory Cards Format Kt895L 1 In the stand by press t and se...

Page 461: ...If a Connection is Cut Off Reconnect 488 Reducing Interference to Hear Calls Clearly Noise Canceling 489 Checking the Duration and Cost of a Call Call Details 489 Checking Memory Usage Check Memory 4...

Page 462: ...is no history Viewing the previous page Press i Back Viewing the next page Press C and then press C Next again e Dictionary Book Viewing e Dictionary Book Kt91L 1 In the stand by press t and select a...

Page 463: ...gits and then press t Some data contain information that allows you to jump to other pages Select such character strings and pictures and then press t to jump to the relevant page Press i Return to re...

Page 464: ...displayed The next time the same book dictionary is displayed Auto bookmark 1 is set for the last page displayed The former Auto bookmark 1 is moved to Auto bookmark 2 Up to 2 Auto bookmarks are set p...

Page 465: ...le of Contents 1 In the details screen press C3 Table of contents 2 Select the item you wish to display and then press t Displaying the Top End Page To Top To End 1 In the details screen press C4 To t...

Page 466: ...e characters cannot be copied Read Characters with the Camera and Search Character Reader 1 In the details screen press C8 Character reader Camera is activated and the character reader screen is displ...

Page 467: ...or Small font The default setting is Default Switching between Vertical and Horizontal You can switch between vertical and horizontal Vertical Screen Horizontal Screen Setting Font Size and Screen Dis...

Page 468: ...layed for dictionary book that do not have them set Ruby text is also unavailable for internal dictionaries 1 In the details screen press C9 Display settings The display setting screen is displayed 2...

Page 469: ...aracter string Using Characters in Dictionary Book 1 In the details screen select a character string with a movie play setting and then press t The movie plays 1 In the details screen select a phone n...

Page 470: ...you can easily make a call send mail or display a site or web page nP 279 Using Images in Dictionary Book 1 In the details screen select a still picture and then press t 2 Select Save to My pic and t...

Page 471: ...i Return 1 In the details screen select a still picture and then press t If the still picture is set with Switch mask it is masked without performing step 2 Perform the step again to display 2 Select...

Page 472: ...delete and then press t The mark changes to E To clear a selection select a dictionary book that has E displayed and then press t Select all the dictionaries books you wish to delete and then press i...

Page 473: ...nd then press t2 The Document viewer folder list is displayed 2 Select a folder and then press t The file list is displayed To switch display method Press C4 Switch view mode nP 153 3 Select the file...

Page 474: ...e the display size Press C1 You can also operate by simply pressing 1 1 touch operations nP 475 To reduce the display size further repeat the same operation To display a whole page or image Press t De...

Page 475: ...ons nP 475 2 Use w to move the cursor 3 Press t The screen is enlarged centering on the cursor position Displaying Edges and Center of Pages Move w in screen 1 In the details screen nSteps 1 to 3 on P...

Page 476: ...o move up and down Press u To adjust the scrolling speed You can adjust the speed to 1 of 3 levels Press r to speed up scrolling and q to slow down scrolling 2 Press t Auto scrolling is ended Note In...

Page 477: ...a Display the next page P 475 1 Reduce the display size P 472 2 Switch between vertical and horizontal display P 472 3 Enlarge the display size P 472 4 Magnifier P 472 5 Specify the zoom position P 47...

Page 478: ...In the details screen nSteps 1 to 3 on P 471 press C You can also operate by simply pressing 1 touch operations nP 475 2 Select Yes and then press t 3 Select OK and then press t To change the file na...

Page 479: ...ress C Complete You can select up to 50 files 5 Select Yes and then press t To not delete Select No and then press t Displaying Detailed Information Properties 1 In the stand by press t and select and...

Page 480: ...n started When Assistant view is starting the Assistant view mark for the original function flashes Only checking of data and the copying for Mail Phonebook Memo pad and Calculator of items characters...

Page 481: ...cannot be used nothing is displayed 2 Select the function to start and then press t Move the cursor with w You can also select by directly pressing the dial keys 1 to 9 The Assistant view icons are in...

Page 482: ...ns other than camera still picture camera movie camera character reader camera bar code reader that do not have m displayed cannot be added to the shortcut menu When registering camera functions still...

Page 483: ...to select a shortcut and then press t The registered function is performed Note When in Viewer position press in stand by to display the Shortcut menu Use to select a shortcut and then press Deleting...

Page 484: ...still picture and then press i Preview 3 Select an image for when unselected and then press t The Unselected icon is set 4 Select No and then press t To set a separate image for Selected Select Yes pr...

Page 485: ...n press i Preview 3 Select a still picture and then press t The background image is set Note Still pictures that cannot be set as the background image are crossed out and cannot be selected When still...

Page 486: ...ress t Note If a side key set for a Shortcut menu item to access miniSD memory cards the miniSD memory card menu is not displayed if one is not inserted Error tones beeps and messages do not appear In...

Page 487: ...ilent or 3 Hold sound is selected Calls are placed on hold when the mova is closed Silent or Holding is displayed in the sub display When 1Silent is selected no hold tone is played To continue the cal...

Page 488: ...t and select and then press t55 The battery saver mode screen is displayed Press t4 to set during a call 2 Press 1 ON Set Battery saver mode To disable Press 2 Note If Battery saver mode is enabled e...

Page 489: ...s to note and how to stop recording are the same as when used from the stand by Note Recording may not be possible if Voice memo is shorter than 3 seconds You cannot record your own voice with Voice m...

Page 490: ...hen the Signal is Weak Kt53L 1 In the stand by press t and select and then press t53 The quality alarm screen is displayed 2 Press 1 ON To not sound an alarm Silent Press 2 3 Press 1 High note To use...

Page 491: ...max 10 sec The call continues to be charged during this time Noise Canceling Reducing Interference to Hear Calls Clearly Kt51L 1 In the stand by press t and select and then press t51 The noise cancel...

Page 492: ...charges Voice Mail Service For 1416 calls and 1417 calls with stored recorded messages Last call cost is displayed nP 415 Call Forwarding Service nP 425 Access Number For 1490 and 1491 Caller ID Disp...

Page 493: ...lls are saved as the previous reset date If the date and time have not been set is registered To not reset Select No and then press t Check Memory Checking Memory Usage Kt31L Phonebook and Schedule To...

Page 494: ...turns to the stand by display Note When performing calculations using memory results are saved even when the Calculator is ended To calculate tax Display the calculation results and then press s TAX T...

Page 495: ...yed Creating Security memos Select Security memo press t and then enter your terminal security code 4 digits 3 Press C1 New The screen to register Memos is displayed If 10 memos are already registered...

Page 496: ...y to save contents on your PC Malfunctions repairs or other handling of the mova may cause loss of registered contents DoCoMo cannot be held responsible in any way for the loss of data registered in t...

Page 497: ...s 4 The details of the memo are already entered in the Agenda field The category for the memo is already entered in the Ctgry field Note During a call or while composing a message press and you can re...

Page 498: ...es and then press t To not delete Select No and then press t Note Press C5 in Memo details to also delete one Money Calculator Calculating a Total Amount Kt84L 1 Enter the numbers or formula in the ca...

Page 499: ...t be held responsible in any way for the loss of data stored by the Money calculator function Using Assistant view Press during a call to use Money calc and copy details In Viewer position press the s...

Page 500: ...lator 1 In the Money calculator details screen select the Money calculator item to edit and then press C2 2 Edit the item Refer to Entering new items from Money calculator nsteps 2 to 4 for informatio...

Page 501: ...displayed by details To copy press i Copy and then select a range to copy To specify a period Press 2 enter dates to total and then press t The totals for the set period for each detail is displayed T...

Page 502: ...all items Press 2 and then enter your terminal security code 4 digits To delete multiple items Press 3 select items to delete and then press t E is displayed before the text To cancel the selection se...

Page 503: ...hat the Fax mode setting is set to ON The default setting is OFF You can also perform this operation during a call Do not perform the following operations during fax transmissions with a G3 fax Refer...

Page 504: ...in any memory number between 000 and 749 The default setting is ON 749 is displayed for the memory number Using the switch to make calls Switch equipped Earphone Using the Switch equipped Earphone Op...

Page 505: ...r plug into the earphone microphone socket 2 When you receive a call press the switch on the switch equipped earphone for at least 2 seconds The call is connected The call can also be connected by pre...

Page 506: ...OFF Auto Answer Set Answering Calls Automatically When the Earphone is Connected Optional Kt58L 1 In the stand by press t and select and then press t58 The screen to set Auto answer set screen is disp...

Page 507: ...ayed as b 2 Select Yes and then press t To not reset Select No and then press t Note When the settings are reset The following items are not reset deleted changed Refer to the reference pages for info...

Page 508: ...onnected to a PlayStation To use i mode by connecting your mova with a PlayStation you need a mobile phone connection cable sold by Sony Computer Entertainment PlayStation PlayStation PS one or PlaySt...

Page 509: ...ision disabilities or arm disabilities can receive this service free of charge For details call 116 NTT sales from an ordinary landline phone As of July 2004 Since your location cannot be pinpointed i...

Page 510: ...508 LMEMO9 e n500 book Page 508 Tuesday August 9 2005 1 15 PM...

Page 511: ...ng Frequently Used Words Registering Words User Dictionary 525 Setting the Dictionary to Use Download Dictionary 527 Selecting the Conversion Method Quick Dictionary Next Word Guess 529 Entering Text...

Page 512: ...ed to each keypad key and you enter the desired character by pressing the key a number of times Refer to P 539 and P 540 for details on the characters assigned to each keypad key To display the candid...

Page 513: ...Katakana O half pitch Katakana OX full pitch alphanumeric characters Od half pitch alphanumeric characters O half pitch numbers Ol Kuten code O Kanji Hiragana After pressing a in the character input...

Page 514: ...ersion mode nP 513 Single character conversion Once you have entered a Kanji using normal conversion the mova can automatically convert to that Kanji the next time you enter the first character in its...

Page 515: ...nter Kanji using combinations of all the Hiragana assigned to the keys you pressed To use 1 touch conversion enter the Hiragana and then press o This eliminates the need to press the same key several...

Page 516: ...n result appears first Adding characters Press w to move the cursor to the point where you wish to add text and enter the characters Deleting characters Press w to move the cursor to the point where y...

Page 517: ...i input mode Example you can enter the word in half pitch alphanumeric characters by selecting it from the conversion candidates Example hitomi etc Entering numbers You can enter numbers in Half pitch...

Page 518: ...dates are displayed you cannot choose directly using the dial key You can convert to numbers as follows The same applies to entry of lower case characters and characters with Dakuten Handakuten marks...

Page 519: ...mail addresses are saved in the Internet category In the character input screen press a for at least 1 second to use Internet phrases Using Preset Phrases Note The phrases are listed in order of use...

Page 520: ...a screen with Pict Sym shown in the lower left the mova switches to pictograph mode and the pictograph list is displayed when you press i Pict Sym By pressing C in Pictograph input mode you can switch...

Page 521: ...ns are shown together with the Kanji candidates Emoticons not listed in the Emoticon table can also be entered Press u to select the emoticon and then press t to confirm entry The following list is di...

Page 522: ...mode Selecting items within the site or webpage and entering text on P 260 After confirming the input operation delete cut etc press s to cancel input and undo the operation The previous operation is...

Page 523: ...es and edit phrases already stored in the mova For details of preset phrases refer to P 545 You can enter up to 64 full pitch 128 half pitch characters Changing Font Size Font Size Registering Phrases...

Page 524: ...You can reset all phrases 1 In the stand by press t and select and then press t35 The screen to edit phrases is displayed 2 Select the category containing the phrase to reset and then press t 3 Select...

Page 525: ...t least 1 second 3 Move the cursor to the last character in the text you wish to copy cut The character string is selected and highlighted The highlighted text may now be copied or cut Press r for at...

Page 526: ...1 Display the screen character input screen where you wish to paste text 2 Press C3 Paste The paste screen is displayed 3 Move the cursor to the point where you wish to paste the character string in...

Page 527: ...you press the wrong key when entering a Kuten code If you press c before entering the fourth digit the number is cleared Enter the correct number Registering Words User Dictionary Registering Frequen...

Page 528: ...ust press t 5 Press 2 Overwrite To save a new word Press 1 You cannot register the new keyword if the same keyword is already registered 5 times Deleting Saved Words 1 In the stand by press t and sele...

Page 529: ...y Setting the Dictionary to Use Kt34L Setting Clearing a Dictionary to Use Set Dictionary 1 In the stand by press t and select and then press t34 The registered dictionaries are displayed Dictionaries...

Page 530: ...ear Checking Dictionary Content 1 In the stand by press t and select and then press t34 The registered dictionaries are displayed 2 Select the dictionary to check and then press t A list of the terms...

Page 531: ...ress t34 The registered dictionaries are displayed 2 Select the dictionary to delete and then press C5 Delete The delete screen is displayed 3 Press 1 Delete one To delete all registered dictionaries...

Page 532: ...can switch between upper case and lower case modes in full pitch or half pitch mode You can also convert characters one at a time by pressing m after character input nP 511 After pressing a in the cha...

Page 533: ...ions Entering Characters 1 In the character input screen enter a 2 digit number Example 22 O Refer to P 541 for details on character assignments Clear Memory Terms Resetting the Memorized Conversion C...

Page 534: ...oped by Sharp Corporation to make the LCD easier to view and read LC LCFONT and the LC logo are registered trademarks of Sharp Corporation Width of characters in i mode menu and Mail menu are also cha...

Page 535: ...5 touch 539 Keypad Character Assignment List 2 touch 541 Symbol Special Character List 542 List of Pictographs 543 Common Phrase List 545 Examples of Calculator Operations 546 Menu List 547 Options an...

Page 536: ...ters on P 524 for information on using the Kuten code to enter characters 534 Appendix Kuten Code List b 0 1 2 3 4 5 6 7 8 9 010 011 012 013 014 015 016 017 018 019 020 021 022 023 024 026 027 028 029...

Page 537: ...73 274 275 276 277 278 279 280 281 282 283 284 285 286 287 288 289 290 291 292 293 294 295 296 297 298 299 300 301 302 303 304 305 306 307 308 309 310 311 312 313 314 315 315 316 317 318 319 320 320 3...

Page 538: ...436 437 438 439 440 440 441 441 442 442 443 444 444 445 446 447 447 448 449 449 450 451 452 452 453 454 455 456 456 457 458 458 459 460 461 462 463 464 465 466 467 468 469 470 470 471 472 473 473 474...

Page 539: ...11 612 613 614 615 616 617 618 619 620 621 622 623 624 625 626 627 628 629 630 631 632 633 634 635 636 637 638 639 640 641 642 643 644 645 646 647 648 649 650 651 652 653 654 655 656 657 658 659 660 6...

Page 540: ...53 754 755 756 757 758 759 760 761 762 763 764 765 766 767 768 769 770 771 772 773 774 775 776 777 778 779 780 781 782 783 784 785 786 787 788 789 790 791 792 793 794 795 796 797 798 799 800 801 802 8...

Page 541: ...s a line break K is displayed as half pitch but counts as a full pitch character You can delete and edit it in the same way as other characters Valid when entering mail messages schedule ToDo and Memo...

Page 542: ...the cursor all characters after the cursor including the one at the cursor position are deleted 3 When entries are restricted to half pitch alphanumeric characters when entering mail addresses and UR...

Page 543: ...d d each count as two half pitch characters Character Assignment List 2 touch Keypad Character Assignment List 2 touch Note Empty boxes indicate a space Where is shown each time m is pressed the chara...

Page 544: ...entering pictographs to switch between Pictograph 1 and Pictograph 2 Full pitch symbols Special characters list Special characters may not be displayed properly if sent to a device that is incompatibl...

Page 545: ...y not be displayed properly when they are sent in i mode mail In Short mail pictographs other than e d and f become spaces When a Heading reading is entered is displayed after the pictograph candidate...

Page 546: ...t displayed properly when they are sent in i mode mail In Short mail pictographs other than e d and f become spaces Pictographs may not be properly displayed depending on the site When a Heading readi...

Page 547: ...545 Appendix Original phrases are not initially set Common Phrase List Common Phrase List ne jp co jp ac jp or jp go jp www e n500 book Page 545 Tuesday August 9 2005 1 15 PM...

Page 548: ...E is displayed If E is displayed as the calculation result further calculation is not possible In this case press C CE When the divisor is zero e g 5 0 When the integers in the memory exceed 12 digit...

Page 549: ...l 105 3 Original ring tone t13 109 4 Vibrator Vibrator t141 OFF 98 Mail vibrator t142 OFF 98 5 Manner mode t15 1 97 6 Ring output t16 Earp speaker 114 7 Mail ring duration t17 ON 3 seconds 113 8 Set m...

Page 550: ...idance center1 195 5 Called LED Called LED color t251 Green 190 Mail Msg LED color t252 Blue 190 Called LED ON t253 Without melody 191 Mail Msg LED set t254 Without melody 191 6 Display light time Dis...

Page 551: ...alarm t53 ON High note 488 4 Number Plus t54 432 5 Battery saver mode t55 OFF 486 6 Record message Set record msg t561 OFF 69 Start time t562 10 seconds 71 Check reply msg t563 69 7 Close operation t...

Page 552: ...644 Disable 61 Reject payphone t645 Disable 61 Reject not support t646 Disable 61 5 Send own number t65 OFF 38 6 Call details t66 0 00 0 yen 5 489 7 Change sec code t67 0000 201 8 Del all secret t68 2...

Page 553: ...4 496 Timer t85 03 00 216 Alarm t86 217 Memo pad t87 493 Receive Ir data t88 439 miniSD manager View miniSD data t891 450 Transfer group t892 453 Import t893 456 New manager info t894 457 Format t895...

Page 554: ...indows Me Windows 2000 Professional Windows XP PC AT devices Faxes to and from G4 fax machines supported in G3 mode DoPa is an optional service that requires a subscription The service cannot be acces...

Page 555: ...forwarded Even for items marked with an reading and editing may not always be possible The display when transmitting data is displayed with the side with the guidance keys up The display is upside do...

Page 556: ...antee or warrant in any way the use of this software as a commercial product nor the performance of the software with respect to the purposes for which the customer is using the software Movies saved...

Page 557: ...Here First 556 List of Error Messages 558 Warranty and After sales Service 562 Updating Software 564 miniSD Memory Card miniSD Memory Card Adapter 570 Index 574 Using the Quick Manual 580 e n500 book...

Page 558: ...lease wait appears and a busy signal is heard The network is down or busy Try again later The battery pack will not charge Is the battery pack attached properly Are the charging terminals dirty Clean...

Page 559: ...om the phonebook Has Phonebook lock been set Has the Keypad lock been set 202 207 Mail was received while storing a phonebook entry composing a message When mail is received the mova returned to the s...

Page 560: ...My picture and i ppli Delete i ppli and images from My picture to secure memory and try again 126 276 157 404 PLights yellow Memory is full Lights yellow when saving area for My picture or i ppli is...

Page 561: ...g to the site again later If the set i mode rcv is set to i mode answer this message may be displayed after you finish a call if you receive a call during an i mode transmission 43 281 Connection is n...

Page 562: ...279 During Ir exchange Connection interrupted Retry No response Retry Authentication failed Retry Displayed when the operation to cancel Ir exchange is performed Displayed when the other party could n...

Page 563: ...ed Select the item to overwrite in the next screen Short of memory Cannot display The process was interrupted because of insufficient memory and the display returns to the previous screen Display Expl...

Page 564: ...2000 Professional Windows XP Home Edition or Windows XP Professional you can use Data Link software nP 553 to transfer mail messages bookmarks and other content to your PC and store it there In additi...

Page 565: ...osstalk The use of mobile phones that do not meet these technical standards is not permitted If your mova has been modified previously replacement of parts modification coating etc it will only be acc...

Page 566: ...ns cannot be used Voice calls can be received However in call menu cannot be used during incoming calls are received When updating software SSL communication with NTT DoCoMo is performed SSL certifica...

Page 567: ...Send terminal ID To not send mobile phone information Press 2 mova information such as the model and serial number is sent to the NTT DoCoMo site Your mobile phone information sent will not be public...

Page 568: ...d is canceled downloaded data is deleted Cannot be operated while software is being rewritten About 5 seconds or t OK Note When performing a Scheduled update this is displayed after Establishing SSL s...

Page 569: ...ear when mail is received if Receive option is ON W appears when messages are received W does not appear if set to a host other than DoCoMo If Keypad lock is set remotely when you are performing steps...

Page 570: ...r if the power is turned OFF immediately after starting on the scheduled time and date the schedule becomes invalid 3 Press 1 Yes The date and time are reserved If H is pressed a message asking whethe...

Page 571: ...lights when mail or message is received at the i mode center After Software update is complete check for new messages or receive selected mail to receive mail and messages W does not appear when mail...

Page 572: ...570 Troubleshooting miniSD Memory Card miniSD Memory Card Adapter miniSD Memory Card miniSD Memory Card Adapter e n500 book Page 570 Tuesday August 9 2005 1 15 PM...

Page 573: ...miniSD Memory Card miniSD Memory Card Adapter 571 Troubleshooting e n500 book Page 571 Tuesday August 9 2005 1 15 PM...

Page 574: ...572 miniSD Memory Card miniSD Memory Card Adapter Troubleshooting e n500 book Page 572 Tuesday August 9 2005 1 15 PM...

Page 575: ...573 LMEMO9 e n500 book Page 573 Tuesday August 9 2005 1 15 PM...

Page 576: ...sage 427 Manual forward 426 Register forwarding destination 427 Start or stop service 424 Call Waiting Service 420 Called LED Illumination 190 Caller ID display 188 Caller ID Request Service 433 Camer...

Page 577: ...phone microphone 502 Auto answer set 504 Make calls 502 Receive calls 503 Switch equipped earphone 502 Earpiece volume 56 e Dictionary Book Copy text 463 Delete 470 Display 460 Display settings 465 Di...

Page 578: ...l 302 Address reset 348 Broadcast send 309 Change mail address 345 Check new message 316 360 Compose Send 307 Compose Send Chat mail 367 Compose Send short mail 371 Create folder 332 Delete 338 Delete...

Page 579: ...emory 491 Memory number 79 Menu list 547 KEITAIviewer 551 Library menu 550 Setting menu 547 Tool menu 551 Menu selections 23 Function number 24 Submenu 26 TOP menu 23 Zoom menu 25 Message services 291...

Page 580: ...son of non disclosure Payphone 61 Unsupported ID 61 User unset 61 Reject calls 59 Disable 61 Save 59 Set 61 Reject unsolicited advertising mail 353 Remote keypad lock 208 Reset Call cost 491 Call dura...

Page 581: ...26 Support menu 549 Switch equipped earphone 502 Symbols Special characters entering 518 List of symbols special characters 542 T Taking still pictures 127 Terminal security code 200 Time 37 Timer 216...

Page 582: ...s from page 581 How to fold Using the Quick Manual Caution Be careful not to injure yourself when detaching Completed This manual is produced of recyclable material Please recycle when no longer neede...

Page 583: ...ring tones for incoming calls V Mail ring tone Select specific mail ring tones for incoming mail Icon Category Notes q Called LED Select LED patterns for incoming transmissions Mail Message LED Selec...

Page 584: ...ble of contents Press C3 w select item t Camera Shooting Still Pictures Camera Shooting Movies Viewing Still Pictures Viewing Movies Customizing the Display Arranging TOP Menu KEITAIviewer 1 In the st...

Page 585: ...n 432 Set forward with message 433 Call Waiting 44 Fax mode 45 Phone setting Menu Function Function number Noise canceling 51 Menu Function Function number Reconnect 52 Quality alarm 53 Number Plus 54...

Page 586: ...Fees apply telegram charge 8 A M to 10 P M No area code 115 Time signal service Fees apply No area code 117 Weather forecast Fees apply Area code for region concerned 177 Police emergencies No area co...

Page 587: ...Where You Use Your Mobile Phone and the Volume of Your Voice and the Ring Tone Be Considerate of the Privacy of the Individuals Around You t Please be considerate of the privacy of individuals around...

Page 588: ...turn used battery packs to NTT DoCoMo any NTT DoCoMo retailer or a recycling agency Don t forget your mobile phone or your manners Sales NTT DoCoMo Group NTT DoCoMo Hokkaido Inc NTT DoCoMo Inc NTT DoC...

Reviews: