background image

23 


Troubleshooting


If you experience any trouble with your wireless Internet Radio, then you may find it useful to visit the help 

section on our webpage:


www.mediayou.net


If you have trouble connecting the Radio to your wireless network, these steps may help to resolve the 

problem: 

1. Confirm that a Wi-Fi connected PC can access the Internet (i.e. can browse the web) using the same 

network. 

2. Check that a DHCP server is available, or that you have configured a static IP address on the Radio. 

You can configure a static IP address on the Radio using the menu item 

„Configuration 

 Network


Manual Configuration

Wireless

DHCP

DHCP(Off)

‟. 

3. Check your access point does not restrict connections to particular Mac addresses: 

a. Press 

, and then press 

 or 

to < 

Information Center

>. 

b. 

Information Center 

 System Information

 Wireless Info

MAC Address

4. If you have an encrypted network, check that you have entered the correct key or password into the 

Radio.   Remember that text-format keys are case sensitive. If, when attempting to connect to an 

encrypted network, your Radio 

displays: „Wireless error‟ followed by a 5-digit number, then please ensure 

that you enter the correct passphrase for the network. If the problem persists, then you may need to 

consult your network configuration. 

5. If your Radio can connect to the network successfully, but is unable to play particular stations, it may be 

due to one of the following causes: 

a. The station is not broadcasting at this time of the day (remember it may be located in a different time 

zone). 

b. The station has reached the maximum allowed number of simultaneous listeners. 

c. The station is not broadcasting anymore. 

d. The link on the Radio is out of date.  

e. The Internet connection between the server (often located in a different country) and you is slow. 

Try using a PC to play back the stream via the broadcaster‟s web site.  

6. If you can play back the station with a PC, use the form at 

www.mediayou.net

  to notify us so that we 

can change the station data that is used by the Radio. 

Summary of Contents for IR-7000

Page 1: ...I N S T R U C T I O N M A N U A L W i F i I n t e r n e t R a d i o w i t h A u d i o M e d i a S t r e a m i n g ...

Page 2: ...o the apparatus the apparatus has been exposed to rain or moisture does not operate normally or has been dropped 15 The apparatus shall not be exposed to dripping or splashing and no objects filled with liquids such as vases shall be placed on the apparatus 16 The mains plug or an appliance coupler is used as the disconnect device the disconnect device shall remain readily operable The exclamation...

Page 3: ...rite 10 Selecting a Favorite Station 10 My mediaU 11 UPnP 12 Step 1 Set Up Media Sharing in WMP 11 12 Step 2 Play Music on the Internet Radio 13 General Operations 14 Browse Weather Information 14 Browse Financial Information 14 Get Radio Version and Mac IP Address 14 Configuration 15 Network Settings 15 Setting Clock 16 Setting Alarm 17 Language 19 Dimmer 19 Sleep Timer 20 Buffer 20 Weather 21 So...

Page 4: ...2 Package Content Main unit Adapter Instruction manual ...

Page 5: ...an get the Internet Radio to communicate with the network If your wireless network is configured for trusted stations you will need to enter the Radio s MAC address into your wireless access point To find the Radio s MAC address need 3 steps 1 Press and then press or to Information Center press to confirm 2 Press or to System Information press to confirm and it is done 3 Press or to Wireless Info ...

Page 6: ...net radio mode by pressing this button Press to directly enter alarm settings Press to directly enter sleep settings Press to shift between Internet Radio and UPnP Internet radio mode use only Press and hold to save Preset station press to load Preset station Press to Main menu and other options Press to goes back to previous item Press to goes back to next item or Press to upward or downward view...

Page 7: ...5 Side and Back Overview Side Overview Socket Description Earphone socket Connects to the headphone Power cord socket It also call DC jack connect to power adapter Back Overview ...

Page 8: ... by pressing Later it will say Step 2 Access to Network If your network is not configured to request a password WEP WPA radio will connect to the network and display In some cases it may find more than one network Press or to cycle through the name list press when the name of your favor network is displayed If a WEP WPA key password is required radio will display as following Press or to your favo...

Page 9: ...racter is being input press to delete it d After input the last character press to get your radio to try access internet Now it should be connected to network and shows as below Note a WEP WPA pass codes are case sensitive b Radio will automatically save the WEP WPA code therefore no bother to re enter unless you order a Reset to Default Or if it failed to access please do follow A Check your Rout...

Page 10: ...n options available for selecting a station Global Top 20 Genre Country Location Australia Canada United Kingdom and USA b GENRE enables you to choose radio stations according to their content for example Classic Rock Sport News etc c COUNTRY LOCATION enables you to choose from the radio stations provided by any country which you choose from a list d Some radio stations do not broadcast 24 hours p...

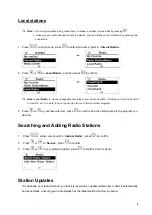
Page 11: ...nstance it can be local US or local UK etc In a word it s a very easy way for you to find your local programs 3 Press or to your favourite item press to confirm and then step to step to the program you desired Searching and Adding Radio Stations 1 Press while cursor point to Internet Radio press to confirm 2 Press or to Service press to confirm 3 Press or to your preferred option press to confirm ...

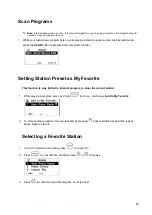
Page 12: ... Setting Station Preset as My Favorite This function is only limited to Internet program to store the current station 1 While playing a program press and hold for 2 sec until it says Add to My Favorite 2 To store another program it can be reached by pressing back to station list and then repeat above step1 to store it Selecting a Favorite Station 1 If it isn t in Internet radio mode press to conve...

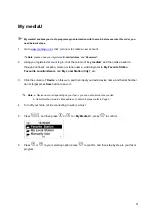
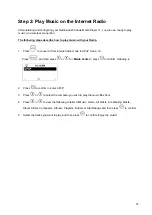
Page 13: ...dd programs to My Favorite Station Favourite Location Genre and My Local Station City etc 3 Click the column of Device on this web and then input your radio device name and Serial Number do not forget press Save button to save it Note a Device name is depending on your favor you can name it what are you like b Serial Number is radio s Mac address to obtain it please refer to Page 3 4 Turn off your...

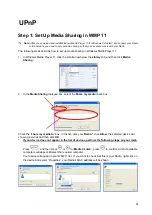
Page 14: ...Media Sharing 2 In the Media Sharing dialogue box select the Share my media check box Check the share my media to box In the list click your Radio click Allow the selected device will show a green tick and then click OK If your device does not appear in the list of devices perform the following steps on your radio Press and then press or to Media Center press to confirm a list of available compute...

Page 15: ...ernet radio mode to UPnP mode Or Press and then press or to Media Center press to confirm following is 2 Press to confirm to enter UPnP 3 Press or to select the computer you wish to play the music files from 4 Press or to view the following criteria All Music Genre All Artists Contributing Artists Album Artists Composers Albums Playlists Folders or Star Ratings and then press to confirm 5 Select t...

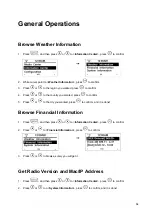
Page 16: ... you wanted press to confirm 5 Press or to the city you wanted press to confirm and it is done Browse Financial Information 1 Press and then press or to Information Center press to confirm 2 Press or to Financial Information press to confirm 3 Press or to browse surely you will get it Get Radio Version and Mac IP Address 1 Press and then press or to Information Center press to confirm 2 Press or t...

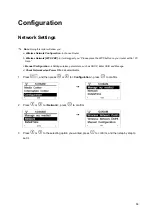
Page 17: ...ress the WPS button on your router within 120 Secs c Manual Configuration Setting wireless parameters such as DHCP Enter SSID and Manage d Check Network when Power ON Enable Disable 1 Press and then press or to Configuration press to confirm 2 Press or to Network press to confirm 3 Press or to the selecting option you wanted press to confirm and then step by step to set it ...

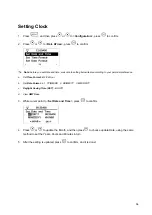
Page 18: ...ersonal preference a Set Time Format 12 24 Hour b Set Date Format 1 YY MM DD 2 DD MM YY 3 MM DD YY c Daylight Saving Time DST On Off d View GMT time 3 While cursor point to Set Date and Time press to confirm 4 Press or to update the Month and then press to choose update Date using the same method to set the Years Hours and Minutes in turn 5 After the setting is updated press to confirm and it is d...

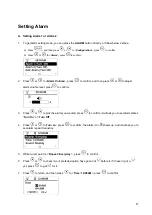
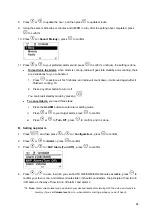
Page 19: ...just alarm volume level press to confirm 3 Press or to pick the alarm you wanted press to confirm it will ask you to set alarm states Turn On or Turn Off 4 Press or to Turn on press to confirm the alarm icon shows up and it will ask you to set alarm repeat frequency 5 While cursor point to Repeat Everyday press to confirm 6 Press or to check if your preferred option have got a tick before it if it...

Page 20: ...by pressing To cancel Alarm you need three steps i Press the ALARM button to enter alarm setting mode ii Press or to your target alarm press to confirm iii Press or to Turn Off press to confirm and it is done B Setting nap Alarm 1 Press and then press or to Configuration press to confirm 2 Press or to Alarm press to confirm 3 Press or to NAP Alarm Turn Off press to confirm 4 Press or to view in wh...

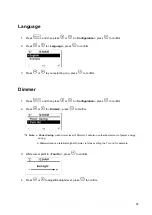
Page 21: ...d then press or to Configuration press to confirm 2 Press or to Dimmer press to confirm Note a Power Saving means lower level of Dimmer it will also use the least amount of power energy saving b Turn on means a relatively higher Dimmer let s take setting the Turn on for example 3 While cursor point to Turn On press to confirm 4 Press or to adjust Backlight level press to confirm ...

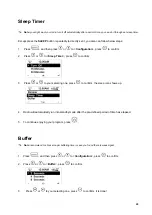
Page 22: ...o Sleep Timer press to confirm 3 Press or to your selecting one press to confirm the sleep icon shows up 4 Radio will automatically run into standby mode after the pre defined period of time has elapsed 5 To continue enjoying your program press Buffer Note recommend to choose longer buffering time in case you found there is weak signal 1 Press and then press or to Configuration press to confirm 2 ...

Page 23: ... step4 press to Temperature Unit press to confirm 2 Press or to your preferred option Centigrade or Fahrenheit press to confirm C Set Location 1 Continue above step2 of item B press to Set Location press to confirm 2 Press or to your region press to confirm and then step by step to your local place you will get it D How to browse weather three steps a Press to enter standby mode b Press to show c ...

Page 24: ...ser settings and return to radio default factory settings 1 Press and then press or to Configuration press to confirm 2 Press or to Reset to Default press to confirm 3 Press or to YES press to confirm 4 It will ask you to set Language press or to your expecting option English or Svenska and then press to confirm 5 It will ask you Enable Check Network when Power On YES or NO press or to YES and the...

Page 25: ...rect key or password into the Radio Remember that text format keys are case sensitive If when attempting to connect to an encrypted network your Radio displays Wireless error followed by a 5 digit number then please ensure that you enter the correct passphrase for the network If the problem persists then you may need to consult your network configuration 5 If your Radio can connect to the network ...

Page 26: ...4ohm Headphone Jack 32ohm Dimension 190x 58 x 126mm This symbol on the product or in the instructions means that your electrical and electronic equipment should be disposed at the end of its life separately from your household waste There are separate collection systems for recycling in the EU For more information please contact the local authority or your retailer where you purchased the product ...

Reviews: