


©
2015 DJI. All Rights Reserved.
13
ZENMUSE H4-3D
User Manual
Refer to GCU and Flight Control System Connection for more information about the connection.
For details on the flight control system connections, refer to the corresponding flight control
system user manuals.
3. Connect the GCU to the flight control system. Then connect the 8-Pin cable of the gimbal to
the G8 port on the GCU.
Flight Controller
A2
WKM
NAZA-M V2
NAZA-M
GCU and Flight Control
System Connection
Connect to the
CAN 2 port on
the A2.
Connect the GCU to a
spare CAN-Bus port on
the WKM system.
Connect the GCU to the CAN-
Bus port on the PMU V2
module.
GCU Power Cable
Connection
Connect the power cable to a connecter or solder the power cable to the
central board as needed.
Gimbal Tilt Control Channel
H4-3D
X3
X1
4. Connection is complete. Power on the aircraft to launch.
5. To fully utilize the gimbal, you will also need to configure its tilt function. Each flight control
system assigns a specified channel (X3 channel for WKM, X1 for NAZA-M, and H4-3D for A2)
for tilt control. To activate the tilt function, set up the channel in the PC Assistant and ensure
the connection between the receiver and the main controller is correct. Refer to the gimbal PC
Assistant for details.
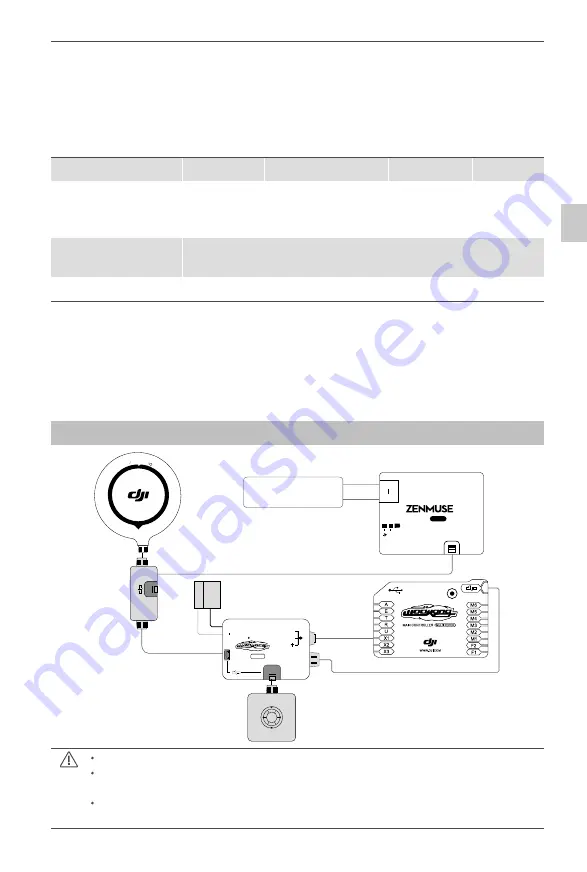
GCU and Flight Control System Connection
2S
V-SEN
X1
PW
3V 5V
6S
@
(2V 6V)
@
P M U
GP
S CO
MPASS
3S
AV
6S
GCU
H -3D
Battery
(3S~6S)
positive pole(+)
negative pole(-)
WKM Connection Diagram
The PMU and GCU can both connect to the same LiPo 3S-6S battery.
The GCU can be connected to any CAN ports on the PMU or to the CAN port on the GPS.
(Any spare CAN port on the WKM system.)
Control the tilt motion via the X3 channel. Properly configure the corresponding channel on
your remote controller.
GCU Connection


