background image


- 15 - 


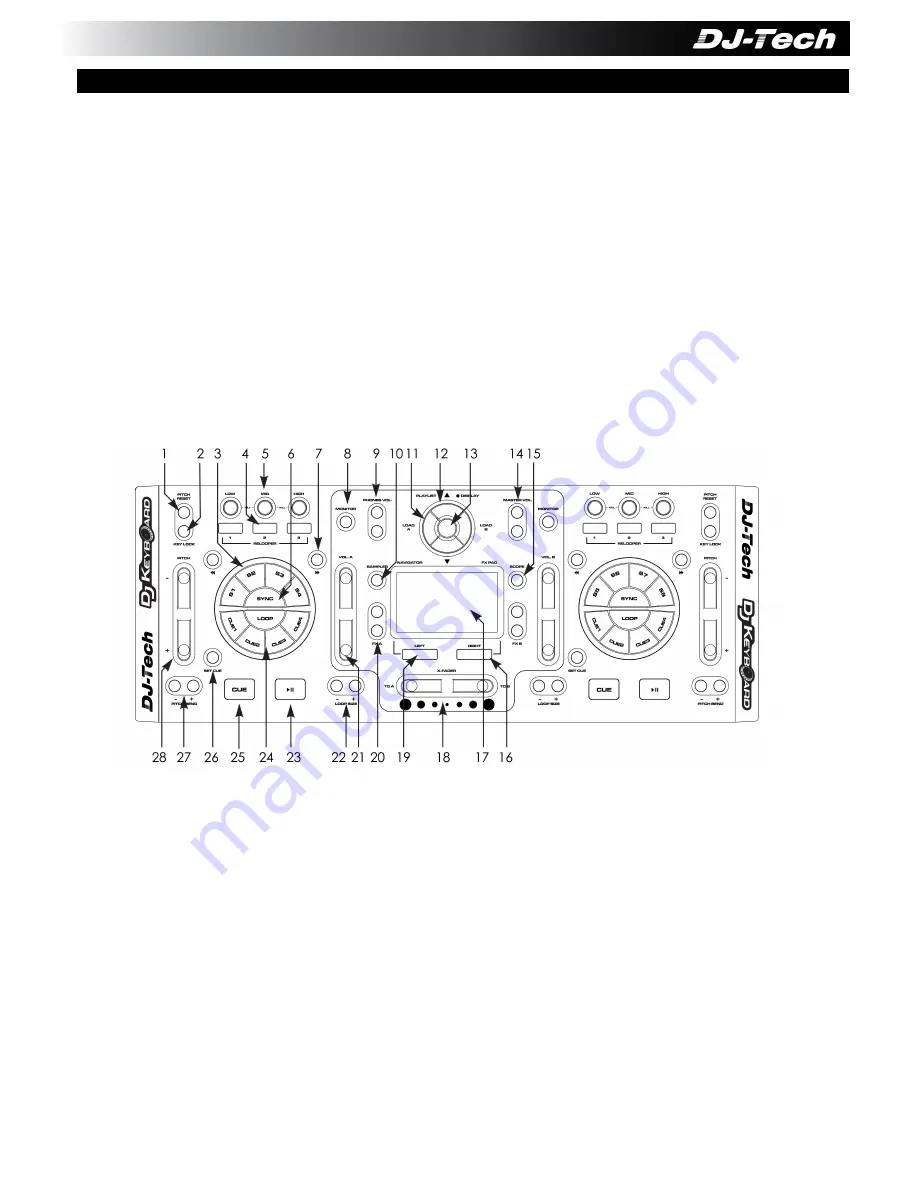
1. 

PITCH RESET

 – Druk hierop om de pitch voor het deck opnieuw in te stellen. 

2. 

KEY LOCK

 – Schakelt Key Lock (toetsenvergrendeling) aan voor het deck. 

3. 

SAMPLERS (S1 tot S8)

 – Afspelen van de samplers S1 tot S4 op Deck A en S5 tot S8 op Deck B. 

4. 

RELOOPERS

 – Indrukken en ingedrukt houden om de 3 RELOOPERS op het deck te activeren. 

5. 

EQ KILL FILTERS

 – Schakelt de High Mid Low Kill Filters aan voor het deck. 

6. 

SYNC

 – Druk hierop voor de deck synchronisatiefunctie. 

7. 

BEAT JUMP

 – Druk hierop om één beat voorwaarts of achterwaarts te springen voor het deck. 

8. 

MONITOR

 – Schakel de monitorfunctie aan voor het deck. 

9. 

PHONES VOLUME

 – Het volume van de hoofdtelefoon instellen. 

10. 

SAMPLER VIEW

 – Druk hierop om de Sampler view aan te schakelen. 

11. 

LOAD A/B

 – Druk hierop om de geselecteerde song te laden naar Deck A of Deck B. 

12. 

PLAYLIST UP/DOWN

 – Druk hierop om door de afspeellijst te scrollen. 

13. 

PLAYLIST VIEW

 – Druk hierop om naar Playlist view te schakelen. 

14. 

MASTER VOLUME

 – Het master volume instellen. 

15. 

SCROPE

 – Druk hierop om naar verschillende beelden voor het middenpaneel te schakelen. 


16. 

MOUSE RIGHT BUTTON

 – Rechterknop voor de ingebouwde muis. 

17. 

MOUSE PAD

 – Ingebouwd multi-touch muispad. 

18. 

CROSSFADER

 – Druk hierop om de crossfader in te stellen. 

19. 

MOUSE LEFT BUTTON

 – Linkerknop voor de ingebouwde muis. 

20. 

FX SELECT 

– Druk hierop om de FX voor het deck in te stellen. 

21. 

VOLUME FADER 

– Druk hierop om het kanaalvolume in te stellen voor het deck. 

22. 

LOOP SIZE 

– Druk hierop om de Auto Loop size aan te passen. 

23. 

PLAY

 – Schakelt Play (afspelen) of Pause (pauze) in voor het deck. (Deze knop wordt enkel opgelicht in 

het BLAUW als de externe DC-adapter aangesloten is) 

24. 

HOT CUE

 – Druk hierop om de CUE te selecteren en ernaar toe te gaan voor het deck. 

25. 

CUE

 – CUE voor het deck. (Deze knop wordt enkel opgelicht in het ROOD als de externe DC-adapter 

aangesloten is) 

26. 

CUE IN

 – Druk op deze knop en de HOT CUE knoppen om de Hot Cue in te stellen. 

D. EIGENSCHAPPEN VAN HET BOVENSTE PANEEL 

Summary of Contents for Deckadance edition

Page 1: ...L D UTILISATION BENUTZERHANDBUCH GEBRUIKSAANWIJZING MANUAL DE INSTRUCCIONES MANUALE DI ISTRUZIONI English Fran ais Deutsch Nederlands Espa ol Italiano 01 04 05 08 09 12 13 16 17 20 21 24 DJ KEYBOARD D...

Page 2: ...EATURES E How to use the Multi touch Mouse Pad F Specification Please read this User Manual carefully for installation and using this item Thank you PC MAC Windows XP SP2 Windows Vista Windows 7 Intel...

Page 3: ...ws For Mac And sometimes there might be some functions mapped to the function keys F1 F2 etc of the keyboard Please disable them in order to use normally with Deckadance software For example in Mac pl...

Page 4: ...ST VIEW Press to switch to Playlist view 14 MASTER VOLUME Control the master volume 15 SCROPE Press to switch different views for the middle panel 16 MOUSE RIGHT BUTTON Right button for the integrated...

Page 5: ...nd scratch your music with the pad s multi touch feature 1 Use one finger to move the mouse like normal mouse device 2 Use 2 fingers and move up and down on the pad for scrolling function 3 To control...

Page 6: ...SUPERIEUR E Utilisation du pav de souris tactile multi point F Sp cifications Pour plus d informations sur l installation et l utilisation de cet article veuillez lire ce manuel d utilisation Merci PC...

Page 7: ...ailleurs il arrive que certaines fonctions soient associ es aux touches de fonction F1 F2 etc du clavier Veuillez les d sactiver afin de pouvoir utiliser le logiciel Deckadance normalement Par exemple...

Page 8: ...re 13 Affichage des listes de lecture appuyez sur cette touche pour passer en affichage des listes de lecture 14 MASTER VOL volume principal permet de contr ler le volume principal 15 SCROPE affichage...

Page 9: ...ide de la fonction tactile multi point du pav 1 Utilisez un doigt pour d placer la souris comme avec une souris classique 2 Utilisez 2 doigts et d placez les vers le haut et vers le bas sur le pav pou...

Page 10: ...as DJ Keyboard verwenden D BEDIENELEMENTE AUF DER OBERSEITE E Verwendung des Multi Touch Mauspads F Technische Daten Lesen Sie sich bitte zur Installation und vor Inbetriebnahme des Ger tes das vorlie...

Page 11: ...eyboards gelegt Bitte deaktivieren Sie diese damit Sei die Deckadance Software ganz normal verwenden k nnen berpr fen Sie als Mac User dazu bitte das Fenster f r die Tastatur Einstellungen die hier re...

Page 12: ...urch die Wiedergabeliste Playlist zu scrollen 13 PLAYLIST VIEW Dr cken um zur Wiedergabenlisten Ansicht zu wechseln 14 MASTER VOLUME Die Master Lautst rke einstellen 15 SCROPE Dr cken um zwischen vers...

Page 13: ...ber das Multi Touch Feature des Pads scratchen 1 Verwenden Sie einen Finger um die Maus wie bei normalen Maustypen Touchpads zu bewegen 2 Verwenden Sie 2 Finger und bewegen diese f r die Scroll Funkti...

Page 14: ...ik van het DJ Keyboard D EIGENSCHAPPEN VAN HET BOVENSTE PANEEL E Hoe het multi touch muispad gebruiken F Specificatie Gelieve deze Gebruiksaanwijzing aandachtig te lezen vooraleer u dit toestel instal...

Page 15: ...s For Mac En soms kunnen er functies zijn die gerelateerd zijn aan de functietoetsen F1 F2 enz van het keyboard Schakel deze uit om ze normaal te kunnen gebruiken met de Deckadance software Controleer...

Page 16: ...LAYLIST VIEW Druk hierop om naar Playlist view te schakelen 14 MASTER VOLUME Het master volume instellen 15 SCROPE Druk hierop om naar verschillende beelden voor het middenpaneel te schakelen 16 MOUSE...

Page 17: ...hen met de multi touch eigenschap van het pad 1 Gebruik n vinger om de muis te bewegen zoals een normaal muisapparaat 2 Gebruik 2 vingers en beweeg op en neer op het pad voor de scroll functie 3 Om de...

Page 18: ...AS DEL PANEL SUPERIOR E Utilizaci n la pantalla multit ctil F Especificaciones Lea atentamente este manual de instrucciones para la instalaci n de este aparato Gracias PC MAC Windows XP SP2 Windows Vi...

Page 19: ...r algunas funciones integradas en las teclas F1 F2 etc del teclado Desact velas con el fin de utilizarlas de un modo normal con el programa Deckadance En Mac por ejemplo compruebe el recuadro en la co...

Page 20: ...cci n 13 VISUALIZACI N DE LA LISTA DE REPRODUCCI N Pulse este bot n para cambiar a la visualizaci n de la lista de reproducci n 14 VOLUMEN MASTER Pulse este bot n para controlar el volumen master 15 S...

Page 21: ...puede controlar diferentes par metros y reproducir el efecto de rayado con la funci n multit ctil de la pantalla 1 Utilice un dedo para mover el cursor como lo hace un rat n normal 2 Utilice dos dedo...

Page 22: ...SUPERIORE E Come usare il mouse pad multi touch F Specifiche Leggere con attenzione questo manuale prima di installare e usare il prodotto PC MAC Windows XP SP2 Windows Vista Windows 7 Intel Pentium...

Page 23: ...e funzioni applicate ai tasti di funzione F1 F2 ecc della tastiera Disabilitarli per poter usare normalmente il software Deckadance Ad esempio in Mac spuntare la casella in impostazioni tastiera a des...

Page 24: ...visualizzazione playlist 14 VOLUME PRINCIPALE Regola il volume principale 15 SCROPE Premere per passare a diverse visualizzazioni del pannello centrale 16 TASTO DESTRO MOUSE Tasto destro del mouse in...

Page 25: ...si parametri e fare lo scratch con la funzione multi touch del mouse pad 1 Usare un dito per spostare il mouse come un normale mouse 2 Usare 2 dita e spostarsi su e gi sul pad per la funzione di scorr...

Page 26: ......

Reviews: