background image


23


FUNCTION 


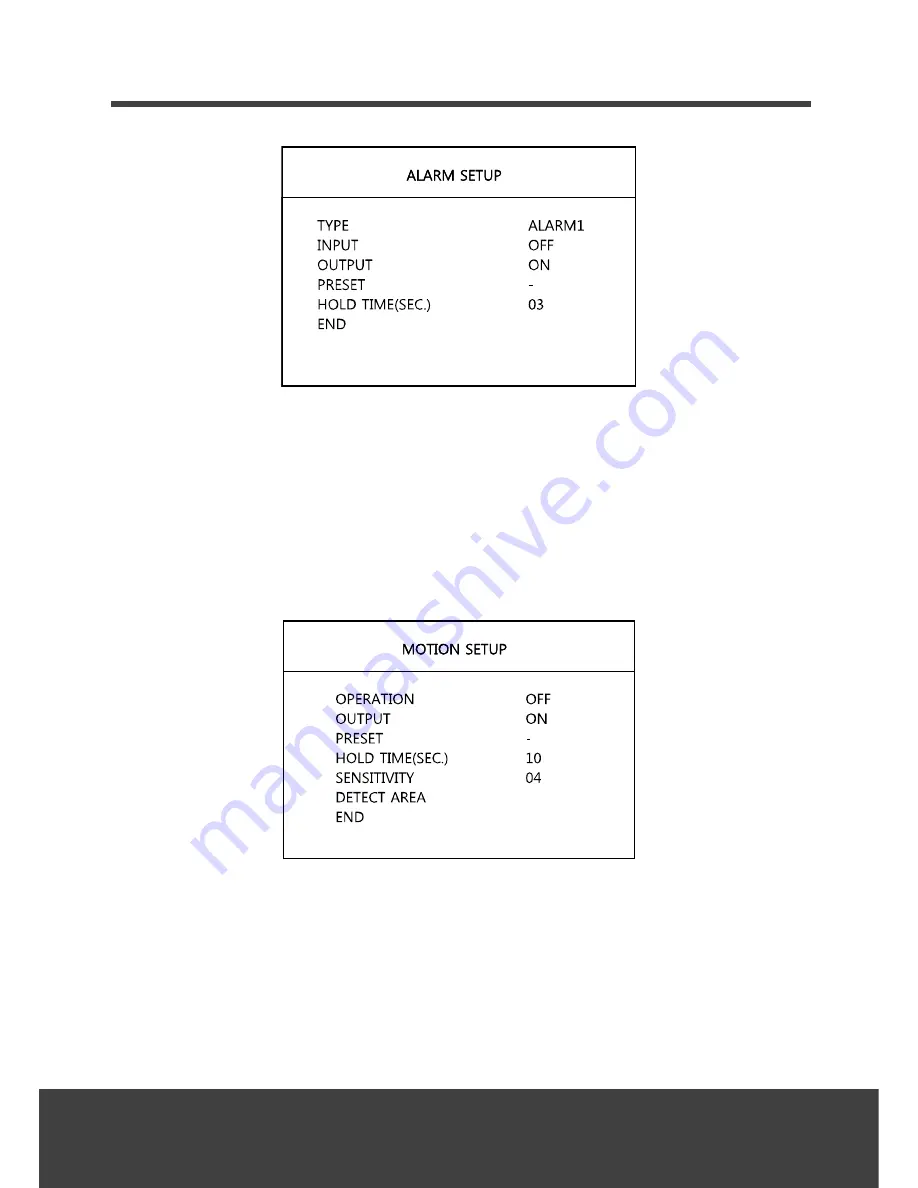
TYPE

: Set the desired alarm input number. ( ALARM1, ALARM2) 

INPUT

: Use this feature to designate dry contact relays (OFF, N/O and N/C) for alarm input.


OUTPUT

: Set to ON to activate the relay output for alarm. 

PRESET

: Select the desired preset number for alarm action. 

HOLD TIME

: Set the dwell time of the relay output for alarm output.(1~60seconds) 


MOTION: 

This camera has a feature that allows you to observe movements of objects on 

the screen, and motion icon appears on the screen when movement is detected. 


OPERATION

: Set to ON to enable the motion. 

OUTPUT

: Set to ON to activate the relay output during the motion action. 

PRESET

: Select the preset number after detecting the motion. 

HOLD TIME

: Set the dwell time of the motion action from 03 to 60 seconds. 

SENSITIVITY:

 Use this feature to select motion sensitivity from 1 to 8. 


Summary of Contents for XIN-VCL-0522

Page 1: ...INSTALLATION MANUAL ...

Page 2: ...re and software described herein at any time without prior notice No part of this guide may be reproduced transmitted transcribed stored in a retrieval system or translated into any language in any form by any means without prior written permission of us We make no warranties for damages resulting from corrupted or lost data due to a mistaken operation or malfunction of the Speed Dome Cameras peri...

Page 3: ...th arrowhead symbol within an equilateral triangle is intended to alert the user to the presence of uninsulated dangerous voltage within the product s enclosure that may be of sufficient magnitude to constitute a risk of electric shock to persons The exclamation point within an equilateral triangle is intended to alert the user to the presence of important operating and maintenance servicing instr...

Page 4: ...CAUSE HARMFUL INTERFERENCE TO RADIO COMMUNICATIONS OPERATION OF THIS EQUIPMENT IN A RESIDENTIAL AREA IS LIKELY TO CAUSE HARMFUL INTERFERENCE IN WHICH CASE THE USER WILL BE REQUIRED TO CORRECT THE INTERFERENCE AT HIS OWN EXPENSE CAUTION CHANGES OR MODIFICATIONS NOT EXPRESSLY APPROVED BY THE PARTY RESPONSIBLE FOR COMPLIANCE COULD VOID THE USER S AUTHORITY TO OPERATE THE EQUIPMENT THIS CLASS A DIGITA...

Page 5: ... obsolete outlet 9 Protect the power cord from being walked on or pinched particularly at plugs convenience receptacles and the point where they exit from the equipment 10 Only use attachments accessories specified by the manufacturer 11 Unplug this equipment during lightning storms or when unused for long periods of time 12 Refer all servicing to qualified service personnel Servicing is required ...

Page 6: ...TRODUCTION 7 CONTENT VERIFICATION 8 DIMENSIONS 8 ADJUSTING THE 3 AXIS BRACKET 9 WIRING DIAGRAM 10 REMOTE CONTROLLER KEYS DESCRIPTIONS 12 ADJUSTING THE LENS SETUP MENU 13 OSD MENU CONTROLS NAVIGATION 14 FOCUS 15 WB SETUP WHITE BALANCE SETUP 16 AE SETUP AUTO EXPOSURE SETUP 17 SPECIAL 18 DISPLAY 20 FUNCTION 21 IR RADIATOR 26 TECHNICAL SPECIFICATION 27 ...

Page 7: ...eep it handy for later use 580 TV Lines True Night Shot function with ICR Day Night Function Auto Focus Auto Iris DSS x256 0 2 Lux Color w Normal Mode 0 02 Lux B W 0 00 Lux IR LED On OSD for Camera Setup 8 programmable presets 4 privacy Home Function RS 485 Communication IR Remote Controller Optional Built in Optical 22X 3 9 85 8mm Digital 16X total X352 78 IR LEDs 1 Relay Out 2 Alarm In IR Adjust...

Page 8: ...the following items are included in the box 1 Integrated Camera 2 Sunshield 3 Remote Controller Optional 4 Instruction Manual 5 Mounting Hardware If any of these materials are missing please contact the vendor or customer service department immediately DIMENSIONS Unit Inch mm ...

Page 9: ...9 ADJUSTING THE 3 AXIS BRACKET Loosen the corresponding screws before attempting to make Pan Tilt and Rotation adjustments ...

Page 10: ...ra s power is off when connecting the cables The camera is supplied with second video output on the camera housing To use this feature along with a service monitor second monitor cable is required Using a RS 485 communication it will be able to control the ZOOM FOCUS and OSD menu from the controller or through the DVR RS 485 does not allow star connection layout It must be in a daisy chain configu...

Page 11: ...11 WIRING DIAGRAM CONNECTING TO THE CONTROLLER CONNECTING TO THE DVR ...

Page 12: ... ID Use CAM button to change the ID of the remote controller when controlling multiple cameras SAVE Saves preset position PRESET Recall preset Example To recall Preset 1 Press 1 and PRESET in sequence HOME Immediately calls Home function MENU Recalls On Screen Display Menu DOWN UP LEFT RIGHT ZOOM Zoom In Out FOCUS Adjusts focus IRIS Adjusts Iris Moves up down in the menu Moves left right in the me...

Page 13: ...u can also enter and make changes in the OSD Setup Menu VIA DVR Use the DVR s PTZ menu to adjust the zoom using the and You can also enter and make changes in the OSD Setup Menu NOTE Make sure that the RS485 connection is connected to the Controller or DVR VIA EZ CoaxTM transceiver Use the EZ Coax transmitter to adjust the zoom You can also enter and make changes in the OSD Setup Menu NOTE Use onl...

Page 14: ...ge is saved immediately except the communication menu Entering the Main Menu To enter the main menu press the MENU Key Entering and Navigating the Sub Menu To enter the sub menu from the Main menu press the Left Right key at the selected line While in the OSD menu scroll up down the available options by using the corresponding navigational keys Go to the Up Menu from the Sub Menu To go to the up m...

Page 15: ... use of the Auto Focus feature under heavy movement conditions will significantly shorten the lifespan of the lens MODE You can select the most suitable zoom mode ONE PUSH Focus is automatically adjusted just once after zoom position is set MANUAL After the desired field of view is set focus can be manually adjusted AUTO Focus is automatically adjusted with moving zoom D ZOOM When this feature is ...

Page 16: ...ode can be used within the color temperature range 3200 K OUTDOOR This mode can be used within the color temperature range 5600 K MANUAL To fine tune select the Manual mode You can increase or decrease the red or blue factor while monitoring the difference on the screen Increase or decrease the value of red R Gain and blue B Gain to achieve the best color while watching the changes in the picture ...

Page 17: ...manual mode IRIS It can be set the IRIS in the IRIS and manual mode AGC Auto Gain Control It can be set the gain in manual mode from 0 to 30 in the manual mode DSS Digital Slow Shutter This feature ensures clear images at low Lux environment Position the indicator over DSS Set DSS to the desired mode from X2 to X256 and OFF This value is the maximum slow shutter level BRIGHTNESS Use this feature t...

Page 18: ...g conditions DAY NIGHT Select between AUTO L Default AUTO M AUTO H COLOR B W COLOR Keeps Color mode B W Keeps B W mode AUTO L M H The camera automatically detects lighting conditions and selects the mode accordingly You can adjust the sensitivity for the IR Cut Filter lighting conditions SHARPNESS Increasing this value sharpens object edges Too high of a setting however produces noise and may obsc...

Page 19: ... reset your camera to factory default condition ACCESS CONTROL Use this mode to limit access to the Remote Controller REMOTE CONTROL The REMOTE CONTROL feature is set to ON for REMOTE CONTROL free operating mode But if it is set to OFF it is REMOTE CONTROL for limited operating mode PASSWORD CHECK The PASSWORD CHECK feature is set to ON pressing MENU to enter the main menu setup mode will display ...

Page 20: ...tered by pressing the MENU ENTER key while highlighting the desired letter number or symbol shown above The title entered will be displayed in real time in the TITLE section CAMERA ID Set to ON to display the ID of the camera FUNCTION NAME Set to ON to display the preset title of the camera ZOOM MAGNIFICATION Set to ON to display the zoom ratio of the camera for several seconds ...

Page 21: ...ned Preset function after the remote controller or the controller has been idle for programmed time FUNCTION Set the preset number for the home WAITING TIME Set the dwell time before it goes into Home Function 10 240SEC OPERATION Set to ON to execute the home ...

Page 22: ...ired preset number using LEFT RIGHT keys FOCUS Select the desired focus mode ONE PUSH AUTO MANUAL for preset IRIS Select the desired IRIS mode AUTO MANUAL for preset BACKLIGHT Select the desired backlight mode OFF LOW MID HIGH for preset TITLE Press right to enter the preset title mode After selecting the desired preset title using zoom keys press ESC to exit SAVE PRESET Press right to save the pr...

Page 23: ... output for alarm output 1 60seconds MOTION This camera has a feature that allows you to observe movements of objects on the screen and motion icon appears on the screen when movement is detected OPERATION Set to ON to enable the motion OUTPUT Set to ON to activate the relay output during the motion action PRESET Select the preset number after detecting the motion HOLD TIME Set the dwell time of t...

Page 24: ...ansparent block means active and gray block is inactive area The blinking gray block indicates current position Press MENU or ENTER key to complete and exit PRIVACY MASK Mask privacy area using this feature ZONE NO Select zone number for privacy mask 1 4 ENABLE Use this feature to enable on off MASK SIZE Use this feature to designate mask size for privacy only when the enable option is ON MASK TON...

Page 25: ... to enter the move screen 3 Mask size Adjustment Select direction will be highlighted and default will be TOP LEFT Change the target into BOTTOM RIGHT can be done by NEAR FAR button When the mask is not visible use the WIDE button to see it TOP LEFT Selected UP enlarge to TOP DOWN shrink in BOTTOM LEFT enlarge to LEFT RIGHT shrink in RIGHT BOTTOM RIGHT Selected DOWN enlarge to BOTTOM UP shrink in ...

Page 26: ... able to control the brightness per each line of LEDs Line 1 set up from 0 to 9 is set up of outside LED and Line 4 is inside 0 means that IR is turned off and 9 is the at IR s brightest mode Note For best result please adjust the IR LEDs intensity levels while viewing the changes on a monitor ...

Page 27: ...More than 50dB AGC off Day Night Function ICR IR LEDs 78 LED Distance Up to 300 ft Lens 22x A F Optical Zoom Lens 3 9 85 8mm 16X Digital Zoom Total 352X Angle of View 49 5 wide 2 4 tele Aperture Ratio F1 6 Wide F3 7 Tele Min Focus Distance 1m Camera Setup OSD Presets 8 Communication RS 485 Camera Control IR Remote Controller Controller Keyboard DVRs supported model EZ Coax Alarm Input 2 Input Rela...

Page 28: ...000000000000 ...

Reviews: