13. Using a vacuum pump, evacuate the system to a low micron reading. The typical
evacuation time is approximately 3 minutes per 3.5 Kw .
14. Check the system for leaks and recharge the system with refrigerant and oil as per the
equipment manufacturer’s recommendations.
15. Reconnect the electrical circuitry and test the system again following the manufacturers
recommendations.
16. Any unused Diversi-Flush™ Solvent can be stored in the injection tank and saved for
future use. Ensure all valves are closed on the injection tank to prevent solvent loss
during storage. Dispose of the waste solvent in accordance with national and local
waste disposal regulations.
Flushing Lines for R-22 to blended
HFC refrigerant Conversions
I. Equipment required
1. Diversi-Flush™ Kit including one 473 ml can of Diversi-Flush™ Solvent.
2. Re-sealable container to hold the contaminated flushed material.
3. Nitrogen tank with regulator.
4. Refrigerant recovery machine
5. Vacuum pump with accessories
6. Absorbent shop cloths, rubber gloves and safety goggles.
II. Detailed Instructions
1. Recover the refrigerant from system and disconnect and remove old equipment.
2. Make sure a re-sealable waste container is attached to the exit end of the lines to
capture the flushed material. Establish one end of the line set as the discharge point.
3. To maximise solvent contact time, restrict the flow at the discharge point. This will also
minimise the amount of solvent needed to thoroughly clean the system. For best results,
use the DiversiTech Line Set Flush Adapter to connect the liquid line and the suction line
at the disconnected indoor air handler. Inject solvent into the liquid line and collect
solvent at the suction line outdoors at the disconnected condensing unit.
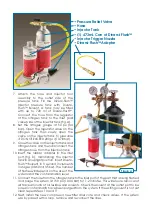
4. Attach the hose and injector tool assembly to the outlet side of the pressure tank. Fill
the Diversi-Flush™ Injector pressure tank with Diversi-Flush™ Solvent. A tank may be filled
with up to 720 ml of Diversi-Flush™. Connect the hose from the regulator of the nitrogen
tank to the inlet (ball valve) side of the injector tank (fig. A).
5. Set the pressure regulator on the nitrogen tank at 50 psi (3.4 bar), open the inlet valve at
the tank then slowly open the valve on the injector tank to pressurise it. DO NOT EXCEED
200 psi (13.78 bar).
6. After pressurising the Injection Tank, close the valve and disconnect the nitrogen fill
hose.
7. Line sets of different diameters, lengths and configurations will require different quantities
of Diversi-Flush™ Solvent to achieve complete removal of residual oils.
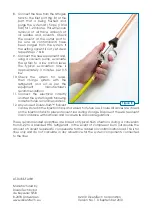
A. For liquid lines, a 473 ml can of Diversi-Flush™ will typically clean up to 150 metres of liquid
line: Insert the rubber adapter in the inlet of one of the line sets, maintaining the injector
tank in an upright position, inject Diversi-Flush™ Solvent in 3 second increments in stages.
The number of flushes will depend on the length of the line and the contamination level.
A typical line set will require 60 to 90 ml of Diversi-Flush™ to effectively remove the oil
residual in the line sets. Results will vary depending on contamination level.
B. For larger diameter pipes: Larger diameter line sets will require considerably more
Diversi-Flush™ Solvent due to increased volume of the larger pipes. The flushing process
will therefore require multiple 3 second injections of Diversi-Flush™ solvent to achieve
satisfactory results.


