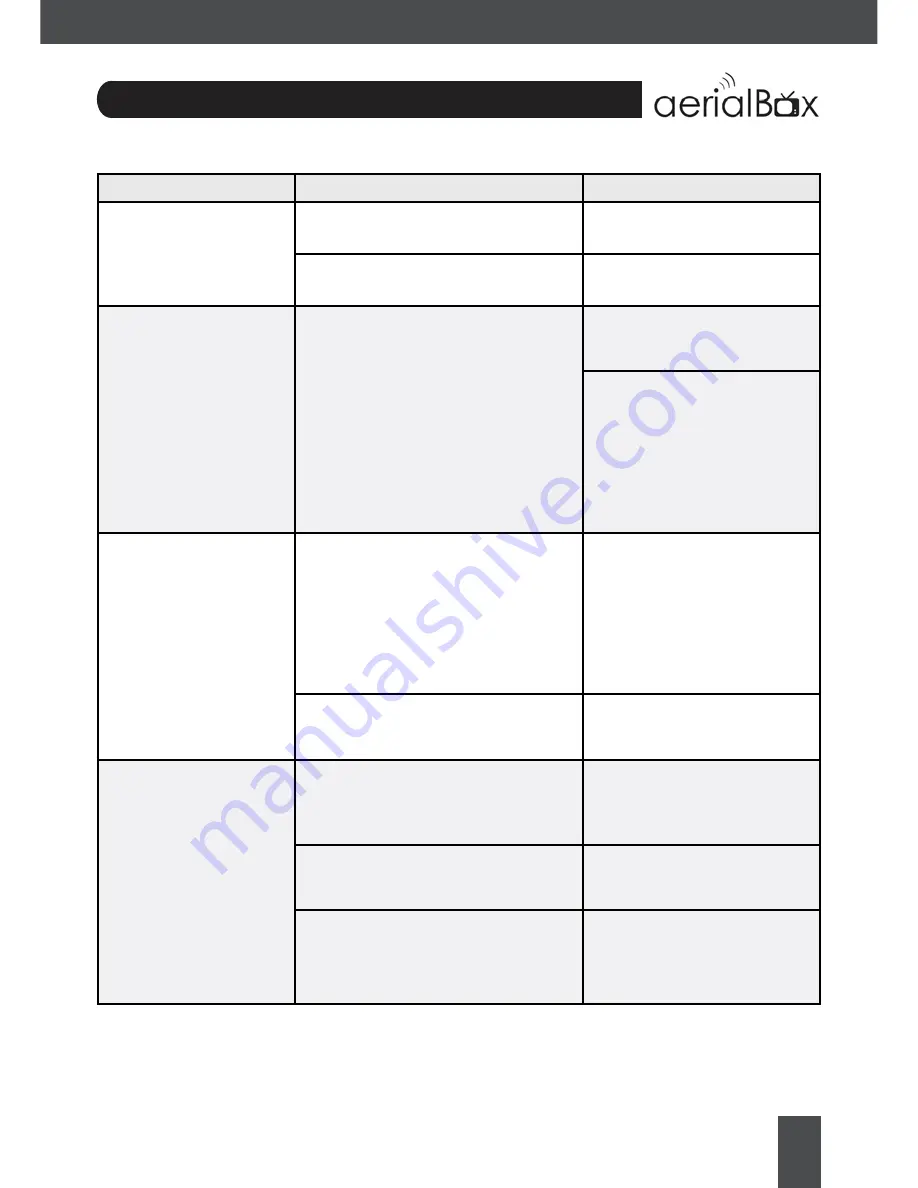
background image

27

Problem

Possible Causes

What to do

Power Indicator on front 

panel not lit.

Main Lead unplugged/switched off

Check that the adapter is 

plugged in and switched on. 

No picture on TV

Your TV isn’t able to display the current 

output format

Check to see if your TV is set to 

the current source. 

Go to Menu>Settings>


System Settings 

Adjust the resolution to suit the 

TV, sometimes HDMI cables 

can’t provide a 1080p picture 

to your TV. 

Tuning Failed or 


Database Empty

• 

Aerial cable not plugged in

• 

UHF Aerial may be misaligned


Plug in the UHF aerial into the 

ANT IN socket at the back of 

the receiver. 

Align the UHF aerial to your 

closest transmitter, ensure that 

there are no objects that could 

interrupt the signal path.

You might be located in an area 

which has very limited or no Freeview 

Terrestrial coverage

You might need a higher aerial 

but please consult your retailer 

or local installer about this. 

Remote Control is not 

responding /working

No batteries or batteries incorrectly 

inserted into the back of  the remote

Insert the supplied 2x AAA 

Batteries into the back of the 

remote.

Batteries are flat

Replace batteries with new 

ones. 

The Infrared receiver on the T2100 

receiver is obstructed (Front panel 

blocked by objects)

Check that there is a clear line 

of sight between the front panel 

and your remote control, move 

objects if necessary. 

Troubleshooting

Summary of Contents for Freeview plus

Page 1: ...User Manual T2100...

Page 2: ......

Page 3: ...nual This product is capable of receiving and decoding Dolby Digital Plus Manufactured under license from Dolby Laboratories Dolby and the double D symbol are trademarks of Dolby Laboratories This Fre...

Page 4: ...Main Menu Channel Organiser User Preference System Settings Network Setup Time Settings Recorder Settings WakeupTimer 12 13 14 15 15 16 17 Electronic Programme Guide Freeview 8 Day EPG Weekly EPG 18...

Page 5: ...5 Frequently Asked Questions 26 Troubleshooting 27 SupportInformation 28 Warranty Information 29 Firmware Upgrading via USB Upgrading via Network Upgrading via Over the Air 25 25 25...

Page 6: ...0p HD output via HDMI Composite AV output for non HDTV s Subtitles and Audio Description when available Catchup Apps What s in the box Please check to see whether you have all the following in this bo...

Page 7: ...HERNET PORT For wired Internet Connectivity 4 USB Firmware Upgrade HDD Connection 5 HDMI 6 R L and CVBS AV Output non HD TV 7 Pb Pr and Y SPDIF Surround Sound System 8 DC 12V Connect the 230V 12v Adap...

Page 8: ...pps 9 EPG Electronic Programme Guide 10 Cursor Selects options in the menu 11 OK Confirms selection in menu on screen displays 12 Menu Brings up the Main Menu 13 Exit Exits menus or screens 14 Color B...

Page 9: ...D Ready TV It s best to check that your UHF aerial is aligned to your closest transmitter and that the aerial can withstand any strong weather Connecting using an AV Cable If your TV doesn t have HD c...

Page 10: ...e Receiver will take some time for it to boot up as part of the initial installation Plug in and switch on 2 The welcome screen should appear on your TV Ensure you have your Country Region and your As...

Page 11: ...ls in the receiver Organiser Manage and organise channels and favorites User Settings Change receiver settings such as HDMI Aspect ratio etc PVR View recorder options such as Media Info Library and Bo...

Page 12: ...eys on the remote 4 On your remote press the corresponding color Red Lock Channel To view the locked channel enter in your password Green Skip Channel Will skip the channel when pressing the Channel a...

Page 13: ...nter your password Default is 0000 2 Adjust the Parental Rating by pressing either the Yellow or Blue buttons 3 You can also change the password for more security please note you need this password wh...

Page 14: ...defaulted broadcast resolutions Aspect Ratio You can set the output picture shape depending on what kind of TV you have 16 9 Suits most newer LCD LED and Plasma TVs 4 3 Suits older conventional square...

Page 15: ...or a WiFi network Automatically or you can enter it in manually 4 Select your WiFi network and enter in the network password using the keys on your remote Ethernet Cable LAN Connect an Ethernet cable...

Page 16: ...w many minutes before your program the unit can start recording The default is currently at 1 Minute Rec Stop Time Offset Adjust how many minutes after your program the unit can stop recording The def...

Page 17: ...t the unit to wake up on a channel at the set time without recording set this to Services 3 Set the channel you want to record or set the message you want to appear at the set day and time 4 Set the D...

Page 18: ...round the guide using the on screen navigation buttons which you can use on your remote To close the EPG press EXIT Weekly EPG As well as the Freeview EPG you can access the built in Electronic Progra...

Page 19: ...ANCED TV GUIDE Launching FreeviewPlus Launching FreeviewPlus is easy You will need to be one of the following channels to see the FreeviewPlus prompt TV One TV2 TV3 FOUR The Plus 1 Channels and The Ed...

Page 20: ...les User Options Audio Descriptions Under User Options select Audio Selection Use the up and down arrow keys on the remote to locate the language that features the small icon then press OK You will th...

Page 21: ...nnel groups visit www dishtv co nz Instant Recording 1 Press the REC button on the remote to initiate the recording 2 You can manually adjust the record duration using the buttons or leave it to the d...

Page 22: ...you wish to record the whole series Yellow or just this episode Blue 4 Once you have a recording set you will a small R or S in red beside the program name R indicates the single recording will be ma...

Page 23: ...cording set you will a small icon on the right hand side of the program name 5 To cancel a recording simple press the red button again and confirm Series Recording Single Recording Need Help You will...

Page 24: ...m the beginning or from your last viewed position Delete Multiple Recordings 1 Select each recording by pressing the Yellow button 2 Press the Red Button to delete the recordings View Booked Recording...

Page 25: ...via Internet You need to be connected to the Internet before you start visit Page X for info 3 Press Menu and then Admin 4 Select Network Software Upgrade 5 The unit will connect to the server and wi...

Page 26: ...e channels A Please check the answer tot he first question and consult a local installer Q What is the default PIN code A The default PIN is 0000 Q I have recorded something but a group of channels ar...

Page 27: ...of the receiver Align the UHF aerial to your closest transmitter ensure that there are no objects that could interrupt the signal path You might be located in an area which has very limited or no Free...

Page 28: ...ion Call Us Call our team during our usual working hours at 0800 DISH TV 0800 347 488 Monday Friday 9am 5pm We also have a local number 07 929 4123 0800 347 488 Email Us Email our team at any time at...

Page 29: ...anty is subject to the following provisions This is only valid in New Zealand The product must be correctly connected and operated in accordance with the instructions contained in the manual This prod...

Page 30: ......

Reviews: