background image

21

Firmware Upgrade

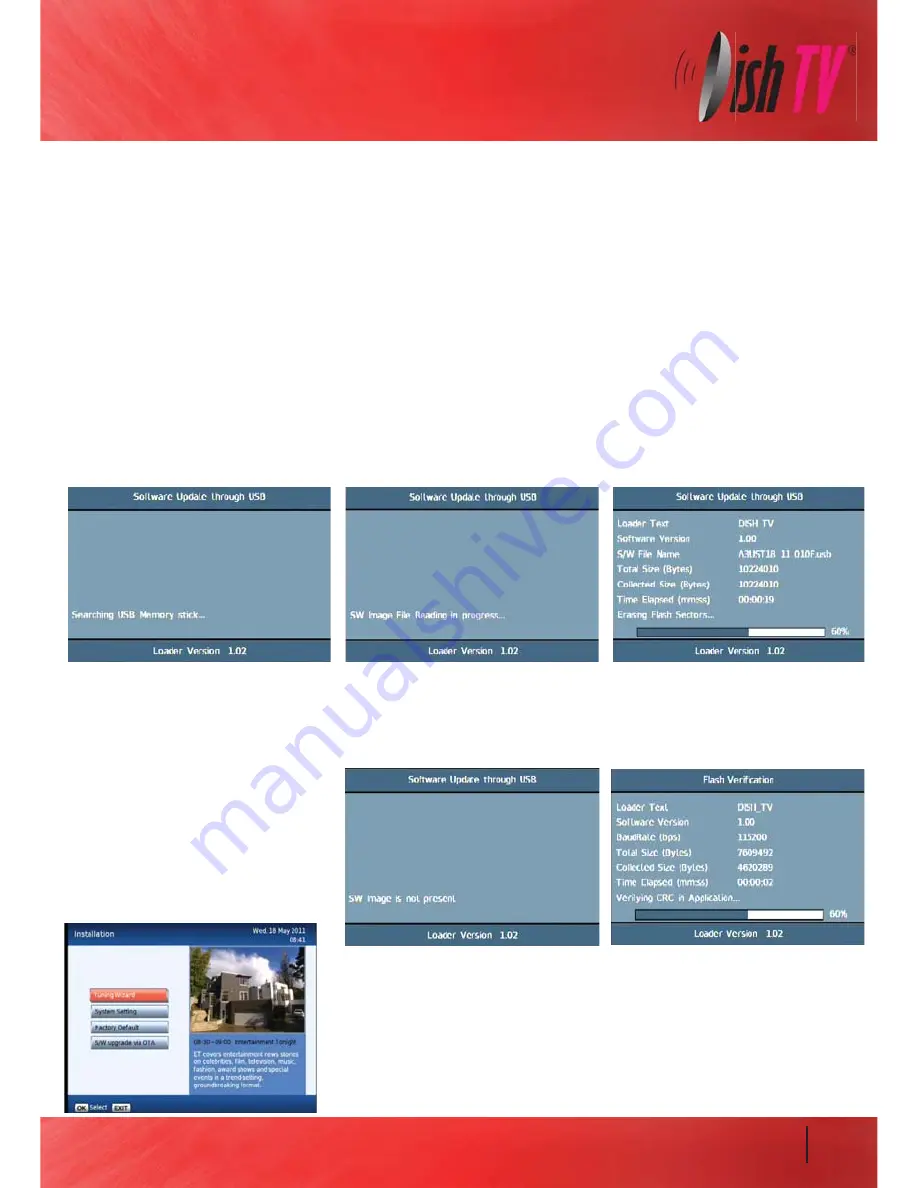
If the firmware upgrade was incorrectly place on the USB it will also come up with the “Searching USB Memory Stick...”
message, the difference is the next message will say “SW Image is not present” it will then quickly display the Flash 
Verification screen which will last only a few seconds.  If this happens double check to see if the firmware files are 
correctly in a folder called 

DISHTV_7167 

on your USB drive.

S/W Upgrade OTA:

This is Software Upgrade over the air. This will only work if the upgrade is being 
broadcast. It can be selected from the “Installation” option in the Main Menu.

Via USB:

One way to perform a firmware upgrade of your receiver is via USB using the USB port in the back.
To do this just follow the instructions below...

1. Download firmware from 

www.dishtv.co.nz

 and extract (unzip) onto a USB flashdrive in a folder called 

DISHTV_

7167

2. Turn your aerialBox-Ultra onto standby with the button on the front, insert the flashdrive. 
3. Push the power button, then 

Immediately

 start Pulsing the “

Menu

” button on your remote (not holding it down)

    Keep pulsing until the front display reads USB, then you can stop and let the unit load the firmware.

The receiver will first display “Load” and if done correctly the display on the front will show “USB” after about 3 seconds.
On screen at the same time it will present a window headed “Software Update through USB”
If the upgrade has been loaded correctly onto the USB flashdrive it will come up with ”SW Image File Reading in 
progress...” straight after it displays “Searching USB Memory stick...”
Then to a couple of loading screens which will take about 3 minutes to complete.

Summary of Contents for aerialBox-ultra T1050PVR

Page 1: ...User Manual aeria aerialB x ultra ultra...

Page 2: ...as well as detailed Freeview program information with the Freeview 8 Day Electronic Program Guide For more information about Freeview visit www freeviewnz tv A Freeview Digital Set Top Box gives you...

Page 3: ...AV Cable USB Firmware upgrade HDD connection RF IN UHF Aerial input RF OUT UHF Signal output 3 DC 12V Connect 230V 12v adapter...

Page 4: ...stallation Tuning Wizard Auto Scan Manual Scan System Configuration ESG Recording Recording Library Connectivity eNet Buttons eWeather eMap eMail Firmware Upgrade Troubleshooting Technical Specificati...

Page 5: ...Pause Pause playback Record Record a programme Stop Beginning End Stops playback Fast Forward Rewind playback 5 Exit...

Page 6: ...your set top box between the yellow red and white sockets on the back panel of your set top box and the AV input on your TV Connect that cable that comes from your Satellite dish to the SAT IN socket...

Page 7: ...Please make sure you don t have a USB device plugged in while going through the setup process Once you are setup you can then plug your device in Switch your TV On and select the correct video input 7...

Page 8: ...the gateway for all other menus User can invoke the main menu by pressing the MENU key This main menu contains several options User Settings Installation System Configuration ESG MEDIA Manager Connec...

Page 9: ...essing channel button Delete Deletes a channel off list can be Configured only from this menu Favourite View Channels related setting allowing you to view your favourite channel list Allowing you to c...

Page 10: ...grade via OTA Software upgrade via over the air This option will only work when the software is being broadcast over the air 10 By selecting Tuning Wizard you will be asked to input your password the...

Page 11: ...Scan When the OK key is pressed the confirmation dialog will be displayed Select the Yes option to start the scanning process The Scan progress will be displayed along with the Signal Strength and qu...

Page 12: ...een will display any channels found and once complete prompt if you want to save the changes Manual Scan The strength bar shows the signal strength of the current frequency Press OK to start scanning...

Page 13: ...by pressing the OK key The highlighted programme will be added to the timer menu The User can select the start time duration for wakeup timer Can also choose Timer record from here If you select the w...

Page 14: ...on from the Main Menu It will list down the available services and when focus is set to the current service then its corresponding current and next events are displayed In the ESG schedule dialog if I...

Page 15: ...record Wakeup Timer Recording From here you can manually set timer recordings This is done through Main Menu System Configuration Wakeup Timer By going down to the Waking Mode and scrolling across to...

Page 16: ...you can select the programme you wish to play To sort rename delete recordings follow on screen instructions By pressing the Library button LIB a second time the Thumbnail browser menu of your video...

Page 17: ...ows you to log in to your email address to send recieve messages view attached files All of the eNet features require an internet connection via the LAN port on the rear panel of the aerialBox Ultra T...

Page 18: ...buttons Use SMS type entry using number keys keyboard to enter letters Press the OK key to load the weather page Press Blue key to change the view between Celsius Fahrenheit and Kelvin Press the info...

Page 19: ...ns Use SMS type entry using number keys keyboard to enter letters Type in the area you wish to search and press OK for the map to start loading Press the Blue key to zoom in on the map Yellow to zoom...

Page 20: ...of this digital receiver Profile Entry Use Green Key to change the keypad mode uppercase special characters numbers Use Info Key for navigate between the different text boxes like a tab key The Back k...

Page 21: ...his just follow the instructions below 1 Download firmware from www dishtv co nz and extract unzip onto a USB flashdrive in a folder called DISHTV_7167 2 Turn your aerialBox Ultra onto standby with th...

Page 22: ...re is a clear line of sight from the remote to the sensor on the front panel Picture is distorted too wide or narrow Wrong TV shape is set Go to Main Menu Installation System Setting Aspect Ratio make...

Page 23: ...23 YUV via RCA sockets For internet connection Composite via RCA sockets T1050 Max 10w 100 Designed to receive Freeview HD high definition broadcasts via a UHF antenna...

Page 24: ...supplier and have your receipt This warranty is subject to the following provisions This is only valid within New Zealand The product must be correctly connected and operated in accordance with the i...

Page 25: ...25...

Reviews: