background image

16

5 Maintenance

5

Maintenance

5.1

Emptying the dust container

„

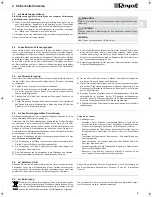
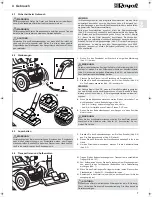
It is best to empty the dust container after each vacuuming session.

„

Empty the dust container at the latest 

- when the cleaning indicator (Fig. 8/A1) flashes red; 
- if the "MAX" marking (Fig. 8/B1) has been reached; or 
- before sending the appliance or storing it for a long period.

1.

Switch off the appliance, 

Z

Chapter 4.3, "Switching off"

.

2.

Press the release catch for the dust container (Fig. 8/A2) and remove
the dust container from its console. 

3.

Empty the dust container by holding it low over a dustbin and only then
press the release button (Fig. 8/B).

4.

If the dust container and cyclone unit are still dirty after being emptied,
proceed as described in 

Z

Chapter 5.2, "Cleaning the dust container

and cyclone unit"

.

5.

Otherwise put the bottom on and put the dust container back into its re-
ceptacle. Check that it is securely fitted.

5.2

Cleaning the dust container and cyclone unit

1.

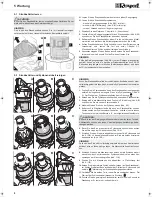
Rotate the cyclone unit and the dust container in opposite directions,
thus unlocking the cyclone unit (Fig. 9/A). The arrow on the cyclone unit
moves in the ‘

’ direction.

2.

Take the cyclone unit up out of the dust container.

3.

Release the collar by turning it in the direction of the arrow (Fig. 9/B)
and remove it from the cyclone unit.

4.

Take the screen off the cyclone unit (Fig. 9/C).

5.

Remove any residual dust still clinging to the dust container and cy-
clone unit components using a dry cloth or a soft brush, e.g. the sup-
plied furniture brush. 

6.

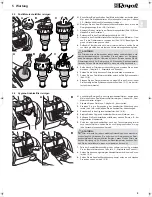
Before you slide the screen back onto the cyclone unit, pay attention to
the position of the two locking tabs (Fig. 10/A).

7.

Slide the screen back onto the cyclone unit as shown (Fig. 10/B) so that
the recesses in the screen fit the two locking tabs (Fig. 10/C).

8.

Also push back the collar onto the cyclone unit so that both locking tabs
on the cyclone unit fit into the two recesses of the collar (Fig. 11/A).

9.

Tighten the collar by turning in the direction of the arrow (Fig. 11/B).

10.

Place the cleaned cyclone unit back on the dust container. Make sure
that the arrow on the cyclone unit and the ‘

’ mark on the dust con-

tainer are opposite one another. 

11.

Connect both parts by turning them towards one another. The arrow on
the cyclone unit moves in the ‘

’ direction.

12.

Push the cleaned dust container back into its receptacle in the vacuum
cleaner. You will feel and hear it snap into place.

ATTENTION:

Switch off the appliance before emptying the dust container. This will
prevent dust from damaging the appliance.

NOTE:

You can dispose of the contents of the dust container with your regular
domestic waste as long as it does not contain any substances not per-
mitted in domestic waste.

A

2

B

MAX

MAX

1

1

MAX

2

8

NOTE:

If the cleaning indicator (Fig. 8/A1) flashed red before the cleaning work
was carried out, then it will still flash red slowly for 20–30 seconds (self-
analysis mode) when the appliance is switched back on before changing
to green (operational).

A

B

C

9

A

B

C

10

A

B

C

11

NOTE:

If the dust container can no longer be completely cleaned by simply
opening the bottom, the cyclone unit has to be removed.

ATTENTION:

Refrain from cleaning with water or a damp cloth. Otherwise, loose con-
taminants could turn into caking that is very difficult to remove.

NOTE:

If the screen is not completely below both the locking tabs, you will not
be able to put the collar on correctly.

M5080.book  Seite 16  Dienstag, 24. April 2012  10:48 10

Summary of Contents for EQU Turbo Silence

Page 1: ...leaner Mode d emploi Aspirateur tra neau multicyclone Bedieningshandleiding Multicycloon stofzuiger Manual de instrucciones Aspiradora rodante multicicl n Istruzioni per l uso Aspirapolvere multiciclo...

Page 2: ...2 DE GB FR NL ES IT TR Bedienungsanleitung 4 11 Operating Manual 12 19 Mode d emploi 20 27 Bedieningshandleiding 28 35 Manual de instrucciones 36 43 Istruzioni per l uso 44 51 Kullanim Klavuzu 52 59...

Page 3: ...3 15 5 6 21 14 16 19 13 12 11 22 9 10 17 3 2 20 18 8 4 7 1 23 24 1...

Page 4: ...eren 6 4 Gebrauch 7 4 1 Sicherheit beim Gebrauch 7 4 2 Staubsaugen 7 4 3 Ausschalten 7 4 4 Transportieren und Aufbewahren 7 5 Wartung 8 5 1 Staubbeh lter leeren 8 5 2 Staubbeh lter und Zykloneneinheit...

Page 5: ...e Verl ngerungskabel keine Mehrfachsteckdosen die f r die Leistungsaufnahme des Ger ts ausgelegt sind Kontrollieren Sie das Stromkabel vor dem Benutzen auf eventuelle Be sch digungen 2 4 zur bestimmun...

Page 6: ...hr auf die gew nschte L nge Zum Verriegeln lassen Sie die Teleskoprohr Arretierung beim Ziehen los Sie h ren ein deutliches Klicken ACHTUNG Transportieren versenden Sie das Ger t grunds tzlich in der...

Page 7: ...einerlei Gegenst nde das Teleskoprohr den Saugschlauch oder andere ffnun gen verstopfen HINWEIS Ihr Staubsauger besitzt eine integrierte Schutzfunktion die das Ger t automatisch abschaltet bevor es be...

Page 8: ...tiernasen Abb 10 A 7 Schieben Sie das Sieb wie abgebildet zur ck auf die Zykloneneinheit Abb 10 B so dass die Aussparungen im Sieb die beiden Arretierna sen passieren Abb 10 C 8 Schieben Sie auch die...

Page 9: ...reinigen 1 Schalten Sie das Ger t aus ZKapitel 4 3 Ausschalten 2 Schieben Sie die Entriegelung der Ausblasfilter Abdeckung nach rechts Abb 14 A und klappen Sie die Ausblasfilter Abdeckung ab 3 Entneh...

Page 10: ...n Sie zudem die Komponenten des Staubbeh lters reinigen ZKapitel 5 2 Staubbeh lter und Zykloneneinheit reinigen und ZKapitel 5 3 Dual Motorschutzfilter reinigen 6 L sen Sie bei dieser Gelegenheit sogl...

Page 11: ...die Garantie und sind deshalb kostenpflichtig Die Gew hrleistung tritt nur in Kraft wenn das Kaufdatum durch Stempel und Unterschrift des H ndlers auf der Garantiekarte best tigt ist oder eine Rechnu...

Page 12: ...4 4 Use 15 4 1 Operational safety 15 4 2 Vacuum cleaning 15 4 3 Switching off 15 4 4 Transport and storage 15 5 Maintenance 16 5 1 Emptying the dust container 16 5 2 Cleaning the dust container and cy...

Page 13: ...xtension cords no multi socket distributors designed for the power consumption of the appliance Always check the power cord for possible damage before using the ap pliance 2 4 About appropriate use Th...

Page 14: ...Then extend the telescopic tube to the desired length Let go of the release catch while pulling until it locks in place You will hear a distinct click ATTENTION Always transport or ship the appliance...

Page 15: ...y fitted Make sure that no objects obstruct the telescopic tube the suction hose or other openings NOTE Your vacuum cleaner has an integrated protective function which turns the appliance off automati...

Page 16: ...o locking tabs Fig 10 A 7 Slide the screen back onto the cyclone unit as shown Fig 10 B so that the recesses in the screen fit the two locking tabs Fig 10 C 8 Also push back the collar onto the cyclon...

Page 17: ...Chapter 5 3 Cleaning the dual motor protection filter 1 Switch off the appliance ZChapter 4 3 Switching off 2 Slide the release catch of the exhaust filter cover to the right Fig 14 A and open the exh...

Page 18: ...being empty then you also have to clean the components of the vacuum cleaner ZChapter 5 2 Cleaning the dust container and cyclone unit and ZChapter 5 3 Cleaning the dual motor protection filter 6 Tak...

Page 19: ...Royal Appliance make the warranty null and void Consumable parts are not included in the warranty and therefore must be purchased by the customer The warranty is only valid if the date of purchase has...

Page 20: ...tion 22 3 1 D ballage 22 3 2 S lection des suceurs et brosses 22 3 3 Montage 22 4 Utilisation de l appareil 23 4 1 S curit lors de l utilisation de l appareil 23 4 2 Utilisation de l aspirateur 23 4 3...

Page 21: ...ion est endommag avant de vous servir de l appareil 2 4 concernant les conditions d utilisation respecter Cet aspirateur tra neau doit seulement tre utilis dans un cadre domes tique Toute utilisation...

Page 22: ...qu il atteigne la longueur souhait e Pour pro c der au verrouillage rel chez l arr t du tube t lescopique pendant que vous le tirez Vous entendez alors clairement un clic ATTENTION Transportez et exp...

Page 23: ...parfait tat secs et bien ins r s Assurez vous qu aucun objet n obstrue le tube t lesco pique le tuyau d aspiration ou d autres ouvertures REMARQUE Votre aspirateur dispose d une fonction de protection...

Page 24: ...ux tenons de blocage Ill 10 A 7 Ins rez nouveau selon l illustration le tamis sur l unit cyclone Ill 10 B de telle mani re que les videments du tamis soient face aux deux tenons de blocage Ill 10 C 8...

Page 25: ...filtre Dual de protection du moteur 1 Arr tez l appareil ZChapitre 4 3 Arr t de l appareil 2 Faites coulisser vers la droite le d verrouillage du couvercle du filtre de sortie d air Ill 14 A et ouvrez...

Page 26: ...vous faut en plus nettoyer les composants du bac poussi re ZChapitre 5 2 Nettoyage du bac poussi re et de l unit cyclone et ZChapitre 5 3 Nettoyage du filtre Dual de protection du moteur 6 S parez al...

Page 27: ...n de pi ces d tach es ne provenant pas de Royal Appliance les droits de garantie deviennent caducs Les pi ces sujettes usure sont exclues de la garantie et leur remplacement est payant La garantie s a...

Page 28: ...uk kiezen 30 3 3 In elkaar zetten 30 4 Gebruik 31 4 1 Veiligheid bij het gebruik 31 4 2 Stofzuigen 31 4 3 Uitschakelen 31 4 4 Transporteren en opbergen 31 5 Onderhoud 32 5 1 Stofbak leegmaken 32 5 2 S...

Page 29: ...eid gecontroleerde spatwaterdichte enkele verlengkabels geen meervoudige contactdozen die zijn ontworpen voor de vermogensopname van het apparaat Controleer de stroomkabel op eventuele beschadigingen...

Page 30: ...e lengte Om te vergrendelen laat u de telescoopbuis vergren deling los terwijl u trekt U hoort een duidelijk klikgeluid OPGELET Transporteer verzend het apparaat steeds in de originele verpakking zoda...

Page 31: ...een voorwerpen de telescoopbuis de zuig slang of andere openingen verstoppen AANWIJZING Uw stofzuiger beschikt over een ge ntegreerde beschermingsfunctie die het apparaat automatisch uitschakelt voord...

Page 32: ...en waar de 2 uitstulpingen afb 10 A zich bevinden 7 Schuif het zeef zoals afgebeeld terug op de cyclooneenheid afb 10 B zodat de uitsparingen in het zeef over de twee uitstulpingen heen glijden afb 10...

Page 33: ...r reinigt Zhoofdstuk 5 3 Dual mo torbeschermingsfilter reinigen 1 Schakel het apparaat uit Zhoofdstuk 4 3 Uitschakelen 2 Schuif de ontgrendeling van de afdekking van het uitblaasfilter naar rechts afb...

Page 34: ...ofdstuk 5 2 Stofbak en cyclooneenheid reinigen en Zhoofdstuk 5 3 Dual mo torbeschermingsfilter reinigen 6 Maak bij deze gelegenheid ook meteen even mondstuk telescoopbuis en zuigslang los van het appa...

Page 35: ...ma die niet door ons is geautoriseerd of bij het gebruik van andere dan de originele Royal Appliance reserveonderdelen vervalt de garantie Slijtagedelen vallen niet onder de garantie en moeten daarom...

Page 36: ...obera 38 3 3 Montaje 38 4 Uso 39 4 1 Seguridad durante el uso 39 4 2 Aspirar el polvo 39 4 3 Desconexi n 39 4 4 Transportar y guardar 39 5 Mantenimiento 40 5 1 Vaciar el dep sito de polvo 40 5 2 Limpi...

Page 37: ...jas de enchufes m ltiples protegidos contra chorros de agua con certificaci n GS que est n dise ados para la toma de potencia del aparato Antes de usar el cable el ctrico controle que no est da ado 2...

Page 38: ...l inmovilizador del tubo telesc pico hacia abajo A continuaci n tire el tu bo telesc pico hasta la longitud deseada Para bloquear suelte el in movilizador del tubo telesc pico al tirar de ste Escuchar...

Page 39: ...l tubo tele sc pico la manguera de aspiraci n u otras aberturas no est n obstrui dos por ning n objeto ADVERTENCIA Su aspiradora est dotada de una funci n de protecci n interna que apaga el aparato au...

Page 40: ...rrecto de las 2 salientes de bloqueo Fig 10 A 7 Reinserte la criba como se demuestra en la unidad de cicl n Fig 10 B posicionando las entalladuras de la criba de manera que encajen en las dos saliente...

Page 41: ...e limpie el filtro dual de protecci n del motor ZCap tulo 5 3 Limpiar el filtro dual de protecci n del motor 1 Desconecte el aparato ZCap tulo 4 3 Desconexi n 2 Deslice el desbloqueo de la cubierta de...

Page 42: ...y reco nectado el aparato deber limpiar tambi n los componentes del de p sito de polvo ZCap tulo 5 2 Limpiar el dep sito de polvo y la unidad de cicl n y ZCap tulo 5 3 Limpiar el filtro dual de prote...

Page 43: ...imientos no au torizados por nosotros o se utilicen piezas de recambio que no sean las ori ginales de Royal Appliance se extinguir la garant a Las piezas de des gaste no est n incluidas en la garant a...

Page 44: ...so 46 3 1 Disimballo 46 3 2 Scelta della bocchetta 46 3 3 Montaggio 46 4 Uso 47 4 1 Sicurezza nell uso 47 4 2 Aspirare la polvere 47 4 3 Spegnimento 47 4 4 Trasporto e conservazione 47 5 Manutenzione...

Page 45: ...senza prese multiple con marchio GS protette dagli spruzzi d acqua e dimensionate per la potenza assorbita dall apparecchio Prima dell uso controllare che il cavo elettrico non presenti danni 2 4 sul...

Page 46: ...e il tubo telescopico alla lunghezza desiderata Per effettuare il bloccaggio durante l estrazione rilasciare l arresto del tubo telescopico Si sentir un clic percettibile ATTENZIONE In linea di princi...

Page 47: ...tubo tele scopico il flessibile di aspirazione o altre aperture INDICAZIONE L aspirapolvere dotato di una funzione di protezione integrata che spe gne automaticamente l apparecchio prima che si possa...

Page 48: ...ne alla posizione dei 2 nasetti di arresto Fig 10 A 7 Reinserire il cestello sull unit ciclone Fig 10 B come illustrato di mo do che le rientranze del cestello oltrepassino i due nasetti di arresto Fi...

Page 49: ...lizia del doppio filtro di protezione del motore 1 Spegnere l apparecchio ZCapitolo 4 3 Spegnimento 2 Premere verso destra lo sblocco del coperchio del filtro dell aria uscen te Fig 14 A e aprire il c...

Page 50: ...ggiare in rosso per pi di 30 secondi necessario pulire anche i componenti dell aspirapolvere ZCapitolo 5 2 Pulizia del contenitore della pol vere e dell unit ciclone e ZCapitolo 5 3 Pulizia del doppio...

Page 51: ...utilizzo di ricambi diversi da quelli originali di Royal Appliance comportano il decadere della garan zia I componenti soggetti a usura non sono coperti da garanzia e sono quindi a pagamento La garan...

Page 52: ...an m 55 4 1 Kullan m esnas nda g venlik 55 4 2 S p rme 55 4 3 Kapatma 55 4 4 Ta ma ve kald rma 55 5 Bak m 56 5 1 Toz kab n bo altma 56 5 2 Toz haznesini ve cyklon birimini temizleme 56 5 3 Dual motor...

Page 53: ...rt me suya kar korumal basit uzatma kablolar oklu prizler de il kul lan n Elektrik kablosunu kullan m ndan nce olas hasarlara ili kin olarak kontrol edin 2 4 Amaca uygun kullan ma ili kin olarak Elekt...

Page 54: ...k boru kilidini a a ya bast r n Teleskobik boruyu arzu etti iniz uzunlu a ekerek ayarlay n Kilitleme i in teleskobik boru kilidini eker ken b rak n Belirgin bir klik sesi duyacaks n z Dikkat Cihaz zar...

Page 55: ...l klar t kamamas n sa lay n A klama Elektrik s p rgeniz a r s nmadan nce rne in t kanm emme yol lar seviyesi zerinde dolmu bir toz haznesi veya zensiz ekilde bak m yap lan bir Dual motor koruma filtre...

Page 56: ...dikkat edin Res 10 A 7 Ele i resimdeki gibi cyklon birimi zerine geri itin Res 10 B b ylece elekteki bo luklar her iki kilit k nt s n ge erler Res 10 C 8 Man eti de cyklon birimi zerine cyklon birimin...

Page 57: ...Cihaz kapat n ZB l m 4 3 Kapatma 2 D a fleme filtresi kapa n n kilidini sa a Res 14 A itin ve d a fle me filtresi kapa n katlayarak a n 3 Hijyenik d a fleme filtresini kar n Res 14 B 4 Hijyenik d a f...

Page 58: ...on birimini temizleme ve ZB l m 5 3 Dual motor koruma filtresini temizleme 6 Bu f rsatla hemen s p rme par as n teleskobik boruyu veya emme hor tumunu cihazdan kar n ve olas t kanmalar rne in bir s p...

Page 59: ...ilmeyen yerler taraf ndan yap lan m dahalelerde veya orijinal Royal Appliance yedek par alar d nda par alar n kullan m nda garanti iptal olur A nabilir par alar garanti kapsam na dahil de ildir ve bu...

Page 60: ...enraa info whitebrown eu Support adresse WhiteBrown A S c o BSL Baltship Seatainers Logistics Egeskovvej 6 DK 8700 Horsens info whitebrown eu Helpdesk nummer Tel 45 73326150 Recambios online www recam...

Page 61: ...DO SOLO SE CORREDATO DA UNA COPIA DELLA FATTURA SADECE FATURA SURET LE GE ERL D R Absender Bitte Blockschrift in Gro buchstaben From Please print in capitals Exp diteur Veuillez crire en caract res d...

Page 62: ...buitenland dus buiten Duitsland richten zich naar de prijzen van de betreffende buitenlandse aanbieders en de betreffende actuele tarieven 0 14 minuto desde la red fija alemana precio m ximo alem n pa...

Reviews: