background image

14

3 Maintenance and care

3.2 Cleaning / changing the exhaust filter

1.

Switch off the appliance (

).

2.

Pull the plug out of the plug socket.

3.

Unlock the exhaust filter cover as shown (Fig. 31).

4.

Remove the exhaust filter (Fig. 32). 

5.

Rinse out the exhaust filter thoroughly under running water 
(Fig. 33).

6.

Then leave the exhaust filter to dry (approx. 24 hours at room 
temperature).

7.

Put the exhaust filter back into its holder (Fig. 34).

8.

Put the exhaust filter cover on the bottom first then push the cover firmly 
on at the top until it snaps into place (Fig. 35).

3.3 Storage


3.4 Spare parts and accessories

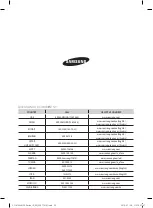
The following accessories and spare parts can be reordered:

Accessory parts and spare parts can be reordered through

Z

Page 46, ‘International Service’

34

click!

35

31

32

33

CAUTION:

Clean the filter each time you clean the dust filter. Replace the filter if it
is damaged or deformed (see 

Z

Chapter 3.4, ‘Spare parts and

accessories’

 for ordering information).

CAUTION:

The filter is washable, but it may not be cleaned in dishwashers or
washing machines. Also, do not use cleaning agents or brushes with
hard bristles. Leave the filters elements to dry after cleaning them with
water (approx. 24 hours at room temperature). Only put the filter back in
place when it is completely dry.

39

click!

37

38

36

40

WARNING:

Danger of injury! 
After vacuuming switch the appliance off (

) and wind up the power

cord (

). Hold the plug in your hand while winding up so that the cable

does not thrash about and injure you. 

WARNING:

Danger of injury! 
Keep the appliance out of the reach of children.

CAUTION:

Never store the appliance next to heat sources (e.g. stoves or radiators).
Avoid direct sunlight. Store the appliance and accessories in a cool, dry
place where it does not take up too much space (Figures 36 – 40).

CAUTION:

If you intend to store the appliance for a long time, empty and clean the
dust container and its filter elements 

Z

Chapter 3.1, ‘Emptying the dust

container and cleaning the motor protection filters’

.

Item number

Description

2200001

Filter set consisting of:
1 dual motor protection filter (Fig. 20) + 
1 exhaust filter (Fig. 33)

2200004

Filter unit (Fig. 23) consisting of:
1 filter  
1 filter cup

M203-4

1 parquet brush

M208-8

1 turbo brush

M219

1 mini-turbo brush “Fellino”

CAUTION:

Only use original spare parts from the scope of delivery or those that
you have purchased by reordering.

DD 2200.book  Seite 14  Donnerstag, 7. März 2013  12:32 12

Summary of Contents for DD2200-2

Page 1: ...ra neau sans sac Bedieningshandleiding Stofzuiger zonder stofzak Manual de instrucciones Aspiradora de trineo sin bolsa Istruzioni per l uso Aspirapolvere senza sacchetto Kullanim Klavuzu Torbas z ele...

Page 2: ...2 DD 2200 book Seite 2 Donnerstag 7 M rz 2013 12 32 12...

Page 3: ...dienungsanleitung 4 9 Operating Manual 10 15 Mode d emploi 16 21 Bedieningshandleiding 22 27 Manual de instrucciones 28 33 Istruzioni per l uso 34 39 Kullanim Klavuzu 40 45 DD 2200 book Seite 3 Donner...

Page 4: ...und der Anschlussleitung ferngehalten werden wenn es eingeschaltet ist oder abk hlt Verpackungsmaterialien d rfen nicht zum Spielen verwendet werden Es besteht Ersti ckungsgefahr 1 3 zur Stromversorgu...

Page 5: ...ie Gefahr dass Regen und Schmutz das Ger t zer st ren Das Hineinstecken von Gegenst nden in die ffnungen des Ger tes Es k nnte berhitzen Das selbstst ndige Umbauen oder Reparieren des Ger tes Das Saug...

Page 6: ...entuell ist es erforderlich beide Teile beim Zusammenstecken etwas gegeneinander zu drehen damit sie fest sitzen Pr fen Sie montierte Teile auf festen Halt indem Sie versuchen diese auseinanderzuziehe...

Page 7: ...oder bevor Sie das Ger t versenden ACHTUNG Bevor Sie den Staubbeh lter entnehmen schalten Sie das Ger t aus So vermeiden Sie dass Staub das Ger t besch digt HINWEIS Den Inhalt des Staubbeh lters k nn...

Page 8: ...eser besch digt oder verformt ist Bestellinformationen siehe ZKapitel 3 4 Ersatzteile und Zubeh r ACHTUNG Der Filter ist waschbar jedoch weder sp lmaschinen noch waschma schinentauglich Verwenden Sie...

Page 9: ...llung des B rstkranzes ber den Um schalter der Bodend se an den Belag an Abb 9 10 Staubbeh lter ist voll Leeren und reinigen Sie den Staubbeh lter ZKapitel 3 1 Staubbeh lter leeren und Motorschutzfilt...

Page 10: ...ection cable whilst it is switched on or cooling down Packing material must not be used to play with There is danger of suffocation 1 3 Concerning the power supply The appliance is operated with elect...

Page 11: ...Sticking objects into the appliance s openings It could overheat To modify or repair the appliance yourself Vacuuming of Persons animals plants especially hair fingers and other parts of the body as...

Page 12: ...OTE You might have to twist the parts when connecting them so they are securely in place Ensure that installed parts are secure by trying to pull them apart 15 11 12 13 14 WARNING Danger of injury Che...

Page 13: ...for a long time or before sending the appliance CAUTION Switch off the appliance before removing the dust container This will prevent dust from damaging the appliance NOTE You can dispose of the dust...

Page 14: ...e the filters elements to dry after cleaning them with water approx 24 hours at room temperature Only put the filter back in place when it is completely dry 39 click 37 38 36 40 WARNING Danger of inju...

Page 15: ...ontainer is full Empty and clean the dust container ZChapter 3 1 Emptying the dust container and cleaning the motor protection filters The filters are dirty Clean the filters ZChapter 3 1 Emptying the...

Page 16: ...enfants de moins de 8 ans ne doivent pas s approcher de l appareil ni de son cordon de branchement tant que celui l est allum ou en phase de refroidissement Le mat riel d emballage ne doit pas tre emp...

Page 17: ...salet peuvent causer des dommages irr parables sur l appareil L introduction d objets dans les ouvertures de l appareil car ce dernier pourrait surchauffer Toute ouverture modification ou r paration d...

Page 18: ...pi ces il peut s av rer n cessaire de les faire pivoter en sens inverse l une contre l autre pour obtenir un assem blage ferme Contr lez la fermet de l assemblage en essayant de le d faire en tirant 1...

Page 19: ...changer le sac filtre poussi re teignez l appareil Vous vi tez ainsi que la poussi re n endommage l appareil REMARQUE Le contenu du bac poussi re peut tre mis la poubelle s il ne contient pas de compo...

Page 20: ...toyage Faites s cher le filtre apr s son nettoyage l eau durant environ 24 heures temp rature ambiante Remettez le filtre en place uniquement une fois qu il est bien sec 39 click 37 38 36 40 AVERTISSE...

Page 21: ...cet effet un long morceau de bois par ex un manche balai L appareil cesse soudain d aspi rer La protection contre les surchauffes s est d clen ch e certainement cause d une obturation des ca naux d a...

Page 22: ...toezicht staan Het is raadzaam om kinderen onder de 8 jaar uit de buurt van het apparaat en de aansluit kabel te houden als het ingeschakeld is of afkoelt Verpakkingsmaterialen mogen niet worden gebr...

Page 23: ...in de openlucht Regen en vuil zouden het apparaat onherstelbaar kunnen be schadigen Voorwerpen in de openingen van het apparaat steken Het zou oververhit kunnen raken Het apparaat zelfstandig om te b...

Page 24: ...acht AANWIJZING Eventueel is het noodzakelijk om de beide delen bij het in elkaar steken iets heen en weer te draaien zodat ze stevig vast zitten Controleer of de gemonteerde delen stevig vast zitten...

Page 25: ...voordat u het ap paraat opstuurt OPGELET Voordat u de stofbak vervangt schakelt u het apparaat uit Zo voorkomt u dat stof het apparaat beschadigt AANWIJZING De inhoud van de stofbak kunt u meegeven m...

Page 26: ...rstels Laat het filter na de natte reiniging drogen ca 24 uur bij kamertemperatuur Zet het filter er pas weer in als het helemaal droog is 39 click 37 38 36 40 WAARSCHUWING Verwondingsgevaar Schakel h...

Page 27: ...Pas de stand van de borstel m b v de omschakelaar van het vloermondstuk aan de vloer aan afb 9 10 Stofbak is vol Maak de stofbak leeg en reinig hem Zhoofdstuk 3 1 Stofbak leegmaken en motorbescherming...

Page 28: ...e 8 a os deben mantenerse alejados del aparato y del cable de co nexi n cuando est conectado o se est enfriando El material de embalaje no debe ser utilizado para jugar Existe peligro de asfixia 1 3 s...

Page 29: ...La introducci n de objetos en las aberturas del aparato Se podr a sobrecalentar Las modificaciones o reparaciones del aparato por cuenta propia Aspirar Personas animales plantas especialmente cabellos...

Page 30: ...girar las dos piezas una contra otra durante el encaje para que queden firmemente asentadas Compruebe la sujeci n firme de las piezas montadas tratando de separarlas 15 11 12 13 14 AVISO Peligro de le...

Page 31: ...tes de el trans porte del aparato ATENCI N Antes de retirar el dep sito de polvo desconecte el aparato As evitar que el polvo da e el aparato ADVERTENCIA El contenido del dep sito de polvo puede ser e...

Page 32: ...to de limpieza ni cepillos con cerdas duras Deje secar el filtro despu s de la limpieza en h medo aprox 24 horas a temperatura ambiente S lo vuelva a introducir el filtro una vez que est totalmente se...

Page 33: ...de polvo est lleno Vac e y limpie el dep sito de polvo Zcap tulo 3 1 Vaciar el dep sito de polvo y limpiar los filtros de protecci n del motor Los filtros est n sucios Limpie los filtros Zcap tulo 3...

Page 34: ...allac ciamento devono essere tenuti fuori dalla portata dei bambini di et inferiore a 8 anni I materiali da imballo non devono essere usati per giocare Sussiste il pericolo di soffocamen to 1 3 sull...

Page 35: ...apparecchio Introdurre oggetti nelle aperture dell apparecchio Potrebbe surriscaldarsi Modifiche o riparazioni autonome dell apparecchio Aspirare Persone animali piante in particolare capelli dita o...

Page 36: ...ssario ruotare leg germente i due componenti uno rispetto all altro in modo che risultino saldamente posizionati Controllare che i pezzi siano saldamente bloc cati tentando di sfilarli uno dall altro...

Page 37: ...ogni 3 mesi prima di lunghe conservazioni o della spedizione ATTENZIONE Prima di rimuovere il contenitore della polvere spegnere l apparecchio In questo modo si evita che la polvere lo danneggi INDICA...

Page 38: ...re Dopo la pulizia a umido far asciugare il filtro circa 24 ore a temperatura ambiente Rimontare il filtro soltanto quando completamente asciutto 39 click 37 38 36 40 AVVERTIMENTO Pericolo di lesioni...

Page 39: ...pulire il contenitore della polvere ZCapitolo 3 1 Svuotare il contenitore della polvere e pulire i filtri di protezione del motore I filtri sono sporchi Pulire i filtri ZCapitolo 3 1 Svuotare il conte...

Page 40: ...ir ken yap labilir 8 ya ndan k k ocuklar al rken veya so umaya b rak lm ken cihazdan ve ba lant hatt ndan uzak tutulmal d rlar Ambalaj materyali oyun i in kullan lmamal d r Bo ulma tehlikesi vard r 1...

Page 41: ...z n a kl klar i ine yabanc maddelerin sokulmas A r s nma meydana gelebilir Cihaz n kendi ba na modifiye edilmesi veya tamir edilmesi El s p rgesinin a a dakilerin temizli inde kullan lmas yasakt r nsa...

Page 42: ...ekilde yerle meleri i in olas olarak her iki par an n birbirine kar biraz evrilmesi gerekmektedir Monte etti iniz par alar sa lam ekilde yerine oturup oturmad klar na ili kin olarak bunlar birbirinden...

Page 43: ...den nce bo alt n ve temizleyin Dikkat Toz kab n karmadan nce cihaz kapat n B ylece tozun cihaza zarar vermesini engellersiniz A klama Toz kab muhteviyat n ev at yla yasak olan bir kir ihtiva etmedi i...

Page 44: ...n Filtreyi slak temizleme sonra s nda kurumaya b rak n oda s cakl nda yakla k 24 saat Filtreyi ancak tamamen kuruduktan sonra tekrar yerine tak n 39 click 37 38 36 40 Uyar Yaralanma tehlikesi Temizlem...

Page 45: ...Bunun i in gerekliyse uzun bir ubuk kullan n rn bir temizlik s p rgesi sap Cihaz ani den emmeyi b rak yor A r s nma korumas devrede muhtemelen t kanm emme yollar vb sebebiyle 1 Cihaz kapat n ve fi i...

Page 46: ...leclatina hotmail es Reparaciones y recambios Servicios Tecnicos B E A Germana de Foix 1 50015 Zaragoza ESPANA Tel 34 976 520 077 Fax 34 976 528 200 satbea satbea es www satbea es Simson Huoltopalvelu...

Page 47: ...IA DELLA FATTURA SADECE FATURA SURET LE GE ERL D R Absender Bitte Blockschrift in Gro buchstaben From Please print in capitals Exp diteur Veuillez crire en caract res d imprimerie et en majuscules Afz...

Page 48: ...land richten zich naar de prijzen van de betreffende buitenlandse aanbieders en de betreffende actuele tarieven 0 14 minuto desde la red fija alemana precio m ximo alem n para telefon a m vil 0 42 min...

Reviews: