background image

15

© 2003 Directed Electronics, Inc.  
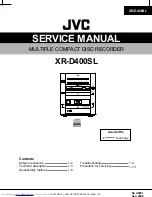
LANGUAGE CONTROL

Many discs have several languages available dur-

ing disc playback. They can be changed at any

time by pressing 

LANGUAGE

(4). Each time the

button is pressed, the language will change and

the information about the current language will

appear in the OSD.

VIEWING ANGLE

Many DVDs have scenes that are recorded from

multiple angles. These scenes can be viewed from

other angles by using the TV/AV (23) button.

1.

Press 

TV/AV 

(23), the angle the scene is

viewed from will change and the angle
mark will appear in the on-screen display.

2.

Press 

TV/AV 

(23) repeatedly to change to

different viewing angles.

3.

Press 

OSD

(21) to clear the screen.

ON-SCREEN DISPLAY (OSD)

Information about the current disc being played

can be displayed on screen.

1.

Press 

OSD

(21) to turn the OSD on and off. 

CD/VCD OPERATION

BASIC CD/VCD OPERATION

Stop Disc, OSD, Mute, Fast Forward/Fast Rewind,

Pause/Resume Play, Volume, Skip Tracks, Audio

Mode, and Repeat Play operate as described in

the 

Basic Operation

section of this guide.

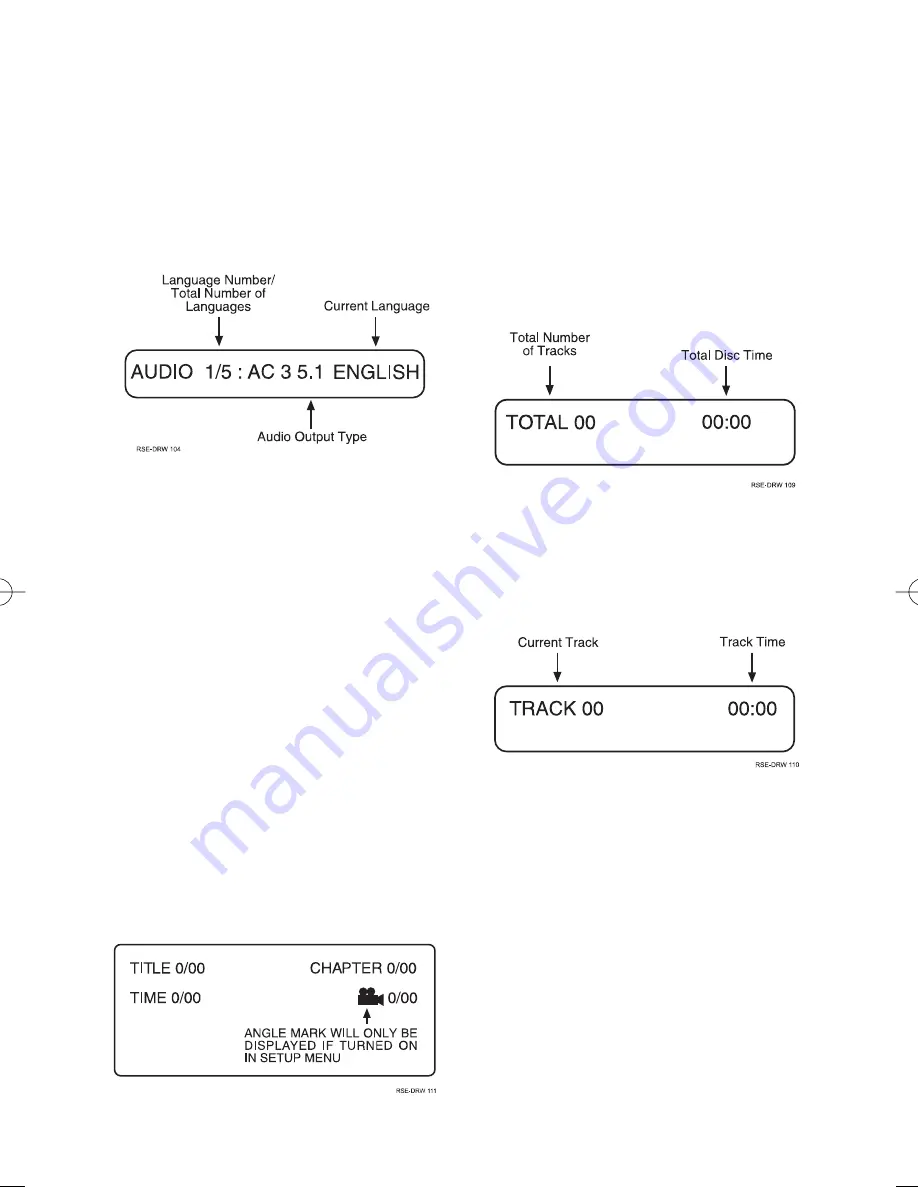
Load an Audio CD; the disc information will be

displayed on-screen.

DISC PLAYBACK

Press 

PLAY

(12) to begin playback; the screen

will show the track information.

MP3 OPERATION

BASIC MP3 OPERATION

Stop Disc, OSD, Mute, Pause/Resume Play,

Volume, Skip Tracks, Audio Mode, and Repeat

Play operate as described in the 

Basic Operation

section of this guide.

Load a disc with MP3 files into the player. The

disc information will appear on screen.

N83102 1-03.qxd  5/6/2003  8:33 AM  Page 15

Summary of Contents for DV1700

Page 1: ...Drawer Type DVD Player MODEL DV1700 O W N E R S G U I D E INSTALLATION GUIDE...

Page 2: ...anel Features 8 Front Panel Controls 8 Display Panel Operation 9 Display Panel Features 9 Remote Operation 10 Prior to Use 10 Remote Control Functions 11 Basic Operation 12 Turning the Player On Off 1...

Page 3: ...agnosis troubleshooting or reinstalla tion of the unit For service on an out of warranty product a flat fate fee by model is charged Contact your authorized dealer to obtain the service charge for you...

Page 4: ...URE TO REDUCE THE RISK OF FIRE OR ELECTRIC SHOCK AND ANNOYING INTERFERENCE USE ONLY THE RECOMMENDED ACCESSORIES CAUTION MOBILE DVD PLAYER IS A CLASS I LASER PRODUCT HOWEVER THIS MOBILE DVD PLAYER USES...

Page 5: ...e set the player to standby mode When left unused for a long period of time the player should be turned off AVOID WATER AND MAGNETS Keep the player away from cup holders If liquids are spilled into th...

Page 6: ...Important Information FCC NOTICE This device complies with Part 15 of FCC rules Operation is subject to the following two condi tions 1 This device may not cause harmful interference and 2 this devic...

Page 7: ...discs in the following places 1 Direct sunlight 2 Dirty dusty and damp areas 3 Near car heaters 4 On the seats or dashboard DISC CLEANING Use a dry soft cloth to wipe the surface If the disc is quite...

Page 8: ...on 6 and playback will resume Audio Video Inputs The AUDIO 3 and VIDEO 2 inputs allow alternate audio and video sources to play through the DVD player Menu Press MENU button 6 to display the root menu...

Page 9: ...PANEL FEATURES 1 DVD Indicator 2 Title Indicator 3 Chapter Track Indicator 4 Repeat Play Indicator 5 Second Indicator 6 Minute Indicator 7 Hour Indicator 8 Title Chapter Track Indicator 9 Pause Indic...

Page 10: ...control sensor and within about 60 degrees of the front of the payer The operating distance may vary according to the brightness of the vehicle interior PRIOR TO USE The player output signal must be a...

Page 11: ...TLE 4 LANGUAGE 5 REPEAT 6 A B REPEAT 7 VOLUME 8 FR FF SEARCH 9 PBC SLOW 10 SETUP 11 DIRECTION BUTTONS 12 PLAY ENTER 13 TITLE 14 ZOOM 15 MENU 16 PAUSE STEP 17 STOP 18 PREVIOUS NEXT 19 AUDIO MODE 20 RET...

Page 12: ...ar graphic will appear in the OSD indicating the volume level Press repeatedly or hold the volume but ton to raise or lower the volume PAUSE RESUME PLAY Press PAUSE 16 to pause play Press PLAY 12 to r...

Page 13: ...layback on CD VCD can be changed from mono to stereo using the AUDIO MODE 19 button Press AUDIO MODE 19 repeatedly to toggle through all available selections They will appear in the OSD LEFT Audio out...

Page 14: ...slow motion play back speeds 3 Press PLAY 12 to return to normal playback speed NOTE The rate of slow motion playback will be dis played in the On Screen Display OSD FRAME ADVANCE The picture can be...

Page 15: ...ing angles 3 Press OSD 21 to clear the screen ON SCREEN DISPLAY OSD Information about the current disc being played can be displayed on screen 1 Press OSD 21 to turn the OSD on and off CD VCD OPERATIO...

Page 16: ...utton to con firm the setting 6 Use the left DIRECTION BUTTON 11 to exit the submenu and return to the previ ous menu 7 To exit the Setup Menu at any time press the SETUP 10 button Setup Menu 16 2003...

Page 17: ...ing disc playback CAPTIONS The Captions submenu will turn the captions on and off during disc playback SCREEN SAVER The Screen Saver submenu will turn the screen saver on and off DOLBY DIGITAL SETUP T...

Page 18: ...is usually adjusted in the disc title menu SUBTITLES The Subtitles submenu is used to turn subtitles on and off and to select the subtitle language This feature is usually adjusted in the disc title...

Page 19: ...ll automatically adjust the player output to match the monitor type If the picture has no color abnormal color or the video doesn t play properly check the monitor and player settings to make sure the...

Page 20: ...s or other modifications of the vehicle Install the unit where it does not get in the driver s way and cannot injure the pas senger if there is a sudden or emergency stop For optimum performance this...

Page 21: ...ust be con nected to a metal chassis point preferably scraped sheet metal The YELLOW wire must be connected to a constant 12 volt source 2 EXTERNAL REMOTE CONTROL CONNECTOR Insert the 1 8 pin plug for...

Page 22: ...oper channel or input zone NO REMOTE FUNCTION 1 Remove any objects that may be blocking the IR eye 2 Make sure the remote IR eye is fully plugged into the con nector on the rear panel 3 Test and repla...

Page 23: ...ration 85dB 1KHz Dynamic Range 80dB 1KHz Output Audio Out Analog Output Level 2 0 1V Load Impedance 10K Output Video Out Output Level 1 0 1V Load Impedance 10K Power Supply DC12V 1 5A Environment Temp...

Page 24: ...car stereo products rear seat entertainment and accessories available The recipient of more than 20 patents in the field of advanced electronic technology DEI is ISO 9001 registered Quality Directed...

Reviews: