background image

9

Camera Registration

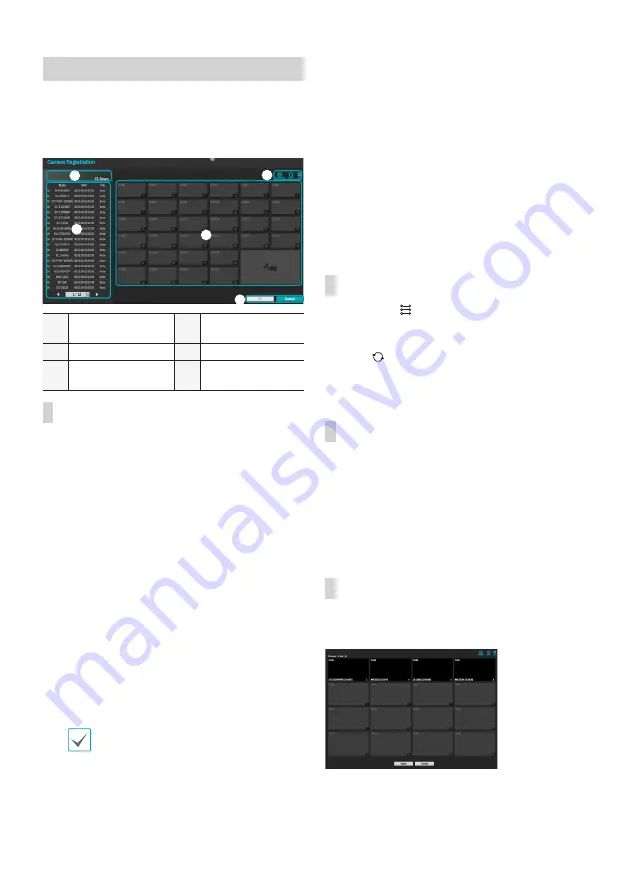
Once Network Setup Wizard is complete, live mode screen 
appears. While in live mode, right-click on the mouse and 
select Camera Registration to run the Camera Registration 
mode. It allows you to scan for the cameras connected to 
the NVR. 

1

3

4

2

5

1

Camera Scan Button

2

Camera View 
Buttons

3

Camera List Area

4

Video Display Area

5

Apply/Cancel 
Buttons

Camera Scan Button

Use this button to scan for and register cameras.
Pressing the 

Scan

 button displays the following submenu:


Rescan

: Scan for DirectIP™ cameras that were not 

scanned automatically. 


Go To Camera

: Moves the focus automatically to the 

camera using MAC address of camera in the camera list.


Screen Auto. Assign

: Assigns the detected cameras on 

the video display area.


Camera list

: By using the camera information file, .csv, 

the user can register the cameras easily. 


Scan Refresh Interval:


Configures the refesh interval 

to scan the camera. If the interval is short, camera scan 
results are refreshed more frequently. However, if the 
interval is long, it is advantageous to scan cameras on a 
wide network.


Third Party Scan

: Used to manually scan for third-party 

cameras that cannot be recognized by the auto scan 
feature. 

 - Protocol: Select the protocol used by the camera (or 

video encoder) you wish to search for.

Even if the network device uses a protocol 
supported by the NVR, the device itself may not 
be visible for scanning and registration by the 
NVR. For more information about supported 
network devices and models, contact your 
retailer.

 - Mode: Select the scan mode.
 - Advanced Setup: If the camera is networked but 

not scanned, use this setup. This setup allows you to 
change the network setting of the NVR’s VIDEO IN 
port which is camera’s network environment. Check 
the camera’s network setting first before you use this 
setup. Make sure that this setting does not conflict 
with the WAN setting. For more information on the 
WAN setting.

Select 

Scan

 to commence scanning.

Select a camera from the scan list and then select 

Add 

Camera

. The Device Login window will appear.

Enter a 

User ID

 and a 

Password

 for the selected 

camera.

Camera View Buttons


ALIGNMENT 


Button: Realigns camera screens 

displayed on the video display area in the order of 

Video 

In

 port connections.


RESET


 Button: Refreshes the video display area and 

the camera list.


TOOL 

 Button: Displays netcwork camera tool 

window and changes the camera protocol.

Camera List Area

Following options can be accessed by right-clicking on a 
camera list entry:


Add/Remove Camera

: Adds or removes the selected 

camera. The Add Camera option is inactive if the camera 
has already been added to the screen.


Authentication

: Enter the necessary camera login info. 

This option is inactive for DirectIP™ cameras because 
they do not require logins.

Video Display Area

Left-click on the video display area to toggle between split 
screen and single screen modes.
Drag the camera screens around to rearrange them.

Summary of Contents for IDIS DR-2300P Series

Page 1: ...DR 2304P A DR 2404P A DR 2308P A DR 2316P A Network Video Recorder Quick Guide Powered by...

Page 2: ...d B If liquid is spilled or objects have fallen into the equipment C If the equipment has been exposed to rain or water D If the equipment does not operate normally by following the operating instruct...

Page 3: ...nontheproductoritsliterature indicatesthatitshouldnotbedisposedwithotherhouseholdwastesattheendofits workinglife Topreventpossibleharmtotheenvironmentorhumanhealthfromuncontrolledwastedisposal pleases...

Page 4: ...d Item Network Video Recorder Power Cable DC Adapter 12V 48V Quick Guide SATA2 Cables Optical USB Mouse IR Remote Control Optional Assembly Screws for Adding Hard Disk Drives Please download IDIS Cent...

Page 5: ...ber of cameras and alarms that can be connected and the number of cameras that can be displayed For simplicity the illustrations and descriptions in this document refer to the 16 channel model Rear Pa...

Page 6: ...rt 7 VideoIn Ext Port 8 AlarmConnectionPorts 9 RS 232Port 0 PowerInPort 12V PowerInPort 48V Connections on the Rear Panel D i r e c t I P S w i t c h Camera Network Keyboard POS Sensor VGAMonitor HDMI...

Page 7: ...ister Mode Button 8 Thumbnail Button 9 Calendar Button 0 Keylock Button Setup Button Freeze Button Log Button Enter Button Arrow Buttons Alarm Button Sequence Button Zoom Button PTZ Button View Button...

Page 8: ...zard Date Time Setup The new date and time settings will only be applied after clicking Next Record Method Setup Record Video Quality Setup Higher recording quality uses up more disk space Finish the...

Page 9: ...itself may not be visible for scanning and registration by the NVR For more information about supported network devices and models contact your retailer Mode Select the scan mode Advanced Setup If the...

Page 10: ...he mouse This will bring up a virtual keyboard you can use to assign a password 3 To log out bring up the Live menu and click on icon using the mouse Find Password 1 Enter a user registered email and...

Page 11: ...rding mode is not set to Recycle and the HDD has reached 100 of its capacity Audio Recording If the Record Audio option under Record Setup General has been enabled the camera will record audio along w...

Page 12: ...enter the NVR name registered to the FEN server instead of its IP address You will be prompted to enter the FEN server s address and port number under Setup IDIS Center Program System Requirements Rec...

Page 13: ...he system this step will be skipped automatically 6 When the Installation Completed window appears click Close and finish the installation Start Program When IDIS Center software is installed IDIS Cen...

Page 14: ...t OK for remote access 6 Click Device Group on the Sites panel and click E at the bottom Add Device Group window will appear Name Enter a name for the device group Location Select an location for the...

Page 15: ...E may result in excessive data charges Android OS device 1 Open the Play Store Google Play on your Android device 2 In Play Store Google Play enter IDIS Mobile in the search field 3 Install IDIS Mobil...

Page 16: ...puts 4 8 16 IP channels Video Outputs 1 HDMI 1 VGA Display Resolution 3840x2160 1920 x 1200 1920 x 1080 1680 x 1050 1600 x 1200 Display Speed Up to 480ips DR 2316P Up to 240ips DR 2308P Up to 120ips D...

Page 17: ...nux Unit Dimensions W x H x D 300mm x 62mm x 231mm 11 8 x2 4 x9 1 Unit Weight 2 3Kg with 1HDD DR 2308P DR 2316P 2 2Kg with 1HDD DR 2304P DR 2404P Working Temperature 0 C to 40 C 32 F 104 F Operating H...

Page 18: ...DR 2304P A DR 2404P A DR 2308P A DR 2316P A...

Page 19: ...2 1 2 3 4 5 6 SMPS 7 8 UPS UPS 9 10 11 12 13 14 15 16 17 18 19 Tmra 20 21 22 23 24 HDMI HDMI HDMI HDMI HDMI HDMI HDMI Ethernet...

Page 20: ...3 IEC 60417 5032 FCC 15 FCC WEEE IDIS Ltd 2020 IDIS Ltd IDIS Ltd IDIS IDIS Ltd OpenSSL OpenSSL http www openssl org eay cryptsoft com tjh cryptsoft com patentlist accessadvance com...

Page 21: ...4 12 48 SATA2 USB IDIS Center IDIS www idisglobal com 300 62 67 231 237 7...

Page 22: ...5 1 USB 2 4 8 16 16 DR 2304P DR 2404P 6 8 3 7 9 1 2 4 5 0 1 2 VGAOut 3 HDMI 4 eSATA 5 48 6 VideoIn PoE 7 8 9 RS 232 0 12 2 1...

Page 23: ...6 DR 2308P DR 2316P 1 2 3 5 6 8 7 0 9 4 1 2 VGAOut 3 HDMI 4 eSATA 5 VideoIn PoE 6 7 VideoIn Ext 8 9 RS 232 0 12 48 D i r e c t I P S w i t c h POS VGA HDMI 12 PoE DirectIP Gigabit eSATA IDISCenter 48...

Page 24: ...9 0 1 ID ID 2 PANIC 3 Camera 4 STATUS 5 LAYOUT 6 PTZ PTZ Control 7 REGISTER MODE 8 THUMBNAIL 9 CALENDAR 0 KEYLOCK SETUP FREEZE LOG Enter Arrow ALARM Sequence ZOOM PTZ PTZ VIEW a SAVE b Menu c Playback...

Page 25: ...8 1 FEN FEN...

Page 26: ...9 1 3 4 2 5 1 2 3 4 5 DirectIP MAC csv NVR WAN WAN 1 2 3 DirectIP...

Page 27: ...10 NVR 1 2 K admin admin OK 3 1 2 OK SSL TLS...

Page 28: ...indows Vista 1 Microsoft Windows 7 Home Premium Professional Ultimate Microsoft Windows 8 Pro Enterprise Microsoft Windows 10 Home Pro Intel Pentium IV 2 4 Core 2 Duo E4600 RAM 1 VGA 128 1280x1024 24...

Page 29: ...crosoft Windows 8 pro Enterprise Microsoft Windows XP Home SP3 Intel CoreTM i5 2550 3 30 Intel CoreTM 2 Duo E7200 2 53 RAM 2 1 5 VGA ATI RadeonTM HD 3650 NVIDIA GeForce 8400GS 1280x1024 32 ATI RadeonT...

Page 30: ...3 4 5 NET Framework Visual C NET Framework Visual C 6 IDIS Center IDIS Center IDIS Center Run as administrator IDIS Center IDIS Center IDIS Center Run as administrator IDIS Center eSATA HDD SD SDHC ID...

Page 31: ...14 IDIS Center 1 IDIS Center 2 E 3 4 5 6 E 7 E...

Page 32: ...1 2 tab IDIS Mobile Wi Fi 3G LTE Android 1 Android Play Store Google Play 2 Play Store Google Play IDIS Mobile 3 IDIS Mobile 4 5 IDIS Mobile FEN FEN FEN FEN fen idisglobal com 10088 FEN FEN FEN FEN IP...

Page 33: ...1680 x 1050 1600 x 1200 480 DR 2316P 240 DR 2308P 120 DR 2304P DR 2404P 16 160 480 Full HD 240 4K UHD DR 2316P 80 240 Full HD 120 4K UHD DR 2308P 40 120 Full HD 60 4K UHD DR 2304P DR 2404P H 264 H 265...

Page 34: ...nux 300 x 62 x 231 11 8 x 2 4 x 9 1 2 31 1HDD DR 2308P DR 2316P 2 21 1HDD DR 2304P DR 2404P 0 C 40 C 32 F 104 F 0 90 DR 2308 DR 2316P 100 240 50 60 1 6A 12 5A PSE 100 240 50 60 1 4 A 48 1 36 A DR 2304...

Page 35: ...IDIS Co Ltd For more information please visit at www idisglobal com...

Reviews: