4
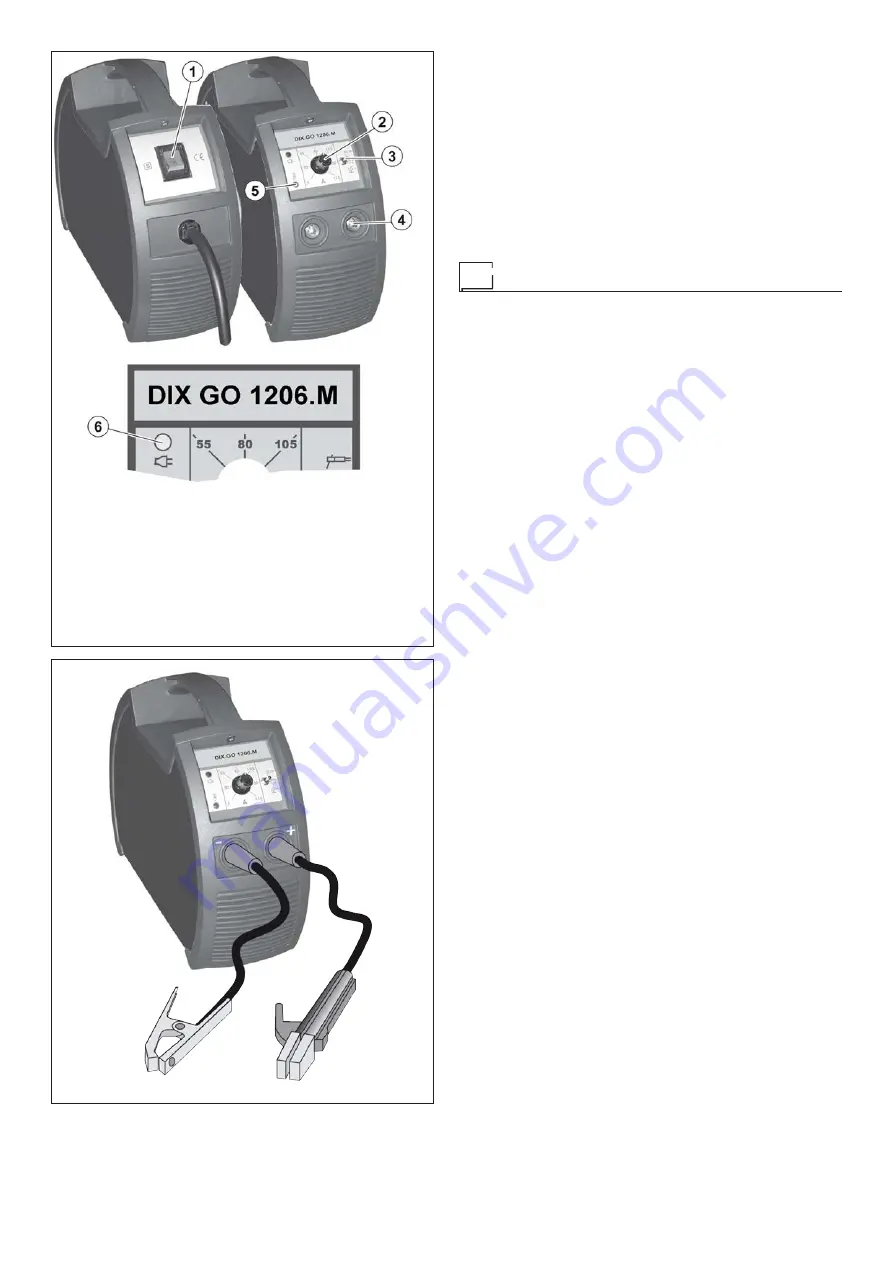
FIG. B
•
TIG -
For TIG welding with thermal controlled (TCS)
“Lift” type striking reducing tungsten inclusions to a
minimum and allowing to also strike on sharp edges.
Pos. 4
Rapid connection attachments of the electrode holder
and earth holder gripper.
Pos. 5
Yellow THERMOSTAT LED. When this LED switches on
it indicates that the trip switch has tripped because you
are working beyond the work cycle. Wait for a few min-
utes before starting to weld again.
Pos. 6
DIX GO 1206.M -
Green POWER SUPPLY LED. When
this LED is on, it means that the power supply to the
welding machine is on, and it is ready to work.
MMA electrode welding (Fig. B)
Electrode welding is used to weld most metals (different types of
steel, etc.) using coated rutilic and basic electrodes with diameters
ranging from Ø 1.6 mm to Ø 4 mm.
1) Connecting the welding cables:
Disconnect the machine from the mains power supply and
connect the welding cables to the output terminals (Positive
and Negative) of the welding machine, attaching them to the
clamp and earth with the polarity specified for the type of elec-
trode being used (Fig. B). Always follow the electrode manu-
facturer’s instructions. The welding cables must be as short
as possible, they must be near to one another, positioned at
or near floor level.
2) Adjust the welding current using the potentiometer (Pos. 2,
Fig. A).
3) Turn the process selector (Pos. 3, Fig. A) to the ELECTRODE
position (for welding using basic electrodes with an “Arc Force”
and “Hot Start” device) or Cr-Ni ELECTRODE (for welding
stainless steel with special characteristics to achieve a softer
arc).
4) Start the welding machine by selecting position 1 on the line
switch (Pos. 1, Fig. A).
5) DIX GO 1206.M - The green LED (Pos. 6, Fig. A) shows that
the power supply to the welding machine is on, and it is ready
to work.
WELDING PARAMETERS
Table 3 shows some general indications for the choice of elec-
trode, based on the thickness of the parts to be welded. The val-
ues of current to use are shown in the table with the respective
electrodes for the welding of common steels and low-grade alloys.
These data have no absolute value and are indicative data only.
For a precise choice follow the instructions provided by the elec-
trode manufacturer.
The current to be used depends on the welding positions and the
type of joint, and it increases according to the thickness and di-
mensions of the part.
The current intensity to be used for the different types of welding,
within the field of regulation shown in table 4 is:
•
High for plane, frontal plane and vertical upwards welding.
•
Medium for overhead welding.
•
Low for vertical downwards welding and for joining small pre-
heated pieces.
A fairly approximate indication of the average current to use in
the welding of electrodes for ordinary steel is given by the follow-
ing formula:
I = 50 × (Øe – 1)
Where:
I = intensity of the welding current
Øe = electrode diameter
Example:
For electrode diameter 4 mm
I = 50 × (4 – 1) = 50 × 3 = 150A
FIG. A


